CQC15 RH to LH frame lock conversion

STR

Knifemaker/Moderator
Moderator
Joined
Aug 27, 2004
Messages
12,955
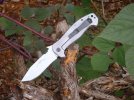
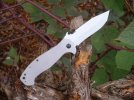
Knivesanonymous has put the question to me that others have been asking me as well. Can I convert an Emerson right handed liner lock into a fully functional true lefty frame lock?

Well, I guess we'll find out.

I'm about to take the plunge. This one may push me to the very limits of my ability to do these things guys. Keep your fingers crossed. :thumbup:

I've had the knife apart to map out everything. It does not appear that I can reuse any of the old body with the exception of the spacer. The old lock side G10 will act as my template to trace out the new slab handles in titanium.

The liners will map out the placement of things but the lock and the contact will change to left hand and we'll see what happens. It looks doable. But this is a first for me. We'll see. Thats all I can say.

STR
 
Oh yeah. The test knife is a CQC15. It appears it will be possible but some trimming of the lock side washer may end up being necessary to reduce the outside diameter. Otherwise it looks to be fairly straight forward.

Stay tuned. I'll be getting more pics up as this one progresses and doing some smaller jobs that arrived today that will come in separate threads yet to get posted.

STR
 
Got the slab sides cut out today to get this project officially underway now.

Man cutting this thick stuff is a bear! Anyway, my rear spacer holes are drilled and threaded. Have to mark the pocket clip holes and thread those next time out in the shop. Then I have holes to recess to seat the screws and 82` recessess to make for the small phillips heads.

Once I have it that far then I have to really get to the toughest part. The change of the contact area on the blade to make the interface angle for a true lefty. Wish me luck when I get that far. I must admit I am a bit nervous about that but I think I'll manage..

STR
 
awesome to see this going down. It may be the inspiration i need to swing one of my emersons your way eventually.
 
Ah! Another south paw watchin' on the sidelines. Lets just hope it works out for now. I'll know soon I guess. These first ones are always ulcer starters. :eek:

STR
 
Ok I have my contact redone on the blade for a lefty. So, the questionable part is over and it looks like I pulled it off. I know I can do the rest of this now because I've made lefty folders before and thats no issue.

The rest should be old hat now that the unknown has been knocked out successfully. I'd take a scan but you wouldn't be able to see it.

Just trust me its done! Now to the lock progrees which will come up in the next few days I'm sure.

STR
 
STR your amazing. It looks like im going to have a beuatiful Lefty CQC 15. Thanks For giving it a try. Cant wait to see more.
 
How will you regrind the tang lock mate area? That will shift where the lockbar has to be cut at?

I'm not a lefty, but I do love mods like this.

-j
 
I already did that today. It sounds simple I know. Actually though there is a lot to it.

First you need to know the pitch or angle of the lock from a factory EKI frame lock. This is slightly different from company to company actually, for example Kershaws lock contacts are typically just a tad flatter than Emerson or Spyderco knives and I've noted variance from knife to knife plus or minus a few degrees even in the same models from all companies too. Sometimes these are obvious to the naked eye. At other times not. I tend to like the flatter ones personally because the really steep ones are the ones that tend to defeat easier under load. Anyway read on.

This particular knife had a 10` pitch angle at the contact. Therefore that is what I shot for to remake it for this lefty conversion. Now I happen to believe that a frame lock contact is by design capable of being a bit 'flatter' rather than hollowed out steeper angle compared to the liner lock of thinner stock. So even though I hollow out both types using a small wheel I do not make it but very shallow on the frame lock. The contact hollow grind is so slight in fact that you can't even see it really until you take the blade out and hold it just right but its there. This is pretty much the same for the factory knives also though.

Anyway, the first thing you do is make sure you have a Johnson Pitch and Angle Locator. (Pic #1) These are very accurate and cheap.

Once you have one of these pitch locators you can use it to make sure you have your table at zero sitting on the floor. My table sits where it does in my shop just for this reason. No where else on the floor of my shop can I set a table that is dead zero like right where my work table is with the wood vises on it. You can see this again in pic 1.

Once I know my table is at zero as shown I can then set the factory blade in and take a measurent best I can with the limited tools I have at my disposal and get an idea of where to set the angle of my MAP arm. This has worked for a long time and even for my customs since most blades offer plenty of view to see that the angle locator is flat or not on the contact. (Pic 2 ) Its not 100% accurate when you are trying to figure out the angle of a blade already made to convert it like I am doing but its close enough to get the table to set and then once the table is close I can then adjust the table and use it to bring up the accuracy to very close to identical to what the angle on the factory blade was.

Once I know the angle of the contact on the factory blade or fairly close I then go to my KMG grinder and using the flat grind platten attatchment I check it for zero first and didn't show that pic. Once there if it needs adjustment I set it to dead on the money zero. Then I set my MAP arm to the same angle as the factory blade when in the vice on the my table.

Then I take off the thumb disc from the blade or thumb stud if it has one and at the slowest speed I can grind I change the contact by flat grinding it to the new angle. I then check it for correctness based on the factory blade. Once I am happy with this I can then move to the small wheel and put a slight hollow in my contact by pulling out my flat grind attatchment and replacing that with the small wheel attatchment.

Once a small hollow is put in the contact I check that against another blade and if it passes my exam for all comparisons of another factory EKI I call it a success. This one is so close I dare say its near as it can be to a factory 10`angle.

I hope that covers it. I'm not saying its the only way but hey. It makes for the same end result so I'm happy. Some guys can eye this up. Before I did it with the KMG and MAP Arm I was using my $39 Harbor Freight 1x30 bench sander and ceramic belts along with this same Johnson Pitch angle locator but the high speed of that darn thing always bothered me. This is much better for both control and less heat. Not just for the slower speed but also the longer belt of 72" makes for less heat than a 30" one also.


STR
 
Ahhh.... fascinating.

You're right; I think that mate/contact area is really the most critical area in making a liner/framelock reliable.

So you're turning the concave EKI contact area into a flat one? The flat ones I find can be reliable on framelocks, especially if the lockbar's side is also cut on angle, but can be rather touch-and-go on a linerlock.

Thank you for the education!

-j
 
Got as far as test fitting the knife together. Everything is looking good at this point and all my hardware goes in as it should. All the heads of the screws are recessed and the stop pin is set. The stop was the hardest part on this one. Its sits down in there deep on this model I'll say that.

Anyway, its moving along. I'll be cutting out the lock soon. I just have to decide how I want to cut it, at a slight angle or straight. The lefty conversion brought it down closer to the washer than I wanted it afterall because once I make my short cut the washer may be slightly in view so I'm working on that now.

We'll see. I can make it work, I'm just toying now with which way will look best. Once I have a plan in my head I'll hook it up to the mill and go for it.

As shown here it weighs in at 6.4 ounces. So its gone up a bit from the 4.9 it was originally. Of course I have trimming of all the excess size to do yet also but it won't lose much I doubt. Looks like it will be around the 6 to 6.2 ounce area for weight when finished.

STR
 
Ok I've reached a stopping point for today. Basically I have a working folder here now. The lock is cut out, we have lock up and a good centered blade when closed.

It seems even though this has been one of the more challenging projects I've undertaken in a while it looks like a successful lefty conversion will be knocked out soon. Stay tuned.

What you are looking at here is the lock cut out, the detent hole drilled but the ball isn't set yet. I have my blade marked which will require a new hole for the detent to fall into since it had no way of working in the existing one on the original set up.

And of course a view of the thickness and lock relief cut outs. Both of which are hovering right at .057-.058 thickness which is more by quite a bit than a factory Emerson CQC12 that hovers around .033 - .040 thickness in the same spot to bend the lock.

STR
 
This one is done.

What we have here is the finish pics of it in the overcast sky today here in Oklahoma territory.

Final weight is 6.2 ounces. Its working fine, Waves out great, and is overall pretty darn nice.

I've been Waving it both ways and must say it whips out even in reverse grip for my right hand quite well.

I am quite happy with how it turned out. Not sure I want to make a habit of these because it has been one of the most challenging to date but I think you will be pleased also.

Looks like you have a one of a kind south paw HD15 Knivesanonymous!

Its done. I will be shipping this one out tomorrow morning to you.

STR
 

Attachments

  • HD15 lefty frame lock done.jpg
    HD15 lefty frame lock done.jpg
    88.3 KB · Views: 36
  • HD15 lefty frame lock done 3.jpg
    HD15 lefty frame lock done 3.jpg
    77.6 KB · Views: 37
That looks hot. Thanks for all the work you put into this knife you did an amazing job. Sorry for the stress i put you through, but thanks for giving it a try. It truly is one of a kind. Where will i find another. Thanks again.
 
My question to you now is this. Do you want the old G10 and liners back? They are not reusable for this blade.

Just curious because they could always be stashed away for parts for someone later or they can go home with the knife.

Let me know.
STR
 
Back
Top