-
The BladeForums.com 2024 Traditional Knife is ready to order! See this thread for details: https://www.bladeforums.com/threads/bladeforums-2024-traditional-knife.2003187/
Price is$300$250 ea (shipped within CONUS). If you live outside the US, I will contact you after your order for extra shipping charges.
Order here: https://www.bladeforums.com/help/2024-traditional/ - Order as many as you like, we have plenty.
You are using an out of date browser. It may not display this or other websites correctly.
You should upgrade or use an alternative browser.
You should upgrade or use an alternative browser.
Emerson Persian frame lock
- Thread starter Haze
- Start date
- Joined
- Aug 27, 2004
- Messages
- 12,955
Don't know if I agree. I'd have to change the way it feels now in the hand to make it work because in order to make the lock wider I'd have to lower it to adjust it. That means it will be up more for the thumb to release the lock which means it will sit different in your grip. The lock would have to be wider than this to really make me completely sure of it. It may work but it just seems to be pushing it to me.
STR
STR
- Joined
- Aug 27, 2004
- Messages
- 12,955
I'd feel better personally by maybe cheating some width in the lock by changing the angle of the cut. A 'wedge' cut lock of sorts if you will. This would add some assurance to resist vertical movement up and down by the lock both in use and as it released from the detent ball and it would also still need to be adjusted to sit so that the thumb release was positioned with more access to the lock to also make the lock wider. So effectively looking at it from this perspective the lock would be higher but technically speaking the thumb grooved area you see on the lock is the lower whereas the ball detent would be the upper. So, not to confuse you but I'd have to lower the lock more to add some width still but not as much if I cheated a wedge cut in the design.
Some companies have done this. CRKT did it on some of their frame locks. See here.
http://www.bladeforums.com/forums/attachment.php?attachmentid=101832&d=1214927201
STR
Some companies have done this. CRKT did it on some of their frame locks. See here.
http://www.bladeforums.com/forums/attachment.php?attachmentid=101832&d=1214927201
STR
Last edited:
- Joined
- Aug 2, 2004
- Messages
- 18,850
- Joined
- Aug 27, 2004
- Messages
- 12,955
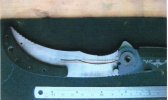
You know when I looked at that earlier I thought I was looking at a lip from the blade where now it appears to be a half moon from a drill. I enlarged the picture and it got even fuzzier on my screen. Thats empty space in that dark spot in the middle isn't it? My glasses are needed but I can't find the darn things as usual.
Anyway, yeah, if thats not a metal lip I see no reason why I could not do that. It looks like from the detent hold on the side of the blade showing that the non lock side is the one holding the blade closed so I could probaby relocate the detent on the lock to look more conventional, however, it would work just where it is too. I'll have to look at it when I see it. I may not relocate it and just not drill the ball hole all the way through the lock so no one would know where it sits from looking outside anyways.
But there is another consideration to take in before we move on it. How low does the non lock side thumb access drop? I don't want to see the line we cut from the non lock side. It always concerns me when I see the drop curve as shown because it makes me think he did that to hide the line in the design so it can't show looking on the non lock side in. As I recall from the few of those I've seen the non lock side is up nearly to the same level as the lock side correct? If so I think its safe to say we are good to go. Looking at the line you drew up I don't think it even needs to be that wide to work but we'll look at all options once its in hand. Then I can actually see it under my scopes. No worries then.
STR
Last edited:
- Joined
- Aug 2, 2004
- Messages
- 18,850
Yup, that is a notch above the lock face on the blade.
I should have posted a better pic
Il get her sent out to you so you can actually see all the bits your self,
pics and explinations are never quite as good as just looking at it. :thumbup:
Thanks much, im looking forward to this one
I should have posted a better pic
Il get her sent out to you so you can actually see all the bits your self,
pics and explinations are never quite as good as just looking at it. :thumbup:
Thanks much, im looking forward to this one
- Joined
- Aug 27, 2004
- Messages
- 12,955
Sounds good. That is going to be a whopper sized piece of real knife when I cut out that big arse slab! Should be a jim dandy for sure.
Please fill out and print the work order form in the Read this to mail me work thread if you have not done so. Once done mail at your convenience. Sorry for my eyes. I found my glasses in the shop so I can see now what I missed earlier. My bad there. I never wear the damn things! I'm supposed to but hate the way they keep falling down my nose. Anyway thanks.
STR
- Joined
- Aug 2, 2004
- Messages
- 18,850
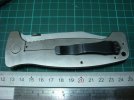
One more thing
Can you put the clip in this position on the lock slab ?
The curve of the clip lines up with the curve of the handle real nice when it set like this.
Yes, im totaly anal about things like that:thumbup:
I'll drill the G-10 so you have a template for this position.

Can you put the clip in this position on the lock slab ?
The curve of the clip lines up with the curve of the handle real nice when it set like this.
Yes, im totaly anal about things like that
:thumbup:I'll drill the G-10 so you have a template for this position.
Attachments
- Joined
- Aug 2, 2004
- Messages
- 18,850
Iv just started work on the other scale for the Persian and was wondering if you can use a screw set up like the 12 has ?
Just using "one set" of screws looks a bit neater and im going to try and make a scale and spacer from one piece of Ti.
Im looking to use this set up with the threaded lock side holding it all together.
(if my guy at the machine shop will swallow the milling part for me that is)

Just using "one set" of screws looks a bit neater and im going to try and make a scale and spacer from one piece of Ti.
Im looking to use this set up with the threaded lock side holding it all together.
(if my guy at the machine shop will swallow the milling part for me that is
) Attachments
- Joined
- Aug 27, 2004
- Messages
- 12,955
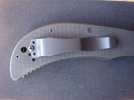
Haze I guess we had a problem in communication here with that last post you made. Never saw it until today. My apologies. As you can see from the scans I already tapped it for factory the way I always do so the folder can go back together as it came with no permanent mods done to the non lock side, or the folder. I do that whenever possible with the exception of the lefty conversions where it can't be avoided.
I made a lot of headway on your Persian. My problem is that I've already drilled and threaded the pocket clip holes for the factory position. You just filled out the form with all the areas I had but with no notes to remind me that the clip was to be slightly moved and since thats all I have when I get to working and didn't see that I did it as usual. I do apologize.
I'll tell you what I can do though if you can live with this other than my having to remake the whole lock, I can make a clip from scratch in a standard style like the Emerson but curve it to fit as you like. It will look much the same as the factory clip for mounting area at the screws with the same shape, just curved to fit the folder body and perhaps a bump longer to flow with the elegant elongated body of this folder. You call there. Since this is my bad I won't add any $ for the clip.
Anyway here is a scan of where I left off today. Its rough but the whole knife is done and goes together now I clean it up and its basically a frame lock other than placement of the detent and making my lock cuts to spring the lock.
Get back to me I'll wait to hear from you before moving further on it.
Thanks
STR
- Joined
- Aug 2, 2004
- Messages
- 18,850
Dont worry about the single side screw placing, I didnt think about it untill after I had sent the knife out to you. It would have been better but its no biggie really.
The clip placing again would have been nice but if you have already drilled and tapped it then there is not much can be done.
There is no point starting again from scratch, I dont suppose you will be getting another persian fram lock job any time soon so its a bit of a waste of Ti
Im liking what I see any way so its going to be all good")
Thanks again :thumbup:
The clip placing again would have been nice but if you have already drilled and tapped it then there is not much can be done.
There is no point starting again from scratch, I dont suppose you will be getting another persian fram lock job any time soon so its a bit of a waste of Ti
Im liking what I see any way so its going to be all good
Thanks again :thumbup:
- Joined
- Aug 27, 2004
- Messages
- 12,955
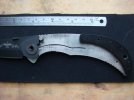
Haze your Emerson Persian is done. I took these pictures before realizing I still have to bead blast the non lock side to match the new lock but thats a simple matter I can do rather quickly tomorrow. A couple of these pics didn't turn out great but its not bright enough now to try again. I will try to get a better shot of it tomorrow open also.
The knife weighs in now at 5.6 ounces. Its a lot of knife! Feels good in the hand though and I am sure you'll love it.
Get in touch with me. We'll square up and I'll get this bead blasting knocked out and should be able to have this in the mail to you shortly.
Thanks for you patience. Here are some teasers for you. :thumbup:
STR
- Joined
- Aug 2, 2004
- Messages
- 18,850
Steve and Haze...Two happy men!")
I sure am :thumbup:
Just wait till the blade comes back from Tom K and I work some of my magic on it
Its going to be one hell of a Knife when its all done
- Joined
- Aug 27, 2004
- Messages
- 12,955
Its a heck of a knife now but when Tom gets done with the blade and you work the other side it will be quite unique and very much a one of a kind. I have been considering taking my 7 A to a zero grind scandi type edge before long but I have so many other jobs on the bench it will be a while to get there.
I've got to get going on another CQC14 and two M-Wave frame lock conversions coming up after that here before long. One step at a time though. The 14 will be next up when I get going on it.
STR
I've got to get going on another CQC14 and two M-Wave frame lock conversions coming up after that here before long. One step at a time though. The 14 will be next up when I get going on it.
STR