Spyderco R2 - want to mod one?

Joined
Apr 27, 2003
Messages
5,738
Hi Steve,

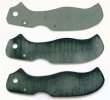
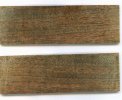
I'd like to have you do some work on a Spyderco R2 for me. Something like what you did with the Atlantic Salt, stabilized wood over ti liners. Only added wrinkle is that I'd like the lower edge of the R2's handle modified a bit to resemble the Stretch as in the mockup below. Would you be interested?

revised_r2.jpg


Paul
bar_02.gif

My Personal Website - - - - - - A Beginners Guide to Spyderco Collecting - - - - - - Kiwimania
Dead horses beaten, sacred cows tipped, chimeras hunted when time permits.
Spyderco Collector # 043 - - WTC # 1458 - 1504 - 1508 - Never Forget, Never Forgive!
It's easy to grin when your ship comes in and good fortune and fame are your lot, but the man worthwhile is the man who can smile with his shorts twsited up in a knot. - Morey Amsterdam
 
Not sure I can pull it off. Tomorrow I'll pull out the one I got as a gift from someone. Gee lets see who was that guy. :D

Seriously I'll have to look. I know it has a beveled edge on the handles so it may require some replacement liners under the wood rather than use them over the existing scales there now. I'm thinking right now that I can do it but let me find it where ever I hid it in the safe and we'll go from there.

Good to see you and thanks for asking.

STR
 
Steve, think perhaps you misunderstood me. I want you to replace the aluminum handles with wood scales over titanium liners, like you did with the steel handle of the Stretch and the FRN of the Atlantic. Only added wrinkle is that I would like you to change the contour of lower edge of the new handle to be like the wood piece on the mockup, rather than having you just use the R2 handles as templates for the titanium. I just did the "fotochop" that way to illustrate the difference between the bottom edge of the old and new handle. Shape of the top strap and butt stay the same, so I'd guess you could reuse the "stock" backspacer/spring carrier. Think that's what you did on the Stretch.

Didn't show it on the mockup, but if you could grind the spine down a bit to give it a splinter picker tip, that would be the frosting on the cake. :)
 
I'm sure I can do that for you. I've all but stopped working with wood for the most part though. My asthma acts up some from certain of them. Winter time with the shop closed up can be a bad time. On it though what would help is if you can find some thinner stock that is close to what I'd need rather than a big slab I have to cut and sand to shape. This reduces my sanding and dusting up the place tremendously. Anyway, I've stored the photoshop pic you created to print off later. If you want the stretch handle or part of it duplicated on the new ones I create, a card cut out tracing of the Stretch shipped with the R2 would be a great aid.

Anyway, I have a standard work order form which is how I do things now. You can find that and fill out and print the details in post number two of the "read this to mail me work" thread sticky top the page page one in my forum here. I really like having these and they help me a lot in more ways than just knowing what we talked about. The PDF file links will allow you to fill that in by typing the answers and then printing. Once done mail at your convenience my friend. I do have a few big projects ahead of you so it may be longer than you are used to this time around.

Thanks

STR
 
Last edited:
No problem with the time frame Steve. I all honesty, I have not even ordered the wood for the scales yet. Wanted to know for sure if you were game for the project before I invested in it. Probably a good thing, as now I can request Chuck Bybee to slice it about 3/16" thick for me. Does the stabilized stuff bother you as much as natural wood? My thought was that it cut and sanded more like G-10, CF, and micarta.

Paul
bar_02.gif

My Personal Website - - - - - - A Beginners Guide to Spyderco Collecting - - - - - - Kiwimania
Dead horses beaten, sacred cows tipped, chimeras hunted when time permits.
Spyderco Collector # 043 - - WTC # 1458 - 1504 - 1508 - Never Forget, Never Forgive!
It's easy to grin when your ship comes in and good fortune and fame are your lot, but the man worthwhile is the man who can smile with his shorts twsited up in a knot. - Morey Amsterdam
 
No not so much a problem using stabalized. Some like the rosewoods, purple heart, and a few others really messed with me though.

STR
 
Ok Steve, glad the stabilized causes you less grief. Called Chuck Bybee, he had a dynamite looking block of Curly Koa which he's slicing into 3/16" slabs for me. Have your form all filled out and ready to go once the wood arrives here. R2 is handy. Just have to do the tracing, then I'll have all my ducks in a row. :D
 
Deacon I got your folder in the mail just now along with the scales and the wood. Not sure I can manage to get it out before year end so I hope that is ok. I never know how things will go and since the way I work is based on mood if I get in a slump it could be Jan. sometime before you see it again. I appreciate your trusting me with your folders once again..

Thanks

STR
 
No problem Steve, glad the stuff arrived ok. I have plenty of toys, so I can afford to be patient. Any time before May is good, after that you may need a new address for me. ;) :)

Did some more playing in Xara-X, using a picture of the Koa I sent you, eliminating the original hadle outline, and adding the "splinter picker" tip...

r2_koa_mockup.jpg

Know I'm being a pain, but if you could also move the lock well forward a bit to better center that damn Boye dent I'd really appreciate it. Whoever ground that sucker must have been cockeyed.
 
I'll see what I can do. ;)

Thanks my friend..

STR
 
I feel cheated! I only got the splinter picker tip when I sent you my R2, Steve! That is some tough work you got ahead of you there, Steve, but I'm sure you will be able to pull it off flawlessly. That design just looks classy, Paul. I still like to use my R2 when I can, but those handles and scales are making me mighty envious. I guess I'll just have to stick with the stock handles and enjoy the inherent flat grind cutting performance with that extra pointyness thanks to STR.

Mike
 
I've actually been working some on this one. It is challenging. The hardware size has been a problematic concern but I've figured out a course of action and am currently getting all my ducks in a row to make it over using a new pivot barrel, and lock rocker arm barrel and once I get those ironed out its a matter of cutting out the liners, and then the scales. Still a long way to go but at least its going the right direction.:thumbup:

STR
 
Well, I'm sure it will turn out great as you always do. I really think the R2 should have been a huge hit with that great flat ground blade. Sure, it wasn't cut out like the original R but is sure is a functional blade that slices great.

Mike
 
Got this one underway today. The problem I ran into last time I pulled it out to start it was that the existing hardware barrels fell far short to do the requested mods that require wood scales over ti liners. What I ended up doing, after gaining permission from the owner of the folder of course, was to order a 1/4" carbide drill bit from MSC. $50.45 before shipping which is about double what this same drill bit ran the last time I had to buy one about a year ago. Actually I ordered two just in case the first one shattered and they back ordered one and shipped the other. I didn't shatter the drill and was able to cancel that second order thank god! :D

Sign of the times on those prices maybe? Anyway, once that arrived I stuck it in the box and today since I was curious to see if it would do the job I cranked the drill press up to high speed and zipped the pivot hole up from the existing size which is something metric, not sure, to where it is now shown in this pic. It is now a 1/4" hole and will sport the bull pivot shown. For the lockbar/rocker arm I had the same issue with the original barrel falling way short. I managed to find in my bin of spare parts an old one off of some past project that just happened to be the exact same diameter and it fits actually just a little better than the factory one with a tighter fit but still lose enough to allow easy movement so I'm good to go now on both the key parts.

Next I'll move to the spacer/spring holder and decide if I'm going to use 2-56 screws there in that or if its feesible to use 1/8" barrel construction there. Won't know that until later.

Shown here you can see the card cut out to use for the ti liners that I need to cut out and drill to match to next. This will be my new body design as per Deacon's request. Then once that is out in ti which is going to be .050 thickness liners I can use the card cut out again to trace to my wood scales and cut those out and match them up to the liners. Then I'm sure its going to be lots of hand sanding to get those down where I like them. With my tennis elbow I may wish I had a planer by the time I'm done but we'll see. Good thing I'm able to use both hands though because my left is going to have to do most of the hand work with my elbow the way its been for the last few months. I've been living on Motrin. Not sure what happens to you if you take that stuff more than ten days in a row. It says stop after ten days but its been well over that.

Anyway here is a shot of the two original barrels I've nicknamed stubs and micro stubs and the new ones shown in and beside the parts they go to which both end up giving me much more to work with.:thumbup:

Stay tuned.

STR
 
Been playing with this one a bit trying to make some progress.

Seen here I've cut out the first ti liner and threaded the rear holes for the spring holder as they were on the original set up.

All my holes are spot on and the lock up is good but I'll really need to get the other side cut and then see how it stands up with both liners on it. If all is a go then I'll move on. Right now with just one side on it things bind and are not pulled together quite as they'll be later and thats due to the spring so its going to be hard to tell until I line everything up. The lock bar barrel and pivot are both kind leaning at this point but when I use my fingers to squeeze it in the gap under the lock bar/rocker arm and the lining up of the body to the parts pulls together nice. Normally the gap under the rocker arm like it has now when its together with just one side holding all the tension will go away when its pulled together. If its still there or some of the parts don't line up as I want I'll just have to use this first one for my template to spot my holes and make another set correcting for the places I see that need correcting before moving forward. Being .050 thickness its not too terribly hard to cut out on the band saw but still sparks to high heavens.

Anyway, here are a shot of it closed and open. The only reason I'm showing this is to let you see the shape of the handle I've got going. Ok it if you like it. If you see something wrong let me know now. I tried to copy it best as the spring holder will allow in the rear. Otherwise its to the shape of your idea I think. You may notice I did not put a lanyard in it. There is no mention of it in your work order Paul. I know you don't use a clip but lanyard? Yes? No? Just let me know.

STR
 
Shape looks great to me Steve. As for the lanyard hole; I find they come in handy on smaller knives by making retrieval from my watch pocket easier. However, knives the size of the Stretch and R2 don't really need it, so no need to add one.
 
Sounds good. We had 86 degree weather today and the wife insisted I cook out my famous honey mustard chicken breasts so I had to whip that up earlier and let them soak. Cooked out and pigged out after that so now I'm a fat and happy couch potato sitting here with my notebook computer in my lap and barely able to move. :barf:

Anyway, I'm thinking that the barrels for the pivot and lock bar will show but I'm going to hide those rear ones under the scales I think. I don't really care for the positioning of them for the looks because I'm sure Spyderco did them where they are for the skeletonized handles having limited places. I'd rather run another rear screw or two on the outside in a more central more balanced position for the wood scales so thats the plan for now.

Otherwise I'll pick back up on it next day in the shop and see where it takes me. :thumbup:

STR
 
Ok well I got the other side liner cut out and put it together using that first one. I liked what I saw and thought I had a go for both sides at first but then at the last minute I noticed I had taken off just a tad too much when trimming out that first liner. It was slight and only the one spot but I didn't like it. I didn't like how the tang of the blade just peeked out enough to see it and catch it with the fingers when the blade is closed and even though the scales could have been made such to cover that I elected to just cut out another third liner and left both oversized. These are marked where I will need to trim them at the top a bit but the rest is already there and it goes together well so I can move forward now with using these as my templates to cut out the wood scales after marking the holes I want in those.

I pulled the wood out today for the first time since the box arrived. This wood is very pretty even unfinished so I'm sure its going to be a nice piece when all is said and done. Here is the first glimpse of the wood which as I recall is stabalized curly Koa. Nice stuff and the first time I will get the chance to work with it.

Seen here are the three liners I cut out of the .050" titanium. And the wood scales that I will be using. Little by little it should start going together now.

STR
 

Attachments

  • Paul's R2 STRetch progress 3.jpg
    Paul's R2 STRetch progress 3.jpg
    38.7 KB · Views: 24
  • Paul's R2 STRetch progress 4 Stabalized Koa.jpg
    Paul's R2 STRetch progress 4 Stabalized Koa.jpg
    55.1 KB · Views: 16
Looking great so far Steve. As for the wood, yes, it is stabilized Curly Koa. As for "finish", I may be reading something into your post, and I also could be wrong, but from what I understand stabilized wood doesn't need finish in the sense of oil or varnish, just polishing like G-10, CF, or micarta. FWIW, Chuck was kind enough to slice the "bowie block" I bought from him into four slabs for me. The two I sent you were the "interior" ones from the block. Picked them because they were the thinnest and you'd mentioned that would be better for you. I just smoothed out the saw marks. Think the finest grit I used on them was 200. Also, if it's any easier for you, it can be wet sanded.
 
Back
Top