folder makers please help asap lock geometry

Oh hay Brian or anybody else for that matter.

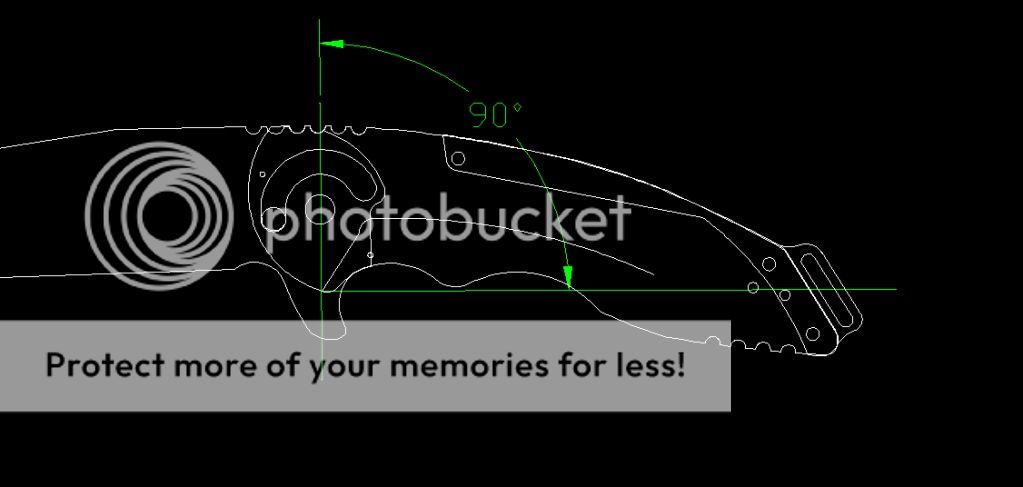
Let's talk about the angle of the lockface a little. I'm talking the angle relative to the bar its self. Do you usually stick to a 90 deg angle or have you noticed any differences with a more obtuse angle? Sorry hard to explain with out a pic. My lockbar has a curve though its length. I'm talking when the lock gar gets to the lockface that angle. Not the face of the lock but the angle of the bar.

Pics coming.
 
quick pic. Gotta run be back in a bit
LOCK.jpg
 
In that pic, you are 90 degs to the blade, not the bar. I shoot for 90 degs to the bar. So the blade wants to push the bar 'back', not 'down', or 'up'.
 
In my liner locks with the stop pin outside,I have found a curved leaf spring can create two problems. 1/ When the blade is closed, the leaf may want to push up against the scale and or 2/ a buckle may occur and cause the leaf to contact the blade just as it finish closing. I use two "tools" when making the bend to help avoid the curved leaf. The are simply two pieces of micarta with band saw cuts in them. As well I use about a 11 degree angle on the blade face cut out which I grind with a 120 grit belt. The leaf I do grind at an "obtuse" angle with a 400 grit belt. For sure long leaf springs create problems as Don has said. I have been cutting longer than his, but recently started to make them shorter.
 
I wonder also with my A series blades. There is a curve the whole length of the handle and blade. I have always wondered if a straight blade and frame would effect the lockup? I notice only a very small difference inlockup with my kwaiken folder which has a slight upsweep.
 
I´ve only made about 40-50 linerlocks so far so I´m nowhere near as experienced as many of you guys. However, I have actually come to just about the same conclusions as Brian and DH3 in terms putting the lockface as close as possible to a point straight under the pivot. My problem is that with the relatively small and slim folders I´m doing now, the lock bar can not be very wide cause then it will interfere with the pivot washers. Sorry, I dont have a picture of this but I think you know what I mean. My lock bars are typically just under 1/4" wide, but on the other hand I really cant say its been a problem so far.

@JBS

I´ve never done a press fit between the pivot and the lock side liner but I see the point. I´m gonna have to try this. Thanks

One thing I learned myself the hard way, is to do what Terzuola describes in his book and ever so lightly round the "entrance" side of the blades lockface (where the lockbar starts to engage the blade lockface). Otherwise the blade will shave of a little material from the lockbar every time the lock engages, wearing it out way too soon.

@ DH3

I´m gonna have to try a shorter spring, mine are normally a little longer.

Thanks everyone

Brian
 
There is no one size fits all answer for this one Jake.
And your picture doesn't tell the whole story, since we don't see the whole lockbar, and therefore know where the axis if the lockbar is.
I shoot for the lockface being parallel to the lockbar axis, though this isn't always feasible.
This is tough on a curved lock, unless the lock curves back before it ends.

Everything we do is a tradeoff, we can almost never have perfect geometry.
But by understanding the forces at work, and the physics behind them, we can engineer for success.
Give a little here, take a little there in order to minimize the effects of our less than perfect geometry.

Lets assume your lockbar curves like that it's entire length.
The "Perfect" geometry for that might actually put the point of contact in FRONT of the pivot!
And the angle you highlighted would become obtuse, rather than the 90* shown as well.

As you can see, this usually won't work in reality.

The "perfect" geometry for a lock has the lockface as a radial line passing through the pivot, AND has the axis of the lockbar parallel to that.
Once we start moving away from this perfection, we just have to start balancing the two.

Always draw a line through the pivot to the contact point on the lock, then draw a 90* line from that point.
You can then see where the force is pushing when pressing on the spine of the knife.
From there you can start making judgements on everything else.
Do I need to change the angle of the lockface?
Do I need to adjust this point forwards, backwards, up, or down?
Is everything just trying to pry my lockbar up, instead of pushing along the bar?
Should I just quit making knives because this crap is not as easy as it looks?

It's no wonder that most guys make fixed blades....
 
Thanks Brian, that helps a bunch! Was never good at geometry in school:) but you put in a very easy to understand way. It seems as though I need to kick the lock face out towards the pivot a bit to make the force push back instead of up.

I'll post a pic later and hopfully I understoon what yall are talking about.

I'll just post up the whole knife for reference also. Lock bar is curved the whole way.
 
Yep, you are understanding!
Except that whole lockface would also need to move to the left so the lockface is in line with the pivot.

Remember, these are Ideals, not realities.

Reality dictates that you make it the way you are...
 
Do what ever you need to do to get the lock face close to 90 deg.s with the bar and as close to the pivot as possible. Compromise, split the difference, meet in the middle, etc...

I learned liner locks while making around 300 latch release liner locking autos. PITA! :D

P.S. your original design is not bad at all. I would just tilt the lock face a bit closer to 90/w the bar and move it forward a bit.
 
awesome guys thanks for helping me understand that a bit better! I think with the new stop pin location a little further out and a little more tilt to the lockface I can start making it easier to make these things.

I dont have any lock slipping since I changed the design awhile back, but this will help in having to fiddle so much with them before I ship them out. Anything that saves time saves money!

We should all get together and get a sticky going for what makes a good lock, so other guys new to folders dont have to look so hard for info. Bobs book is a great source, but its still hard to understand some info.
 
Do what ever you need to do to get the lock face close to 90 deg.s with the bar and as close to the pivot as possible. Compromise, split the difference, meet in the middle, etc...

I learned liner locks while making around 300 latch release liner locking autos. PITA! :D

P.S. your original design is not bad at all. I would just tilt the lock face a bit closer to 90/w the bar and move it forward a bit.
Yessiree.

Don is spot on.

What you will find, playing with your drawing is that when you move that lockface so that it's on a radial line from the pivot axis that you just end up with the 90* naturally.
It's a function of the geometry.

But then you will also see that you can't make that knife.

So, you do as Don says, compromise.

With a solid understanding, you can chose wisely on which compromises to make, and more importantly which to avoid.
 
Makes sense. As I am using a .5" bearing on my folder I need to maintain a .510 area around the pivot so the lock doesn't interfere with that, so where Im at now, + adding a small angle adjustment to the lock face is about as close to 90 deg as I can get:)
Yessiree.

Don is spot on.

What you will find, playing with your drawing is that when you move that lockface so that it's on a radial line from the pivot axis that you just end up with the 90* naturally.
It's a function of the geometry.

But then you will also see that you can't make that knife.

So, you do as Don says, compromise.

With a solid understanding, you can chose wisely on which compromises to make, and more importantly which to avoid.

That's the kind of insight we depend on from you, Fellhoelter, thanks for joining in.
One thing: I just built a knife like that.

A few months ago someone on this forum sold some blades that Benchmade had made for a canceled product line. The one I bought had the lock face right below the pivot. I made a folder for my son when he enlisted, and it has exactly that feature.
Unfortunately I didn't take any photos during construction...

Andy
 
Andy, I imagine that knife achieved this one of 2 ways, and possibly both.

1: It used a really small thrust washer.
2: The front of the lockbar was cut around the washer via EDM or Waterjet, etc...

So, did it sorta have a notch in the front.

Or, there is a third option I can think of off hand.
The knife is HUGE, allowing for a regular sized lockbar, beneath a decent sized washer.

I did trim the washer a little- another option might have been to mill the liners and not use a washer, which I don't really have the means to do well.

It was an average "medium" flipper, 3.5" blade; I like a cutaway where the index finger grabs the handle, and didn't do that on this one so as not to weaken the lock bar - What I DIDN'T like about it was that the lock location was a little below most of the locking bar, so the force from the blade wasn't transferred through a straight line into the tab- with spring tempered .050 410 I don't think it'll flex much...time will tell. I'll be able to say something intelligent about it in a year or two! :)

Or maybe that's why Benchmade didn't use this design?
 
Back
Top