- Joined
- Nov 8, 2005
- Messages
- 103
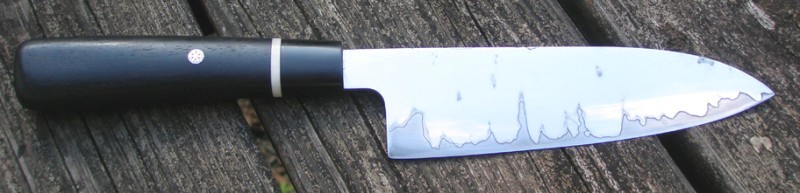
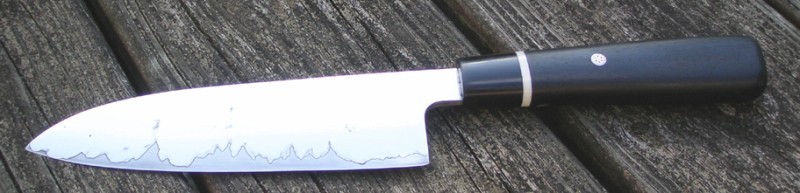
This is a Shinichi Watanabe / Bill Burke / Burt Foster inspired high carbon/stainless sanmai AKA kurouchi gyuuto AKA warikomi houcho
Blade: 1095 clad in 416 Stainless Steel
OAL: 12.5"
Blade Length: 7.25"
Bolster: Buffalo Horn with Ivory Spacer
Handle: Ebony with .25" mosaic pin
Blade Finish: 1500 grit Satin/FeCl Etch
Handle Finish: 1500 grit horn & ivory/1000 grit handle - danish oil
Proceedure:
1) Stacked and welded the following:
.125" 15N20/ .1875" 416/ .25" 1095/ .1875" 416/ .125" 15N20
2) Wrapped in two layers of heat treating foil with a piece of brown paper and place in the forge for 20 min - flipping at the 15 min mark.
3) Pressed on flat dies to weld on first heat
4) Fullered to .25" thick over the next 3-4 heats
5) Peeled / Ground off 15N20 which only partially bonded
6) Hand forged to shape
7) Quenched in Parks 50 / Oven tempered
It took me 3 attempts to get this too work. The first 2 were canister welds, one of which exploded (too much WD-40) and the other partially delaminated. So, I'll stay away from canisters for a while.
I was incredibly discouraged until visiting Burt Foster's website, which inspired me to try again - his work is amazing ... And last week's posting by Bill Burke helped me to understand why I was forging 1095 peanut butter between 416 crackers - Thanks Bill.
Any comments - Positive or Negative are ALWAYS welcome.
Literal Translation of Japanese Names:
Sanmai: Three Layers
Korouchi Gyuuto: Black (high carbon) Centered Meat (Chef's) Knife
Warikomi Houcho: Interupted (stainless or low carbon by high carbon) Kitchen Knife
