- Joined
- Nov 21, 2009
- Messages
- 141
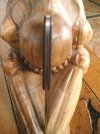
Here it is.
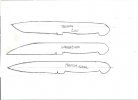
O1 tool steel 3/16x1
8 7/16 OAL
4 1/8 butt to top of micarta
4 3/8 to Spanish cut at top of ricasso
4 1/4 micarta to tip of blade
4 ricasso to tip of blade
tip of blade is drop point (kinda)
I drew the pattern myself. I wanted a "companion" style knife I left the blade a little longer than I had initially planned.
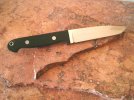
I cut it out of 1 inch stock with my cut off wheel. Shaped it with an 8 inch wheel grinder. rough shaped it with a 4x36 belt grinder.
Bought Fred's bubble jig and fixed So Many boogers. Bought a used ($50) craftsman 2x42 grinder, used it to refine my blade. Filed for hours on end to make it uniform. Sanded to a consistent 400 (100,220,400)
Drilled two hole for corbys and one for lanyard. Drilled 12 more to lighten handle and provide epoxy a place to "bite".
Made a simple forge in my masonry fireplace (old blowdryer,2 1/2 inch pipe, heavy steel frame/grate, chunks of coal and cedar)
Heated blade to nonmagnetic, held it there (glowing red) for almost ten minutes, quenched it in hot mineral oil.
Tempered it in my oven at 425 for two hours, let it cool.
Sanded off the decarb to 400.
Set the edge in water in an ice cube tray and used a plumber's torch to draw out the spine, let it cool.
Sanded it to 800.
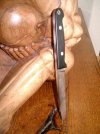
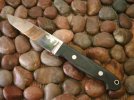
epoxied 1/8 black micarta scales to red vulcanized rubber spacer material. Ground several recesses into backside of scales for epoxy to bite.
Epoxied and clamped those to the handle using 1/4 stainless corby bolts and 1/4 stainless lanyard tube.
Shaped and sanded scales. I went to 400 on the scales, I know that is a little too smooth compared to most everyone else's work.
Cleaned everything up to a mostly uniform 800.
I am happy with it. I think it looks good. The only comment I have heard was a dig from one of my buddies. He said it looks like a steak knife from Texas T-Bone.
What do you think? What is good or bad? How can I improve the next one? Yes, I already cut the blank out...
I am going to ditch the craftsman belt grinder, it has too many issues. I can afford the Kalamazoo 2x48 ($239- Jantz) I think it is an okay upgrade for the money. Fred's jig and clamp is great for making a clean plunge, it saves me hours of "oops".
I have a small piece of carbon fiber for the next scales and am going to make some burlap "mycarta".
I look forward to your comments. Thank you in advance.
In all reality you taught me how to make this first knife. I built it from scratch with this website and it's members expertise. If only I can develop the skill set of some of the members.
O1 tool steel 3/16x1
8 7/16 OAL
4 1/8 butt to top of micarta
4 3/8 to Spanish cut at top of ricasso
4 1/4 micarta to tip of blade
4 ricasso to tip of blade
tip of blade is drop point (kinda)
I drew the pattern myself. I wanted a "companion" style knife I left the blade a little longer than I had initially planned.
I cut it out of 1 inch stock with my cut off wheel. Shaped it with an 8 inch wheel grinder. rough shaped it with a 4x36 belt grinder.
Bought Fred's bubble jig and fixed So Many boogers. Bought a used ($50) craftsman 2x42 grinder, used it to refine my blade. Filed for hours on end to make it uniform. Sanded to a consistent 400 (100,220,400)
Drilled two hole for corbys and one for lanyard. Drilled 12 more to lighten handle and provide epoxy a place to "bite".
Made a simple forge in my masonry fireplace (old blowdryer,2 1/2 inch pipe, heavy steel frame/grate, chunks of coal and cedar)
Heated blade to nonmagnetic, held it there (glowing red) for almost ten minutes, quenched it in hot mineral oil.
Tempered it in my oven at 425 for two hours, let it cool.
Sanded off the decarb to 400.
Set the edge in water in an ice cube tray and used a plumber's torch to draw out the spine, let it cool.
Sanded it to 800.
epoxied 1/8 black micarta scales to red vulcanized rubber spacer material. Ground several recesses into backside of scales for epoxy to bite.
Epoxied and clamped those to the handle using 1/4 stainless corby bolts and 1/4 stainless lanyard tube.
Shaped and sanded scales. I went to 400 on the scales, I know that is a little too smooth compared to most everyone else's work.
Cleaned everything up to a mostly uniform 800.
I am happy with it. I think it looks good. The only comment I have heard was a dig from one of my buddies. He said it looks like a steak knife from Texas T-Bone.
What do you think? What is good or bad? How can I improve the next one? Yes, I already cut the blank out...
I am going to ditch the craftsman belt grinder, it has too many issues. I can afford the Kalamazoo 2x48 ($239- Jantz) I think it is an okay upgrade for the money. Fred's jig and clamp is great for making a clean plunge, it saves me hours of "oops".
I have a small piece of carbon fiber for the next scales and am going to make some burlap "mycarta".
I look forward to your comments. Thank you in advance.
In all reality you taught me how to make this first knife. I built it from scratch with this website and it's members expertise. If only I can develop the skill set of some of the members.
Attachments
Last edited:

 J/K! Great job on your first one! some constructive feed back though...next time if your going to use O1 find someone with a ceramics kiln and then the proper O1 heat treat is ramp up to 1500 and let stand for 15 - 30 minutes then up to 1550 and quench. Again Great Job!
") !
!