2nd knife

Joined
Dec 4, 2013
Messages
891
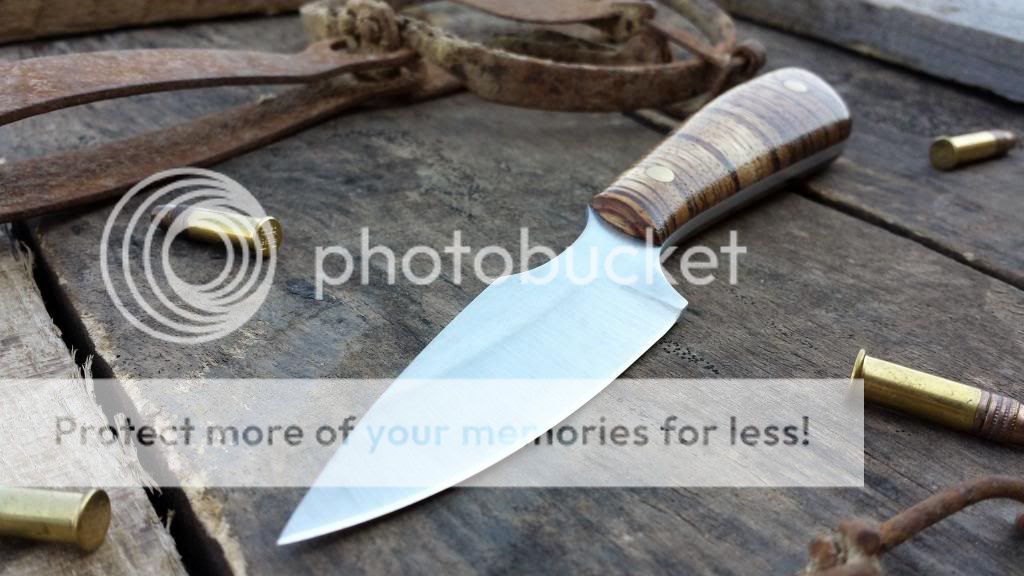
This is the second knife I have completed. This one is a gift for a fella in Skidmore MO that let's a group of us come up and deer, turkey hunt on his acerage and drink beer and tell lies in his shop he calls the coon shack . He is big into trapping so I made him the not sure what to call it kind of caping knife.

OAL: 6 1/2
2 5/8 cutting edge
Steel: 1080+ .133 thick
Heat treat by Darrin Sanders
Zebra wood scales finished with truoil and brass pins

This baby is sharp!! I kind of surprised my self how sharp I got it but I'm a newbie so this is all new experiences.

Thanks for looking comments welcome. Good or bad

Justin Presson


I hope the pics loaded right did it from my phone:D
 
Last edited:
Thanks guys. I have a few things that I struggled with in this one. I had a hard time getting the bevel/grind line to look clean with the sanding lines going opposite of the flats area. Felt like I was washing out the bevel. I was doing the sanding by hand not sure I was using the right technique. I also have a spot of what I think is Epoxy right close to the scales on the ricaso that I can't seem to get off and I didn't want to screw the finish up rubbing it hard.
 
That is very very nice. Love the lines and handle material. If that's your second knife, I can't wait to see your tenth.
 
Very nice. Just curious did you free grind it or use a jig? I use a jig because I haven't learned a good technic. Your lines look nice.
 
Curious about the sheath. Did you groove the stitch line? Also, what are you using to whack your stamps?

The knife, I have no questions. It's awesome. :)
 
Justin, very nice job. Definitely ahead of the game for being a 2nd knife. For the epoxy issues you can use a piece of brass rod sharpened into a scraper or sometimes even a wooden dowel is enough to remove stubborn epoxy without marring your finish. On the leather, it appears you grooved your stitch line but it could have been deeper. Some will say you put the snap on backwards for right hand carry. For your stamping, did you case the leather first?

Chris
 
Thanks fellas.
I did grove the stitch line but sounds like not deep enough. The stitching does not sit below the leather. Case the leather first? Stigamort I whacked them with a hammer...should I use something else?
 
I find it easier to cut stitch grooves when the leather is dry. If I wait until the leather is cased it gums up the groove tool.

Is the leather torn a bit? If so, I'd guess it was too wet and the stamp pulled and tore your leather instead of simply stamping. If you feel you lost some detail in the stamps as you assembled the sheath, make sure the stamped area is dry before you fold it up and stitch. I spray the bend area to keep it supple, but try to avoid the stamped areas with my water bottle. Just some thoughts.
 
Casing the leather is getting it damp prior to tooling. But damp in a specific way. Many folks will only cut cased leather too, particularly heavier leather such as saddle skirting. Traditional way of casing was to soak leather in warm water until bubbles stop coming out. Then wrap the leather in a wool blanket and come back the next day to work your leather. Now there is a product called Pro Carv. Jantz carries it in 8 oz bottles. Mix that with some water and spray it on or use a sponge and get your leather damp. When the leather starts returning to its normal color it is ready to start tooling. Good stuff that Pro Carv. It will save you a lot of time. Your leather will be ready in a few minutes instead of overnight. When tooling you will know your moisture content in the leather is right when your stamped impression is uniformly darker. Most guys will use a maul designed for stamping not a hammer. Two pounders seem to be about right although I do have a three pounder I use sometimes. Barry King Tools is a good source if you are looking. Like forging this is an area where mass is good. Both in the maul and under the leather. You should be tooling on a solid, heavy surface. Most folks use some form of polished granite or quartz. 12 x12 x1.5 inches is a common size. Some guys score head stones that were screwed up somehow and these work well as long as they are polished. The wife, who does most of the tooling on our outfit recently talked me into a 18 x 24 x 3 inch granite surface plate for her to tool on. Thing weighs 200 lbs. I know me and a buddy got to move it from the shop into her office where she does most of her tooling. Plenty of mass there. You want your stitches to be just below the surface of the leather which is one of the reasons for grooving the stitch line. This helps protect the stitches from abrasion. So on this sheath, yep, could of grooved a little deeper. I REALLY like how you orientated the zebra wood vertically on the handle. Very striking. Nice package. Your friend will be proud to own it.
 
Thank you very much for the leather tips guys I obviously have a bunch to learn. I have been focusing on making the knife itself and admit I have lacked researching the sheath making aspect of it. I feel I don't really know how wet I'm supposed to be getting it afraid to screw it up I reckon.
Horsewright..the orientation of the grain I thought turned out pretty sweet to thank you. It was a booger to work that stuff is hard!
 
I asked about the stamping because mine got kinda washed out on my last sheath. I don't think I cased well enough, had enough mass in my mallet and some of the other tips here are things I'll need to try. I don't blame you for using a hammer, it's made to hit stuff, but my understanding is that it's about the last thing you should use to hit a stamp. A cheap poly mallet from Tandy is better, but I rather dislike them. The Barry King pieces look really nice.

As for casing, Al Stohlman use to recommend soaking the leather until no bubbles were still coming out, then placing the piece in a plastic bag to "sweat" and even out overnight. Remove and wait until it starts to return to normal color. While this is likely a great way to do it, that Pro Carve sure sounds nice. I use a standard Tandy set of stamps, but some of the guys doing killer work are using custom stamps. From what I can tell, they are made to a much higher standard, but they are pretty costly.

I was gonna pm this to you (I should get a referral fee at this point lol), but check this out when you have some time. Doesn't cover everything, but it sure helped out a number of guys, me included.

http://www.bladeforums.com/forums/showthread.php?t=1139038
 
Back
Top