A couple in W2 with Desert Ironwood

Joined
Feb 27, 2008
Messages
264
Here's a small drop in with a Desert Ironwood handle and a 4 inch blade.

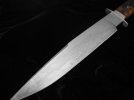
The second is a large fighter with an 11 Inch blade.

Sorry the pictures turned out dark but the Hamons show up nice.

Dave from Diller
 

Attachments

  • knives 005.JPG
    knives 005.JPG
    18.4 KB · Views: 239
  • knives 006.JPG
    knives 006.JPG
    16.4 KB · Views: 171
  • knives 008.JPG
    knives 008.JPG
    15.1 KB · Views: 188
  • knives 010.JPG
    knives 010.JPG
    18.5 KB · Views: 157
Hi..

Looks good. If I might make one suggestion. On the Hamons, the reason they have sort of a blocky look is what I bark. It is the decarb caused from the heat treat. If you grind a bit more and finish finer after removing a few thousandths you will get down to the true Hamon which will have more character in them. I can see they are in there.. Not trying to tell you what to do ,, but just a suggestion. They knives look beautiful !!:thumbup::thumbup:

Zoe
http://www.zoecristknives.com
 
Dave, looking good man!

Zoe, Dave got the W2 from me. This steel is super shallow hardening, any bit of clay will leave a mark (hamon) after HTing. Knowing Dave, he most likely removed .010" or more from each side of the blade after HT, so I don't think you're seeing decarb, just crazy hamon.
 
Thanks Don

I guess I should of explained the Hamons. The one on the small hunter is a series of XXX's.
Which would explain the blocks, the opposite side actually shows up a lot better.

The large fighter is an extremely random pattern.

Dave from Diller
 
Very nice work on both. I find the large fighter particularly appealing.

Roger
 
sorry, if i sounded no-it-all:) but I just came back from the class with Don Fogg and we were working with W-1 and I had a very similar piece and Don told me to go deeper with the grind and the Hamon totally changed. So again, in no way was I trying to tell you how to do it as I think you do GREAT work, but was trying to relate an experience that is fresh to me...

Zoe
 
Zoe, you are right and Don Fogg is King of the Hamon :) I know Dave and figured he took enough steel off the blade post heat treat.

A lot of makers do not grind enough off after HTing. Looks bad and usually leaves the edge much too thick. Both bad.

One can also grind too much off the blade after HTing and lose a lot of hamon activity, (blade too thick pre-heat treat). There is a sweet spot that's just right...
 
Two different explanations both of which sound reasonable to the novice collector. So how do you the bladesmith know how much to grind off? Not looking to start a controversy, just curious.

Paul
 
when I worked with Don,this is how he showed me.. he is such a master at it that for him he just knows.. but in teaching me it went like this... we would clean it up after heat treat and then after the grind do a quick hand rub at 220 grit or so just on one side and do a quick dip in Ferric-Chloride to get a look at it.. If all looked good then i would go through all the grits but if i saw any bark then I work go back to the grinder.. After a bit you kinda knew how much needed to be removed... just my 2 cents :-)

Zoe
http://www.zoecristknives.com
 
Two different explanations both of which sound reasonable to the novice collector. So how do you the bladesmith know how much to grind off? Not looking to start a controversy, just curious.

Paul

Paul, Zoe's method taught by Don Fogg is one way. I've learned to leave the edge the thickness of a dime, or around .040" before heat treating. When I clean up the blade on the belt grinder, I can see the hamon easily (W2, 1086M steel). If I like what I see, I grind to nearly sharp and continue to finish. If I don't like it, the blade gets re-clayed and goes back to the forge. When it comes to producing very active hamon, lots of practice is needed, but learning from someone like Fogg will cut the learning curve down by a bunch. :)
 
I've learned with Don Hanson's W2 just as Don has described. I hit it after heat treating knocking off the scale and clay. If you see the hamon you want go with it. I've noticed that you can see it all the way to the finer grits.

I believe I know the bark your talking about and sometimes it can be quite a chore to get out. I've found hardened W2 to be quite abrasion resistant.

Thanks for the comments

Dave from Diller
 
Great job on both. I really like both. :thumbup:
We have to think for something more after what we've already planned
:D
 
Back
Top