How To A question on blade finishes, scotchbright, etc

Cushing H.

Gold Member
Joined
Jun 3, 2019
Messages
2,714
Here is a question I have not been able to find an answer to by searching:

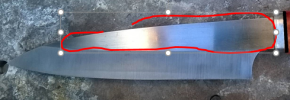
I get the progression of finishes through progressively finer grind, then to scotchbright or cork ... BUT what do you do if you are after, say, a scotchbright finish on the bevel, and more of a bright finish (but not necessarily mirror - that is the buffer question again :-( ) on the remaining visible flats of the blade. For example, the image below:
upload_2019-8-8_11-25-9.png
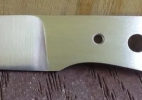
shows a scotchbright finish on the bevel, but a non-satin, brighter, finish on the exposed blade flat just in front of the handle. the same question would apply to any blade flat above the bevel (if you are not doing a full face grind). How do you go about getting that finish?
 
Are you referring to polishing right at the plunge line?
lets try another picture:
upload_2019-8-8_11-36-49.png
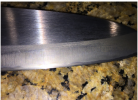
this picture (taken from the "whats happening in your shop" thread) shows a sanded finish on the bevel (could be a scotchbright or cork...does not matter) ... the area from the top of the grind to the spine is a different finish. I guess it could be a surface grind finish - but if you want something like that finish and you do not have a surface grinder - how do you achieve that finish? (could also be on the exposed flat of the blade between the plunge line and the handle/bolster)....
 
lets try another picture:
View attachment 1175500
this picture (taken from the "whats happening in your shop" thread) shows a sanded finish on the bevel (could be a scotchbright or cork...does not matter) ... the area from the top of the grind to the spine is a different finish. I guess it could be a surface grind finish - but if you want something like that finish and you do not have a surface grinder - how do you achieve that finish? (could also be on the exposed flat of the blade between the plunge line and the handle/bolster)....
You can get that sort of finish with hand sanding. Only go one direction, and be sure not to stray sideways. Push the sandpaper from the heel to the tip in one continuous movement, and don't change direction at all.
To me, that looks like a 320 grit hand rubbed satin that's been polished afterwards. Maybe with some 1k paper or scotchbrite
 
To get that finish after the bevels are done I would hand sand the flats with long straight pulls or with a high grit trizac belt on the grinder I would hold the blade with the point up and press the flats against the platen.
 
I do the main bevels to 400 first.
Then I flat sand the tang/ricasso/upper bevel on the flat platen and finish those surfaces as needed by hand with a hard backing block.
After that is all straight and clean, I do the main bevel with the scotch brite belt.

HERE IS A GOOD TRICK FOR CRISP SCOTCH-BRITE LINES:
After the blade is all sanded out, tape up the flat surfaces with blue tape or frog tape. Go right along the edge of the upper bevel, leaving only the main bevel exposed.
 
HERE IS A GOOD TRICK FOR CRISP SCOTCH-BRITE LINES:
After the blade is all sanded out, tape up the flat surfaces with blue tape or frog tape. Go right along the edge of the upper bevel, leaving only the main bevel exposed.
Actually - this is an opening for a question I had been thinking to post to a new thread tentatively titled "Have I been Suckered". The picture below is one of my Santoku's from Japan....
upload_2019-8-8_13-32-48.png
I had noted the nice clean, consistent boundary between the bevel and the flat above the bevel. This is quite a thin blade with a very shallow (ten degree???) bevel - and this appearance was actually my initial incentive for an earlier thread on "how hard to grind consistent bevels on thin blades". HOWEVER, after looking more closely, and "past" the nice-clean line at the "bottom" of the flat (see also picture below)...
upload_2019-8-8_13-36-23.png

it actually looks more like evidence that the actual bevel grind is not all that even from the edge (look at the slight discoloration / different texture) below the apparent end of the flat. It looks more to me that the bevel grind was not really all that even, then they ground across the boundary between the actual grind and the flat, and THEN did something like Stacy is suggesting (mask and then re-do the finish on the un-masked portion of the blade) to produce and apparently incredibly sharp, consistent "boundary" between the bevel and the "flat" portion of the blade. What think all of you? did they do that, or were they actually able to produce such a clean/sharp/consistent bevel grind???
 
I think you are seeing the area where the rough bevel grind was and where they stopped the final bevel grind a tad short so as not to mess up the sharp border. It was probably a factory knife and they do it quick and simple. The edge is all they care about, so they don't really try to get the shinogi area beautiful. Also, as the blade is sharpened, the bevel grind will walk up a tad to meet the shinogi more perfect ( or make it much less perfect, which is more common)

The order of grinding would be:
Grind the basic edge bevel - flat grind the tang and upper bevel longitudinally- finish grind the edge bevel - quitting just before it reaches the shinogi.
 
Grind the basic edge bevel - flat grind the tang and upper bevel longitudinally- finish grind the edge bevel - quitting just before it reaches the shinogi.
So if i understand correctly, that shinogi is established by a longitudinal grind, and not somehow “finessed” by later masking? (Thank you for the terminology BTW. im still catching up - else i would have asked the question more clearly...)
 
The flat is set in rough grinding.
Then the bevel (kiriba) is added to get the desired shinogin position.
Then the flat is fine sanded.
Then the bevel is fine sanded.
Then the edge bevel is added.


Shinogi - the ridge where two different surfaces meet in a line.
jbladeant-jpg.4807
 
Last edited:
There is also a fairly popular Japanese knife with a sandblasted faux shinogi. It was done for cosmetics only, and I'm not aware of anyone that likes it.

Kitchen knife geeks who really care about the look of bevels on their shinogi-bearing knives will sometimes spend significant time on whetstones to get their bevels smooth, so that they can be polished on the stones. Done carefully, this can leave a distinctive contrast between the flat and the bevel, especially with certain stones that leave a hazy finish.
 
I have seen the bead blasted edge look you describe. It is very common as a faux hamon on wall hanger Chinese swords made from stainless steel. You do see it from time to time on chefs blades that have a FFG to simulate a shinogi. The effect is done with metal or plexiglas templates placed on the blade and then blasted. Another way is to mask off the upper bevels with wax and aid etch the exposed metal with nitric acid.

When I make a knife for a Japanese chef, I only put a small starter edge bevel on it. I know they will take it home and immediately redo the bevel and edge to their preference with their own stones.

Today, many folks like the parallel lines look of a belt ground edge. A scotch-Brite finish over that gives a little more hazy look.
 
Don't do this with a scotchbrite. Tip up a recipe for being impaled. Trizac is fine.
To get that finish after the bevels are done I would hand sand the flats with long straight pulls or with a high grit trizac belt on the grinder I would hold the blade with the point up and press the flats against the platen.
 
Back
Top