The book, "Knifemaking" by Bo Bergman is the puukko makers bible. It used to be readily available in Swedish and IIRC, in German. English copies are pricy and hard to find.
There are many online tutorials on making a puukko. Here are a few:
http://www.northcoastknives.com/northcoast_knives_tutorials_puukko.htm
https://nordiskaknivar.wordpress.com/tag/puukko-tutorial/
Birchbark is a good material for a person with limited equipment. A sharp knife, some files, and sandpaper is about all you need. A hand drill will work fine for making any needed holes. Cut the bark into rectangles about 30X40mm. As you cut them, drop in a bowl of water. When all are cut, drain and put in a zip-lock bag to keep moist.
To punch the holes in the bark, use a 6mm leather punch, making two adjacent holes to make a slot. You can cut the slots with a sharp tipped knife, too ( a small woodcarving knife works well). As the slots are cut, slide the pieces on a piece of mild steel that is about the shape of the tang ( called a mandrel). The piece should be about 8" long. Cut two pieces of wood to fit on the ends as if they were a bolster and end block. They are for clamping, so there is no need for them to be a precise fit. Put one block on, slide on the bark, put the other on the end when done. As the stack gets to about 25mm longer than the desired Compress in a vise or with woodworking clamps to squeeze tightly together. Let dry a day or two. Take the pieces off the mandrel and set on an old towel or news paper. The next step will be messy, so do it outside or over paper. Put some wood glue ( I use Tightbond 2) in a bowl. Wax the mandrel well with beeswax so it won't stick to the bark pieces as they get glued up. Put one wood block on the mandrel, then a piece of waxed paper, and then start gluing up the handle. Dip a bark piece in the glue, squeegee off the excess with your fingers, slide it in the mandrel, repeat until all are on. Slip on another piece of waxed paper and then the end block. Wash your hands and then clamp in the vise or clamps to tighten up the stack. Wipe off the excess glue squeeze out and tighten again. When the stack is tight, let cure for a week. Take apart and clean out the hole if needed. If the mandrel is stuck, just set the stack on a slit somewhere and hit the end of the mandrel with a hammer ... it will drive out easily. Remove the wooden ends and you now have your birchbark handle block. You could do all this on the actual blade tang, but it is a lot easier to do on a mandrel first.
Now you can carve the handle to a basic shape with a sharp carving knife. A belt sander is a much faster way to get the basic shape if one is available to you. Talk to someone who does woodworking about them helping with that. BTW, the mandrel is a good way of holding on to the handle block while shaping it, so don't toss it away.
Once the corners are cut/ground off, slowly shape the handle to the desires profile. A basic "fatter in the middle" oval shape is best for a puukko. Leave some room for the final shaping once the knife is assembled.
After the basic shape is done, it is time to assemble the handle on the knife. The blade should be taped up to protect it from glue and scratches ... and to keep you from getting cut.. Shape the front bolster piece fully and sand the front end smooth. You can't really work the front easily once it is on the knife. The end piece only needs the basic shape and a snug fitting slot to the tang. When the front Bolster/guard and end cap/block is ready, slide the bolster on the knife with a little epoxy in the joint, slide the handle on with epoxy in the hole, slide on the end block and clamp the knife tight while the resin dries. Use 1 hour or longer cure epoxy. Do NOT use 5 minute type, or you will have problems. Once the knife is in the clamp. wipe off any excess resin on the blade, and then clean off with denatured alcohol ( the best solvent for epoxy). Let cure overnight and take out of the clamps. Cut off the tang about 2-3mm past the end block and round over with a ball peen hammer. File to shape as needed and you are ready to do the final handle shaping. Use files and sandpaper to get the right shape and feel. Once it is right, sand to at least 400 grit. The handle can be oiled with linseed oil, treated with a wood finish like polyurethane or Minwax. or waxed with beeswax and hand buffed. The beeswax is a good and easily renewed finish. Just paint with melted beeswax, let cool a bit, and rub hard with an old tee-shirt.
A simple puukko sheath is just a leather "wrap" style sheath ( sometimes called a pocket sheath) that comes about half way to two thirds up the handle. The leather sheath can be oiled with Neatsfoot oil and then or waxed just like the handle.
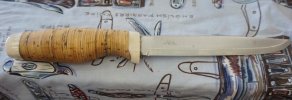
Attached is a photo of a birchbark puukko I did in December. The front and rear blocks are reindeer horn.
") ) I will be buying a ready-made blade as I suspect that trying to use a hand-hold gas blow lamp is not quite up to that task.
) I will be buying a ready-made blade as I suspect that trying to use a hand-hold gas blow lamp is not quite up to that task.")