Any tips on a flat and even file grind?

Joined
Sep 29, 2008
Messages
10,394
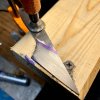
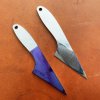
I'm prototyping some ideas and thought I should start with as simple a set of tools as possible. Cutting a primary bevel with a file felt very simple. Having spent some time roughing a bit of this out (it's nowhere near finished even roughly, view the picture with that in mind) I thought I could list what I've been doing and see if there are any tips or recommendations for adjusting things.

I started by bluing everything up with a sharpie and scribed a line 0.02" back from the rear side. I think that for a small single grind knife I could go thinner, but I didn't want to overshoot by much if at all. I then laid out a less critical but somewhat parallel line where I think the primary grind should end.

Work holding is an open question. I didn't have anything easily on-hand, so I put a screw in a 2x4 as a stop and a clamp on the other end. The 2x4 then went into a bench vise. I imagine there are far better ways to accomplish this and will happily take suggestions.

I started filing at a fairly steep angle and went until I was close to meeting the scribe line. I cleaned everything off, put some Tap Magic on (can't hurt right?), and started filing at a more in-between angle making my way up the primary grind. Periodically I would stop, card the file, wipe things down a little, and put some more blue on to make sure I was cutting what I thought I was cutting.

Now some questions. The grind is not flat. I can prove the grind is not flat because I went back and hit it with an extra coarse DMT stone for about 10 minutes. That's the "nice" scratch pattern you see. The curve is more pronounced on either end, the heel and the tip, but it is also slightly convex from the top to the edge. Is there a better way to be more "flat" right off the file? Or is this something I can only control for so much (save a jig) and I should plan on coming back with sandpaper and a flat reference?

Scribing and layout. The increments I'm measuring here are not very large. I went very light with a pair of calipers to set the edge line and didn't feel good about it in the slightest. Is there a better way to scribe or mark small distances? What about parallel offsets?

Material removal. I occasionally would wipe everything down and look at what was cut and where I felt I should be cutting next. Bluing everything back up occasionally helped with focus that, and helped keep me from cutting beyond the lines. With the two lines (top of primary grind line, edge line) I don't see how I could mess things up to a state where it isn't salvable as long as nothing has been cut past those lines and the file is still perpendicular. Am I wrong?

Any other general advice I'm happy to take as well.
40CAEC69-E488-4A40-A38B-116A698E7E8F.jpeg
 
If you are draw filing, the lines should be in parallel with the cutting edge

Ah, I understand. As I noted in the post the lines you are seeing most prominently in the picture are from an extra coarse DMT stone, not the filing.
 
I'm prototyping some ideas and thought I should start with as simple a set of tools as possible. Cutting a primary bevel with a file felt very simple. Having spent some time roughing a bit of this out (it's nowhere near finished even roughly, view the picture with that in mind) I thought I could list what I've been doing and see if there are any tips or recommendations for adjusting things.

I started by bluing everything up with a sharpie and scribed a line 0.02" back from the rear side. I think that for a small single grind knife I could go thinner, but I didn't want to overshoot by much if at all. I then laid out a less critical but somewhat parallel line where I think the primary grind should end.

Work holding is an open question. I didn't have anything easily on-hand, so I put a screw in a 2x4 as a stop and a clamp on the other end. The 2x4 then went into a bench vise. I imagine there are far better ways to accomplish this and will happily take suggestions.

I started filing at a fairly steep angle and went until I was close to meeting the scribe line. I cleaned everything off, put some Tap Magic on (can't hurt right?), and started filing at a more in-between angle making my way up the primary grind. Periodically I would stop, card the file, wipe things down a little, and put some more blue on to make sure I was cutting what I thought I was cutting.

Now some questions. The grind is not flat. I can prove the grind is not flat because I went back and hit it with an extra coarse DMT stone for about 10 minutes. That's the "nice" scratch pattern you see. The curve is more pronounced on either end, the heel and the tip, but it is also slightly convex from the top to the edge. Is there a better way to be more "flat" right off the file? Or is this something I can only control for so much (save a jig) and I should plan on coming back with sandpaper and a flat reference?

Scribing and layout. The increments I'm measuring here are not very large. I went very light with a pair of calipers to set the edge line and didn't feel good about it in the slightest. Is there a better way to scribe or mark small distances? What about parallel offsets?

Material removal. I occasionally would wipe everything down and look at what was cut and where I felt I should be cutting next. Bluing everything back up occasionally helped with focus that, and helped keep me from cutting beyond the lines. With the two lines (top of primary grind line, edge line) I don't see how I could mess things up to a state where it isn't salvable as long as nothing has been cut past those lines and the file is still perpendicular. Am I wrong?

Any other general advice I'm happy to take as well.

View attachment 1409635
You filing free hand ? Why you not make file jig ?
 
You filing free hand ? Why you not make file jig ?

I have not invested in a jig for a few reasons. First, that's another—although small—project that puts starting on a knife further down the line. Second, I don't see a clear benefit for using a jig when the primary grind generates a curve. The next prototype has a curve so I felt it better to start by hand off the bat. Third, I'm very new to physical prototyping. I know that I don't know what I'm doing. Intentionally slowing the pace down by not having a jig or other guide forces me to be more attentive to what is actually happening.

I could dig a powered belt sander out of the back but would I be learning as much if I did that?
 
I can’t imagine freehand filing a bevel or what I’d learn by doing so other than wasting time.

You do realize a filing jig will follow the curve of a blade and create a curved bevel right?
 
So, draw filing needs to be done slowly and with great care, if you want your work to be flat.
When you are draw filing, you should only pull towards yourself, lift the file, then replace it at the start. Make sure you are putting equal force down with each hand and pull towards yourself again.

This is not a fast metal removal technique, it's a smoothing technique that you use after you have roughed out your blade's bevels.

If you are using only hand tools, you just have to be ok with everything taking a long time.
 
I can’t imagine freehand filing a bevel or what I’d learn by doing so other than wasting time.

You do realize a filing jig will follow the curve of a blade and create a curved bevel right?

Are there any jigs setups you recommend? Most of the ideas I’ve found which are small projects essentially look like an Edge Pro. Since the bevel is a lot larger than an edge and the primary grind doesn’t revolve around a fixed center point I’m having trouble seeing how it would be an even grind unless I moved the knife around at the same time as the file. In which case, why not only move the file?
 
So, draw filing needs to be done slowly and with great care, if you want your work to be flat.
When you are draw filing, you should only pull towards yourself, lift the file, then replace it at the start. Make sure you are putting equal force down with each hand and pull towards yourself again.

This is not a fast metal removal technique, it's a smoothing technique that you use after you have roughed out your blade's bevels.

If you are using only hand tools, you just have to be ok with everything taking a long time.

I spent about 90 minutes and figure it’s maybe halfway done. I’m definitely feeling the slowness :D I’ll pay closer attention to the pressure, I certainly was favoring the handle more than the tip. Thank you!
 
You can make a filing jig with free wooden scraps, some screws, a few hose clamps.
Super super cheap

If you created the filing at the heel by draw filing, it's super super deeply gouged. that will be huge work to sand out.
You need to clean the file with every stroke.
chalk it, use some sort of brush, I prefer stiff nylon brushes to file cards, a brass rod also works.
 
i think its called the gough jig. there are tutorials on youtube. easy to make, and your bevels will be flat.
 
You need to clean the file with every stroke.
chalk it, use some sort of brush, I prefer stiff nylon brushes to file cards, a brass rod also works

Hmm, chalk doesn't seem like a good mix with cutting fluid. I was cleaning frequently but I was definitely not cleaning every stroke. I'll experiment with this, thanks!

i think its called the gough jig. there are tutorials on youtube. easy to make, and your bevels will be flat.

This is the most common jig I've found. Maybe I am not picturing it right, but won't a single fixed point jig create a variable bevel as the file moves down the knife, if the knife is tangent to the circle that fixed point creates?
 
i think its called the gough jig. there are tutorials on youtube. easy to make, and your bevels will be flat.

"greenpete" is the first time I've seen that filing jig. Aaron show a nice one, Fleming shows a nice one. Even Tom Lipton did an interesting video on one.
 
Is there a better way to be more "flat" right off the file?
Practice....Don't forget, we humans were making metal machines that required tight tolerances for how many years by hand without the benefits of power tools.

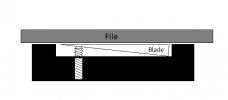
Here's a simple jig you could make to help prevent the file from rocking at the end of each stroke and keep the surface flat. Untitled.jpg
 
Hmm, chalk doesn't seem like a good mix with cutting fluid. I was cleaning frequently but I was definitely not cleaning every stroke. I'll experiment with this, thanks!

Absolutely right.
You use files dry.
Cutting fluid makes the chips stick to the file. You never oil a file.

Clean them off.
Simple green and some low heat will clean and dry before it rusts.
Or use brake clean spray if you have that.
 
Dry file and more even pressure. My low spots on the heel and tip are showing clearly. I brought it back home and hit it on the DMT stone again, everything quickly flattened out and showed an additional low spot near the middle of the edge. Mic says the flat edge bits are 0.016" and the low spots are about 0.013". I'll pay more attention on the next one.

IMG_9105.jpeg

Practice....Don't forget, we humans were making metal machines that required tight tolerances for how many years by hand without the benefits of power tools.

Here's a simple jig you could make to help prevent the file from rocking at the end of each stroke and keep the surface flat. View attachment 1409977

This idea is great, thank you! I'm going to take a look at what I have on hand and see if I can't come up with something reasonable.
 
Back
Top