- Joined
- Feb 3, 2001
- Messages
- 32,359
This procedure is for entertainment, and informational purposes only. I in no way advocate the disassembly of any Benchmade product, disassembly of any Benchmade product may void your warranty and you do so at your own risk. That being said lets get on with it
Before beginning this procedure prepare a clear work area and set out a white sheet to work on, and make notes as to the location of the various parts you remove.
Tools needed: #6 & #8 Torx Screwdrivers, Tweezers, two pairs of Needle Nose Pliers, and cleaning supplies.
Disassembly Directions
Use removable thread lock on all removable screws.
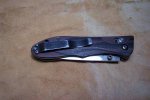
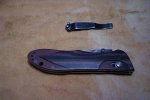
1. Use a # 6 Torx screwdriver, (available at Sears) to remove the pocket clip.
2. Use the same driver to remove the two screws at the rear of the handle, this secures the plastic spacer between the liners, (be careful the spacer has two little nibs that float in a set of slots in the liners)
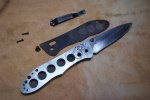
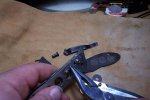
3. Next use a #8 Torx screwdriver remove the pivot pin screw, and than use the screwdriver to push the pin out of the scales, and liners, (if you have a problem pushing the pivot pin out, pull back on the Axis lock while pushing the pin out). There are two nylon washers on either side of the blade, be careful not to lose them.
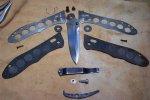
4. Remove the G-10 scales they will lift right off easily.
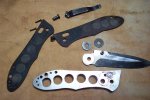
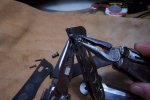
5. Underneath youll see the Omega springs that keep the Axis lock in position, gently pull the springs from the liners. Next slide the spring off of the Axis lock bar. Repeat this on the opposite side, once again being careful not to lose the small parts.
6. Now using two pair of needle nose pliers grab the Axis lock thumb studs and loosen in a counterclockwise direction. Remove the Axis lock from the Opposite side. (When you do this the liners may come apart in your hands, be careful not to lose the stop pin located between the liners)
Assembly Directions
7. Sandwich the stop pin between the left & right hand liners, pinch the scales together and insert the Axis lock with the shaft thru the corresponding slot.
8. Screw the tapped side of the axis lock onto the threaded stud.
9. Attach the Omega springs to the Axis lock bar, and then tighten the thumb studs.
10. Insert the spacer between the liners, remembering to position the nibs on the spacer with the slots at the rear of the scale.
11. Install the two scales and secure with the two Torx screws.
Now youre ready for the pivot pin, nylon washers and blade
12. Insert the pivot pin partway thru the right scale, (making sure the flat side of the pivot pin lines up with the flat in the scale), and liner. Leave enough of the pivot pin showing in the center to put the nylon washer on with a pair of tweezers, (if you have a hard time lining up the nylon washer with the pivot pin, use the Torx screwdriver to help align the washer).
13. Next pull back on the Axis lock and insert the blade, while at the same time pushing the pivot pin further into the blade pivot hole, (you may have to wiggle the blade some to get the pivot pin in the rest of the way), Leave enough room to insert the last nylon washer. If you have a hard time aligning the last washer see step 12.
Adjust the tension on the pivot pin, and your done.
This procedure is written by The Mad Hungarian and is Copy Righted, and not to be reprinted or used outside of the context of BladeForums.com

Before beginning this procedure prepare a clear work area and set out a white sheet to work on, and make notes as to the location of the various parts you remove.
Tools needed: #6 & #8 Torx Screwdrivers, Tweezers, two pairs of Needle Nose Pliers, and cleaning supplies.
Disassembly Directions
Use removable thread lock on all removable screws.
1. Use a # 6 Torx screwdriver, (available at Sears) to remove the pocket clip.
2. Use the same driver to remove the two screws at the rear of the handle, this secures the plastic spacer between the liners, (be careful the spacer has two little nibs that float in a set of slots in the liners)
3. Next use a #8 Torx screwdriver remove the pivot pin screw, and than use the screwdriver to push the pin out of the scales, and liners, (if you have a problem pushing the pivot pin out, pull back on the Axis lock while pushing the pin out). There are two nylon washers on either side of the blade, be careful not to lose them.
4. Remove the G-10 scales they will lift right off easily.
5. Underneath youll see the Omega springs that keep the Axis lock in position, gently pull the springs from the liners. Next slide the spring off of the Axis lock bar. Repeat this on the opposite side, once again being careful not to lose the small parts.
6. Now using two pair of needle nose pliers grab the Axis lock thumb studs and loosen in a counterclockwise direction. Remove the Axis lock from the Opposite side. (When you do this the liners may come apart in your hands, be careful not to lose the stop pin located between the liners)
Assembly Directions
7. Sandwich the stop pin between the left & right hand liners, pinch the scales together and insert the Axis lock with the shaft thru the corresponding slot.
8. Screw the tapped side of the axis lock onto the threaded stud.
9. Attach the Omega springs to the Axis lock bar, and then tighten the thumb studs.
10. Insert the spacer between the liners, remembering to position the nibs on the spacer with the slots at the rear of the scale.
11. Install the two scales and secure with the two Torx screws.
Now youre ready for the pivot pin, nylon washers and blade
12. Insert the pivot pin partway thru the right scale, (making sure the flat side of the pivot pin lines up with the flat in the scale), and liner. Leave enough of the pivot pin showing in the center to put the nylon washer on with a pair of tweezers, (if you have a hard time lining up the nylon washer with the pivot pin, use the Torx screwdriver to help align the washer).
13. Next pull back on the Axis lock and insert the blade, while at the same time pushing the pivot pin further into the blade pivot hole, (you may have to wiggle the blade some to get the pivot pin in the rest of the way), Leave enough room to insert the last nylon washer. If you have a hard time aligning the last washer see step 12.
Adjust the tension on the pivot pin, and your done.
This procedure is written by The Mad Hungarian and is Copy Righted, and not to be reprinted or used outside of the context of BladeForums.com