Beginner - Help needed on getting past a "rustic look" to knives

Joined
Jul 2, 2009
Messages
1,176
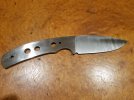
Hey all – I have been making fairly quick personal progress improving in my hobby knife making over the last month or so, but I continue to struggle getting past what I will call a quite “rustic look”. I have made huge personal strides in most everything outside of this area. I have progressed from totally uncomfortable/useless knives to comfortable/functional (but rustic knives), but the progress seems to have really slowed. Any suggestions or advice on how to get over this plateau for a beginner? I do and love rustic knives but would like to be capable of making something beyond this over time. Any suggestions on easy adjustments to materials or design/finish? I know much of this will come in time, but any help would be great. Thanks all.


(FYI - I have used both the knives in the photos so not all the scratches are my finish work but the overall look is the same rustic look).
 
Look at the knives you like best. You'll notice flat or uniformly concave bevels, a crisp line between flats and bevels, good fit and finish on the handles or scales. Well designed knives have a "flow" about their lines, and they LOOK comfortable to hold and use.

Add more radius to your handles so they fit your hand. Whittle with one for an hour and see where the blisters come up. Sand or grind to a finer, flatter, more uniform finish. Watch nick wheelers YouTube videos on hand sanding.

And practice, practice, practice.
You'll get there...
 
In my hobbyist opinion what you call rustic, I call unfinished. That is not a negative, can’t remember who said it but when you quit working on a knife issue is when the finish level and your patience have had enough. Make more knives and they will get less rustic. Take your grinds higher, and have fun. James
 
I agree with James above, I would say you have the skill, you just need to spend some more time finishing. Watch a few handsanding videos (Nick Wheeler, Aaron Gough, Simple Little Life) and really get a clean 400 grit finish and even bevels, that will really make things come together.

Also work on getting the handles sanded to at a minimum 400 grit and play with finishes like Tru oil or wax and buffing, etc until you find what works for you.

Most importantly experiment and take in as much knowledge as you can from YouTube and here on the forum, etc
In my hobbyist opinion what you call rustic, I call unfinished. That is not a negative, can’t remember who said it but when you quit working on a knife issue is when the finish level and your patience have had enough. Make more knives and they will get less rustic. Take your grinds higher, and have fun. James
The comment about patience is so true (expecially now when I am excited to try out the knife). Making even grind lines is a struggle for me. Going right I am good - going left things fall apart real quick.
 
You don't talk about your tools, materials, or process.
Looking at the bottom knife in the first picture, it is a nice basic design, but could look better. The flats are scratched, the bevels are uneven, and the plunge is not crisp and very close to the handle.
I would start with the profiled stock, measure and drill the pin holes. Scribe two lines down the edge about 0.04" apart. Mark where you want the plunges to start. Grind the bevels to even height reaching the scribe lines. Take your time and work to get them even.
Before you glue up the handle decide if the flats are truly flat and to the desired grit. This can be improved on a granite plate by hand sanding, or more easily with a disc grinder.
If you have trouble getting the bevels as even and crisp as you like on the grinder, you can finish with EDM stones, and hand sanding.
Don't jump ahead and start gluing because you are out of patience for the day. Take a break and look again to see if it is good enough.
 
"Don't jump ahead and start gluing because you are out of patience for the day. Take a break and look again to see if it is good enough."
Agreed.

As a newbie myself take what I say with a grain of salt.
First and foremost to me is the design. I probably spend as much time thinking about what I want it to look like as I do making it.
I draw it out in pencil, stare at it, erase parts and draw again. In my opinion the pins are too close to the ends of the scales
Truthfully I might spend too much time on design but it helps solidify in my mind what the finished product is supposed to look like.
Second freehand grinding is tough for me. I have to grind a little, check the lines, grind a little more, check the lines, ect.
I've found a jig helps immensely, especially with regards to establishing the plunge lines. Symmetry is crucial.


One I'm making for a friend.
 

Attachments

  • 20210715_180914.jpg
    20210715_180914.jpg
    61.6 KB · Views: 31
try starting with the left hand grind if that's the one you're struggling with. free hand grinding is a muscle memory task, so it takes a lot of time for your body to learn. keep working at it.
i often use hand sanding to even out bevels, it's slow but i find it gives me more control.
it looks like you buffed those from a fairly low grit machine finish? maybe try one with a hand sanded satin finish to get a feel for different scratch patterns and how they change as you work.
also use those knives and pay attention to what you like/dislike about them

and remember there is a lot to learn that is subtle and personal. a component of all this is developing a style and that takes time
This is great advice with the hand sanding and off hand starts. I can actually keep a really clean grind line up untill around 180grit. After that things always seem to get a little messy for me with the finer grits and clean scandi grinds quickly turn into a convex. Not sure why... Thanks for the help.
 
"Don't jump ahead and start gluing because you are out of patience for the day. Take a break and look again to see if it is good enough."
Agreed.

As a newbie myself take what I say with a grain of salt.
First and foremost to me is the design. I probably spend as much time thinking about what I want it to look like as I do making it.
I draw it out in pencil, stare at it, erase parts and draw again. In my opinion the pins are too close to the ends of the scales
Truthfully I might spend too much time on design but it helps solidify in my mind what the finished product is supposed to look like.
Second freehand grinding is tough for me. I have to grind a little, check the lines, grind a little more, check the lines, ect.
I've found a jig helps immensely, especially with regards to establishing the plunge lines. Symmetry is crucial.


One I'm making for a friend.
Man that blade looks really clean - great work. I have made it a point to try to learn free hand but it's a challenge for a beginner. May need to try out a jig at least to establish a clean angle at the start.
 
the belt bunches up and moves as you're grinding which may be part of the problem? I'm not good at machine finishes, so can't offer much advice. i do the best i can on the machine then go to hand sanding
 
Do yourself a favor and go to Chris Crawford website to the DVD section and buy a video on how to make the kind of knfe you are interested in and watch the video several times and then go and do what you learned.

No to be to critical but you are in need of watching an acomplished knifemaker do what they do best.

You will shave years off of your learing curve.
 
Big plus one to EDM stones. You need the softer kind, as I have found the harder stones leave unsightly gouges. In my experience, I need to run up to 1200 on the stones and make the final passes with 400 grit rhynowet with a hard backing to get a decent finish.

If you start with 120 or 220 sandpaper, you'll quickly wash the lines away and it will be very difficult to get them back. I have also found that using a jig helps me get flatter bevels, which helps tremendously when hand sanding (also try going for a clean 400 grit finish on the grinder before moving to hand sanding. Going from say 60 or 120 will be a miserable experience). I'm just no good at free hand grinding, but it is worth your time to learn how.
 
A glass platen made a big difference in my flat grinds as did using a bevel jig to start my bevels and get them established. Mild steel platens do not stay flat. For a machine finish, a scotchbrite (or other non woven abrasive) belt works well and hides some of the left over belt scratches for a user finish. These belts have some give to them, so you won't get crisp grind lines as much. A cork belt helps keep the crisp lines better I have found. I have been using F1 and S2-32 felt on my platen to soften out and put a slight convex grind after I do a flat grind. The hard felt really cushions the belt splice jump and gives a much nicer finish.

It looks like you buffed a satin finish, which still had deep scratches left over. EDM stones or handsanding would work, but you may want to make sure you get all of the deep scratches out when you go to the next belt. Offset the knife a bit and you will quickly see the scratches left by the coarser belts. Grinding perpendicular to the edge 100% of the time will allow really deep scratches to hide and then come out again when they are buffed. I try to angle the blade at the 120 and 220 grit belts and get the vast majority of the deep scratches out at that stage. If hand sanding, start lower than you think; it will save a lot of time starting at say 80 grit hand sanding than at 220 grit hand sanding if you have deeper scratches left over.
 
Wow you guys are great! Thanks for taking the time to share your knowledge and help. This forum is incredibly helpful for beginners like myself who are just getting started. I have a 95% digital job, so knife making on the weekends has helped bring some real balance to my life. I have more 1084 arriving today so hopefully the next several I make will continue to improve with the knowledge you have shared. 😀
 
Download, bookmark, print a few photos of knives made by other makers that knock it out of the park for you.
Use these images for inspiration. Though copying the MASTERS is an accepted historical way to learn a trade or an art you don't need to copy in its entirety just concentrate on certain aspects until you get it right. Patience and practice and a trained eye will set you free - but be aware - you can't aspire to greatness if you don't recognize greatness over mediocrity - You are on a good start.
 
Last edited:
Your mindset everytime you work or practice on a knife can't be "good enough" it has to be "can I make it better" that goes for every little detail. Once you get in the habit of asking yourself this simple question the "how" starts to become easier to answer.
 
as something of a beginner myself, I've found it helpful to focus on aspects of knife making which are particularly difficult, (#1 on the list is crisp bevel junctions, symmetry and corners) and build one knife that has a lot of whatever the difficulty is. Right now I'm working on a knife that has a swedge which is crowned, a crowned choil and all sorts of fiddly little things that will look terrible if they're not close to perfect. Hours of filing, sanding and making little sanding contraptions to get into the nooks and crannies. Teaching one's self takes a lot of patience and, depending on what you want to achieve, it can drive a person nuts!

some, if not most, of the advice I've heard over the years is to make lots of knives! It's a nice idea, but if you don't address your shortcomings, then you'll have made lots of knives with the same mistake repeated over and over. On the other hand, you don't want to make one knife that takes a whole lifetime, unless you are 100% committed to the design. So, for me, it's a matter of balance- I'll make a fairly simple knife, (for myself or someone else who won't be letting go of it) that scratches the itch of getting a knife made, and then take my time and focus on the quality of my work with another.

for me, having multiple knives on the go at the same time- at different stages of completeness- seems to work really well. When patience with 600 grit paper an a bicycle spoke runs out, I'll move to another knife and hog off 30% of the material with a 36 grit belt. Back and forth, and what I'm noticing is that it's harder to become frustrated, and easier to concentrate on working.
 
Back
Top