- Joined
- Mar 13, 2006
- Messages
- 13,878
Weve had a little cold snap here at Fiddleback. I just keep telling myself that Andy just doesnt want us to get soft. The thing that is important is the small number on the bottom of my watch. 27.2
.that would be the temperature around the sanding table.

Chris was even pondering if what we were seeing wassleet or freezing rain this morning

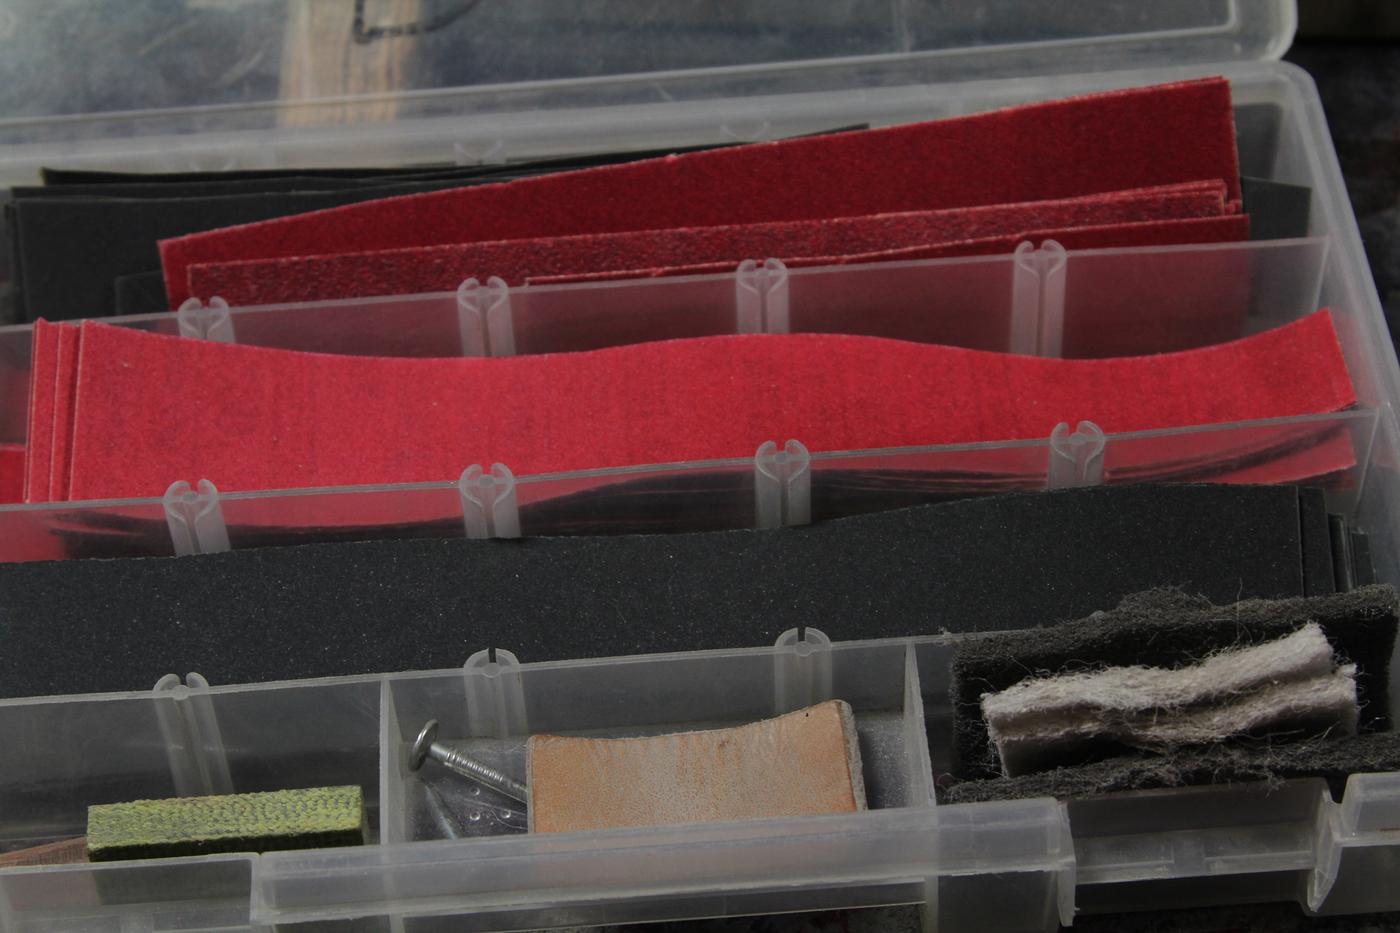
I get quite a few emails/PMs regarding minor sanding issues so i took a photo of my sanding box to give a visual explanation that i sometimes feel i am not describing very well in text.
Here is what is going on in the photo .
Top section
This is where we start w/ the straight burlap scales. Skip to the middle section if you have wood scales or a bolster & wood combo.
150 grit in red and 600 grit in gray. There is a piece or 2 of 80 grit but ignore those unless you know what you are doing. Please!
Middle section
Here I have 220grit. This is where we start all the wood scales and bolster/wood combos. This is also the second step on the burlaps.
Bottom section
This is the 400grit. This is last step of sandpaper on the scales. Hopefully, If fine scratches just wont go away head back to the Top section and grab the 600grit.
Bottom right cubby
These are the scotch brite pads that are often mentioned when sanding advice is given. The gray is the next step after the 400 grit followed by the white to finish off your sanding. At this point all you have to do is add Howards Feed & wax for that fresh from the factory finish. Please allow approx. 15 minutes for the Howards to soak in and wipe w/ a clean cloth or paper towel.. take a break because you are done!!
Bottom middle cubby
This is my leather backer. We use these to make sure the pins do not become proud while sanding. This is an important piece of kit. The pins are not needed unless you want to volunteer to come and help us sand the tops and fronts before glue up. Dont be shy we are always looking for help.
Bottom left cubby
This is a small flat piece of evergreen burlap. Dont worry about this. If you have a problem that involves using this i am going to recommend you send it in to me.

If you made it this far here are some pics to look at!


We have abandoned the idea of attaching the machete scales w/ screws & have opted for flared tubing.


Im going to be posting these soon for sale.


Chris was working on these before i left today..Im going to post more of Chris, Allen & Johns work when i get some time.

Stay tuned!!

Chris was even pondering if what we were seeing wassleet or freezing rain this morning

I get quite a few emails/PMs regarding minor sanding issues so i took a photo of my sanding box to give a visual explanation that i sometimes feel i am not describing very well in text.
Here is what is going on in the photo .
Top section
This is where we start w/ the straight burlap scales. Skip to the middle section if you have wood scales or a bolster & wood combo.
150 grit in red and 600 grit in gray. There is a piece or 2 of 80 grit but ignore those unless you know what you are doing. Please!
Middle section
Here I have 220grit. This is where we start all the wood scales and bolster/wood combos. This is also the second step on the burlaps.
Bottom section
This is the 400grit. This is last step of sandpaper on the scales. Hopefully, If fine scratches just wont go away head back to the Top section and grab the 600grit.
Bottom right cubby
These are the scotch brite pads that are often mentioned when sanding advice is given. The gray is the next step after the 400 grit followed by the white to finish off your sanding. At this point all you have to do is add Howards Feed & wax for that fresh from the factory finish. Please allow approx. 15 minutes for the Howards to soak in and wipe w/ a clean cloth or paper towel.. take a break because you are done!!
Bottom middle cubby
This is my leather backer. We use these to make sure the pins do not become proud while sanding. This is an important piece of kit. The pins are not needed unless you want to volunteer to come and help us sand the tops and fronts before glue up. Dont be shy we are always looking for help.
Bottom left cubby
This is a small flat piece of evergreen burlap. Dont worry about this. If you have a problem that involves using this i am going to recommend you send it in to me.

If you made it this far here are some pics to look at!


We have abandoned the idea of attaching the machete scales w/ screws & have opted for flared tubing.


Im going to be posting these soon for sale.


Chris was working on these before i left today..Im going to post more of Chris, Allen & Johns work when i get some time.

Stay tuned!!
Last edited:

