You have blocks, so you will have to go with the size and shape you have, but stabilizing is required to use them for a knife handle.
If you can get a board of Black Palm from your supplier , get the thickest and widest board available. In black palm, the biggest you can normally ever find is around 1.5X5-6". Look at the board, The tubes that make up the wood grain are dark and light bundles. They run parallel to the board, and only show the neat look on the end, The sides are just stripes. If the board is big enough, you could cut blocks of end grain and use those with their spotted look. Nothing wrong with that.
But, if you want to get a really unique look, here is how to cut the board so it shows a fantastic "fish scale" pattern in matching scale sets. As in making damascus, the bolder the pattern, the more waste is involved, but the results are more valuable.
Cut the board into two equal pieces. Mark the ends of both A and B to show the direction of the grain. You should now have two boards with the same grain direction and orientation.
Set the table saw blade at 30° and the slide fence at 45°. This will make slices cut at two angles, giving you a longer and wider scale. Additionally, it makes the end grain show as teardrops or small heart shapes. The angles may need to be adjusted to get the best size slices. Only cut the excess off the end to get to what will be the first slice. Flip the board and cut the other end off this board the same way - to make parallel ends.
Switch the slide fence to 45° the other way ( Depending on your saw that will be turning it to 135°, or 45° past the 0° mark). Leave the blade angle where it is. Take the second board and cut like the first...going only far enough to get the ends parallel.
You should now have a left and a right board with oppositely angled ends and bevels.
Send these two boards to the stabilizer (WSSI for me).
When they come back, set the saw up the same as before, and make a few slices from each board. I make about 3/8" thick slices. Don't cut up the whole board yet.
Now, take a left and a right slab and place them together. You will see that the "scales" go the same direction on both sides this way. Look at the top of the pair. The stripes make a herringbone pattern to the top and bottom views. This will give you a stunning handle. It is really nice for fishing knives and kitchen blades.
The slices are trapezoidal, and have beveled edges, but this will all be trimmed off and ground away when making the handle. I only cut the whole board up once I am sure that I like the pattern and size I am getting. If necessary, tilt the blade more to get wider slices. I also usually cut slices in different thicknesses, for knives from folders to hunters.
Additionally, you can take a set of scales, sand the inside of each flat, and epoxy them together as a solid block. Trim the block square after the epoxy has cured....... and you have a stunning block for hidden tang blades.
If making solid blocks, cut the slices at the thickness needed to make the size block wanted.
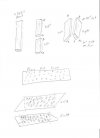
I'm going to try and make a sketch of this, as it sounds a lot worse in words, than it really is.