fishface5
Gold Member
- Joined
- Feb 3, 2001
- Messages
- 9,812
(Im not putting this in the CBM thread because its not done yet, and because although for the most part it worked great in one respect I want to share it as a cautionary tale, and also this is filled with long-winded musings).
So my ideal EDC would have a few main characteristics:
1 3.5 blade of decent steel
2 Wide & flat-ground for slicing
3 Pointy but strong tip
4 blade somewhat thick, over 1/8 but probably not over 3/16
5 Tip at or below midline, as opposed to a big-belly/skinning profile
6 Axis or button-lock so no danger of cutting oneself when closing the blade
7 Full liners for strength
8 Good blade-to-handle ratio
9 comfortable in multiple grips
10 non-metallic scales (I love titanium handles, but not when very hot or cold)
11 a flipper or choil that prevents the index finger from getting cut if the lock fails and the blade closes
12 a solid hand-filling handle
13 but not super-bulky in the pocket
14 a wave, or wave-able
15 balances at index finger
When you write them out thats a lot! Anyway, I have never found a knife that met all of these. The BM Ares came close buy didnt feel quite right in my hand. Then I saw the HK, read the good reviews, and thought lets try it. So I ordered one online. When it arrived I was very pleased with it . . . except it was a bit short for my hand. That was also why I had to sell my ZT 801, a great knife that met most but not all of my criteria above.
Cant lengthen a handle though . . . but unlike the ZT, with the HK I realized there was room in the index choil to remove some of the steel in the liners near the blade tang, making more finger-room on the handle! Dare I try? I have ruined many a cheaper knife experimenting on various mods . . . but a few have succeeded, so lets throw caution to the wind, or more accurately my HK to the belt-grinder.
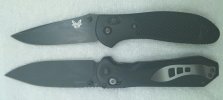
I did it and the result is fantastic! It is SO much more comfortable in hand for me, and I think it looks better now too *except for the grungy scales at choil - see below), and it now meets criteria 9 as well as 1-8, 10, 13 and 15 above. Once I make slightly thicker handle scales it will meet #12 as well. I attached one before and a couple after pics. Some modifications were functional, some were esthetic, and some were both:
- Carve away liners/scales to allow index finger closer to blade
- Reshape index cutout and blend it to continue coffin flow throughout handle
- Reduce width of guard
- Slightly change lines of top of handle to be more angular & match overall design
- Slightly reduce/contour the jimping hump above the axis lock, so it flows with the design a bit more w/o reducing strength
- change out clip to one that didnt annoy my hand as much (modified a Kershaw clip; need to darken it somehow)
- slightly widen the bevel around the axis lock for better access
- polish the scales at the edges but keep texture in the middle
- file jimping notches into the scales to match the liners
- sand the edges of the liners so that all the stainless steel is exposed on the edges
- put a swedge on the blade, and slightly grind it to more of a drop-point (the tip is still strong but now it is POINTY)
Now for the cautionary part: I was careful when reshaping the liners not to remove too much and expose the blade tang. BUT in contouring the scales by the index finger cutout, to give easier access to the thumbstuds, I did not realize that the scales are hollowed out for the axis springs. Duh. So I sanded right into the hollows, exposing them from the outside. I was able to fix that with some black-dyed epoxy, but It doesnt look or feel perfect. Since I will be replacing the scales anyway I will fix that, but its a bit tricky because there is very little thickness between the hollow and the end of the modified scale. I may have to do aluminum bolsters just to have enough structural integrity there.
Once finally done I will post it in CBM. Hopefully next weekend, hopefully! The big challenge will be figuring out how to center the holes in the scales for drilling - the holes in the liners are D shaped not round, so its hard to use the liners as a template. Anyone have any ideas for that?
So my ideal EDC would have a few main characteristics:
1 3.5 blade of decent steel
2 Wide & flat-ground for slicing
3 Pointy but strong tip
4 blade somewhat thick, over 1/8 but probably not over 3/16
5 Tip at or below midline, as opposed to a big-belly/skinning profile
6 Axis or button-lock so no danger of cutting oneself when closing the blade
7 Full liners for strength
8 Good blade-to-handle ratio
9 comfortable in multiple grips
10 non-metallic scales (I love titanium handles, but not when very hot or cold)
11 a flipper or choil that prevents the index finger from getting cut if the lock fails and the blade closes
12 a solid hand-filling handle
13 but not super-bulky in the pocket
14 a wave, or wave-able
15 balances at index finger
When you write them out thats a lot! Anyway, I have never found a knife that met all of these. The BM Ares came close buy didnt feel quite right in my hand. Then I saw the HK, read the good reviews, and thought lets try it. So I ordered one online. When it arrived I was very pleased with it . . . except it was a bit short for my hand. That was also why I had to sell my ZT 801, a great knife that met most but not all of my criteria above.
Cant lengthen a handle though . . . but unlike the ZT, with the HK I realized there was room in the index choil to remove some of the steel in the liners near the blade tang, making more finger-room on the handle! Dare I try? I have ruined many a cheaper knife experimenting on various mods . . . but a few have succeeded, so lets throw caution to the wind, or more accurately my HK to the belt-grinder.
I did it and the result is fantastic! It is SO much more comfortable in hand for me, and I think it looks better now too *except for the grungy scales at choil - see below), and it now meets criteria 9 as well as 1-8, 10, 13 and 15 above. Once I make slightly thicker handle scales it will meet #12 as well. I attached one before and a couple after pics. Some modifications were functional, some were esthetic, and some were both:
- Carve away liners/scales to allow index finger closer to blade
- Reshape index cutout and blend it to continue coffin flow throughout handle
- Reduce width of guard
- Slightly change lines of top of handle to be more angular & match overall design
- Slightly reduce/contour the jimping hump above the axis lock, so it flows with the design a bit more w/o reducing strength
- change out clip to one that didnt annoy my hand as much (modified a Kershaw clip; need to darken it somehow)
- slightly widen the bevel around the axis lock for better access
- polish the scales at the edges but keep texture in the middle
- file jimping notches into the scales to match the liners
- sand the edges of the liners so that all the stainless steel is exposed on the edges
- put a swedge on the blade, and slightly grind it to more of a drop-point (the tip is still strong but now it is POINTY)
Now for the cautionary part: I was careful when reshaping the liners not to remove too much and expose the blade tang. BUT in contouring the scales by the index finger cutout, to give easier access to the thumbstuds, I did not realize that the scales are hollowed out for the axis springs. Duh. So I sanded right into the hollows, exposing them from the outside. I was able to fix that with some black-dyed epoxy, but It doesnt look or feel perfect. Since I will be replacing the scales anyway I will fix that, but its a bit tricky because there is very little thickness between the hollow and the end of the modified scale. I may have to do aluminum bolsters just to have enough structural integrity there.
Once finally done I will post it in CBM. Hopefully next weekend, hopefully! The big challenge will be figuring out how to center the holes in the scales for drilling - the holes in the liners are D shaped not round, so its hard to use the liners as a template. Anyone have any ideas for that?
Attachments
Last edited: