-
The BladeForums.com 2024 Traditional Knife is available! Price is $250 ea (shipped within CONUS).
Order here: https://www.bladeforums.com/help/2024-traditional/
You are using an out of date browser. It may not display this or other websites correctly.
You should upgrade or use an alternative browser.
You should upgrade or use an alternative browser.
Cable Damascus
- Thread starter Folsoml
- Start date


Stacy E. Apelt - Bladesmith
ilmarinen - MODERATOR
Moderator
Knifemaker / Craftsman / Service Provider
- Joined
- Aug 20, 2004
- Messages
- 38,468
Your welding skills are very good.
I would suggest you work on your blade/handle shape and fit and finish more now.
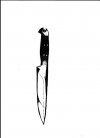
The knife shown looks sort of cool for a pirate costume, but not very good for a user or for hunting.
I would recommend you look at some photos of knives and pick one by an accomplished maker. print out the photo, and make a knife roughly the same shape. This will teach you to form curves the way you ant them to go, not where the steel wants to move on its own.
I would suggest you work on your blade/handle shape and fit and finish more now.
The knife shown looks sort of cool for a pirate costume, but not very good for a user or for hunting.
I would recommend you look at some photos of knives and pick one by an accomplished maker. print out the photo, and make a knife roughly the same shape. This will teach you to form curves the way you ant them to go, not where the steel wants to move on its own.
Stacy E. Apelt - Bladesmith
ilmarinen - MODERATOR
Moderator
Knifemaker / Craftsman / Service Provider
- Joined
- Aug 20, 2004
- Messages
- 38,468
I appreciate your taking the critique in the manner it was meant. I want to emphasise that I wasn't criticizing your efforts, just the final shape and some blade features. I think the knife shows serious skills. They just need a little refining.
I will point out a few places it could use some improvement:
1) The overall blade shape is what happens when you forge a tapered tip and the bevels in without pre-curving the bar, or correcting the rise on each heat. By curving the bar down in a banana shape, the tip will rise as the bevels are shaped and end up straight.
2) The transition from the edge to the handle is called the ricasso. Try and make a more defined transition with a small flat area before the handle. On this blade the problem was accentuated by the blade having a bulge in the center and reducing toward the ricasso. If the blade had a normal edge shape, the transition would have been more pronounced.
3) The edge sort of looks like it was just filed on ( including file marks). The whole bevel should taper toward the edge and only the actual cutting part be sharpened.
4) Nothing terrible wrong with the handle, but a little less palm swell, and more rounding would refine the shape. Your fit of the bolsters is very good. It looks like the handle and especially the fittings needed more sanding before polishing. I probably would have made the butt bolster a little shorter and had it drop down in a bird's head.
The best way to get the bevels looking more "crisp" is to file/sand/grind them flat to the spine after forging. Use a flat platen or a flat block backig your sandpaper. If they aren't flat, the whole knife will be off. Leave the edge at about .030" before HT and then re-sand the bevels after HT to end up arund >005-.010". That is what gets sharpened. By having the bevels flat, the edge sharpening line will be more straight.
The best way to get a knife to come out right is to start with a drawing. Use a photograph of a similar knife if you can't draw. Mark lengths and features, and plan on how you will get the final shape to come out right.
When drawing the knife on paper and in shaping it in steel - to get the blade to look more "normal", start with a straight edge. Lift the tip curve up slowly. You can take more off ... but can't put any back on. Blades only rarely need a bulge in the middle of the edge. Normally, the blade is fairly straight for most of the blade and then the tip rises, the spine drops, or both, to form the blade shape. A slight taper from the ricasso to where the tips starts forming is OK, but try and keep it small.
Imaging your knife with the blade straightened out and the width of the blade at the ricasso being the same as the middle - That would be one heck of a fighter.
In reference to my first comments:
A golfer came up to the pro with a gorilla dressed in golfing clothes. He told the pro he wanted to hire him to give the gorilla a few pointers. They went out to the first green where the gorilla teed up his ball, selected a driver, and smacked a 400 yard drive that landed 1 foot from the flag The pro looked at the man and said, "I don't know what I could teach this gorilla!". The man responded, "Well, you could start by teaching him to putt."
I really do appreciate any and all help I can get. I gave the wrong impression in the "I dropped hot 1095 in a water bucket" thread.
It's funny that you say the knife would look good as a pirate costume. I saw a picture of a pirate knife and was actually making this one to look like that. Most all of the knives I've made so far are just for looking-at anyway, so like you said, I need to work on the fit and finish of things.
It's funny that you say the knife would look good as a pirate costume. I saw a picture of a pirate knife and was actually making this one to look like that. Most all of the knives I've made so far are just for looking-at anyway, so like you said, I need to work on the fit and finish of things.
- Joined
- Jul 7, 2013
- Messages
- 2,614
Good looking welds on the cable. Did you forge it out by hand?
Stacy E. Apelt - Bladesmith
ilmarinen - MODERATOR
Moderator
Knifemaker / Craftsman / Service Provider
- Joined
- Aug 20, 2004
- Messages
- 38,468
I will post a photo of your knife straightened out later tonight. It makes a pretty good looking knife.
Good looking welds on the cable. Did you forge it out by hand?
I did. I heated the cable up to melt out any oil or grease that was in it (and there was a lot), and then welded the ends. I heated it up, put it in a vise, and untwisted it to get the flux inside everything. I made a V-shaped trough to sit the in hardy hole on my anvil. I then heated it to forge welding temp and hammered it in the trough so it would not flatten out. I then put it back in the vise and tightened the twist, brushed it, fluxed it, and re-heated it. I repeated this process until I saw no loose strands of wire sticking out anywhere. I then heated it and hammered it until it was long and flat. I folded it in half lengthwise, fluxed it, heated it, and hammered it. I repeated this process until it was apparent that this weld took. I then heated and hammered it until it was in the shape I wanted.
I will post a photo of your knife straightened out later tonight. It makes a pretty good looking knife.
I'd love to see it. I may even treat it like a homework assignment.
Hengelo_77
Basic Member
- Joined
- Mar 2, 2006
- Messages
- 6,307
I like that damascus a lot!
Stacy E. Apelt - Bladesmith
ilmarinen - MODERATOR
Moderator
Knifemaker / Craftsman / Service Provider
- Joined
- Aug 20, 2004
- Messages
- 38,468
")
- Joined
- Sep 22, 2015
- Messages
- 47
I did. I heated the cable up to melt out any oil or grease that was in it (and there was a lot), and then welded the ends. I heated it up, put it in a vise, and untwisted it to get the flux inside everything. I made a V-shaped trough to sit the in hardy hole on my anvil. I then heated it to forge welding temp and hammered it in the trough so it would not flatten out. I then put it back in the vise and tightened the twist, brushed it, fluxed it, and re-heated it. I repeated this process until I saw no loose strands of wire sticking out anywhere. I then heated it and hammered it until it was long and flat. I folded it in half lengthwise, fluxed it, heated it, and hammered it. I repeated this process until it was apparent that this weld took. I then heated and hammered it until it was in the shape I wanted.
Cable damascus is a pretty straight forward process, but man is it hard work! I honestly think it is easier to layer a billet and weld it.
Cable damascus is a pretty straight forward process, but man is it hard work! I honestly think it is easier to layer a billet and weld it.
I've done a layered damascus project and two cable projects and I would have to say cable was WAAAAAAAAAAAY easier for me. I have no power hammer other than the power in my right arm. The layered damascus was with 6 layers each of 1095 and 15N20. I spent a day and a half heating, fluxing, and hammering this thing. I literally got to where I would heat it to welding temp, hammer it until I physically could not longer grip the hammer, and then put it back in the forge while my arm rested. While the first cable damascus was the blade in this thread. It seemed so easy to get it to weld that I KNEW something was going wrong. I assumed the cable was too soft to be any good as a blade. That is why I did not put more effort into the handle. When I did the knife in the current thread, the process was just as smooth.
Here are pictures of the short sword I made with the layered damascus.


- Joined
- Sep 22, 2015
- Messages
- 47
Wow so a 12 layer billet? Yikes that would be a crazy hard thing to hammer out. I dont have a power hammer either, or a press for that matter, but I wish i did! I have some cable laying about that i fooled around with when i first got started. Im wondering if maybe I had so much trouble out of it was because of my inexperience? I am wanting to do a cutlass for the Cutlass WIP thread anyway, so a big damascus blade would look cool I think.