Camp Food Prep and EDC WIP

Brian.Evans

Registered Member
Joined
Aug 20, 2011
Messages
3,267
This will be my WIP thread for a new design I'm working on. It's an EDC designed with an eye towards a light camp belt knife.

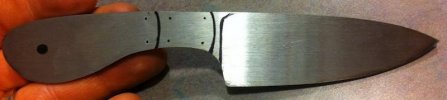
Now I have 5 kids, so we don't do "survival" type stuff, but rather pretty docile tent camping. As such, most of my cutting tool work is hatchet or food prep related. We always have a hatchet for wood prep, pocket knives for whittling and fun, but I wanted a belt knife for small food prep (slicing weenies, potatoes, carrots, etc) and minor incidentals. Thus the mostly chef knife shape.

This knife is made in 3/32" A2. The blade is only a hair under 1 1/4" at it's widest. OAL is ~6". Aiming for a full flat grind. Let's see if I can pull it off without blowing the spine!

I have 11 pictures to post, but have to wait until I get to a computer tomorrow because I can't get photobucket to upload from my iPhone. Anyone know what level of paying member I have to be to be able to post pictures to the forum from tapatalk?

P.s., I promise this time it will be a real WIP and I will remember to take pictures along the way and not get sidetracked. Promise, cross my heart, etc, etc.
 
Picassa is great--acts like a mobile photobucket but also offers phone-friendly photoediting. It'll likewise allow sharing the pics on here, or give you a copy friendly links to share via
post.

Otherwise I think Basic member gets limited attachments while other subscriptions earn extra perks.
 
Last edited:
Here's what I'm starting with. Piece of Aldo's A2. You can see I've cut my pattern out and used a glue stick to paste it to the steel. This is the first time I've ever done it like that, and I really liked it. Much better than following a sharpie line. You can also see my feet, proving I am actually wearing leather boots instead of flip flops for once. I had a helper in the shop, I had to set a good example. Lol
IMAGE_1000001046.JPG


Cutting the blank off the bar with my cutoff wheel.
Also note, wearing pants. Pants are critical the not receiving nasty burns. Just FYI in case anyone was wondering.
IMAGE_1000001047.JPG


My wonderful shop buddy Emily modeling the blade pattern. Also known as Emi and Bug/Buggy/Chug. She took the picture of me grinding. Note her awesome vest, carabiner attached name customized water bottle, and pretty pink shoes. That's what I do on my off time, water bottles and shoe shopping. Lol.
IMAGE_1000001049.JPG
 
Last edited:
Now, I have one of these, but as you can see, it's in the box still. So.....since it doesn't cut worth a darn still in the box, I had to improvise. I know what you're saying, "Brian, why don't you just grind away the excess?" And I could. But I'm down to one new 60 grit blaze, one worn one, and a couple really worn ones. I want to save the new one for the bevels on this knife.
IMAGE_1000001050.JPG


A cutoff wheel and a blatant disregard for proper usage works!
IMAGE_1000001051.JPG


Rough profile with only the Craftsman 2x42.
IMAGE_1000001052.JPG


I still needed to get in that handle curve a bit. Over to the drum sander. Drill press. Whatever. It works.
IMAGE_1000001053.JPG


Getting closer with the 1 1/4" and 3/4" wheels.
IMAGE_1000001054.JPG


Back and forth, files and power abrasives, sneaking up on the profile.
IMAGE_1000001055.JPG


Profile done. Headed inside to think.
IMAGE_1000001056.JPG
 
Last edited:
Here is what I'm thinking for the pin placement. I can source aluminum rod locally, or order nickel silver from several fine online retailers. Opinions? The big middle pin will be a mosaic pin. I might remove it and make two small pins in the corners.

The bolsters will either be nickel silver or black linen micarta. Handle material, something curly. Maple, Koa, something similar. Probably black linen and deep brown/red stained maple.

IMAGE_1000001045.JPG
 
Last edited:
Looking good so far Brian. How does it feel in hand?

As for the handle I think the black linen with a nce dark wood would look great! I also think a larger mosaic pin in the center an 2 smaller ones on the left an right of it would look nice...
 
Hard to believe you bought the bandsaw and had an excuse to use it... but chose to leave it in the box and use an angle grinder. But then, people criticize me for using my hand files even after building a real grinder, so who am I to talk...

You're doing great so far. My one critical comment is that the placement of the mosaic pin seems a bit odd. I understand it (one big pin to balance the two small pins), bit it just doesn't seem to work for me. Maybe I'll feel differently when you've installed in and I can see it as something other than a black dot on a gray blank.

Something like this would be more what I would do.
 

Attachments

  • IMAGE_10CGD01045.jpg
    IMAGE_10CGD01045.jpg
    19.2 KB · Views: 34
Last edited:
JG, it feels pretty good, but it could e better. I brought it to work today to play with it and think. I think I'm going to take a bit off the "belly" of the bottom of the handle. As it is it's a little to bulbuous.

Thanks for that edit Greg. I am thinking I may just scrap the mosaic and run single small pins in the corners of the handle. I am going to make some dots and see here shortly. It really is being a pain. Sometimes I just have to let it sit and percolate for a bit.

Using small, out of way pins might let the beauty of the wood come through.

Something like this:
IMAGE_1000001059.JPG


Also forgot to post this video. It's nothing special, just me cutting the blank off, but my daughter was so tickled that she "snuck" a video in on me that I promised I'd put it up.

http://v6.nonxt5.googlevideo.com/vi...0EA3BC05706417EE20E35EEA54D3732565944&key=ck1
 
Evans, just Ed is fine and I'm relieved I could be of help.
I'm as green as grass when it comes to being a novice maker no matter how many blades I put under my belt, but some areas of tech are where I can help--applications and programs are no issue. Knife supplies, techniques, and so on are written down in notebooks for further digestion and review.
 
Thinking more......I need to sleep on it, but I'm thinking of shaving the bottom like this:

IMAGE_1000001060.JPG


Thoughts?
 
Shave the bottom off the handle like your marking demonstrates - really improves the flow.

I think omitting the mosaic pin is a great idea - too many details tend to distract rather than compliment. Red/brown stained curly maple with a linen bolster sounds spot-on! Keeping the weight down by avoiding metal bolster sounds smart to me, too - I hate heavy knives!

Will this be flat ground?

The whole project looks like a good one - can't wait to see the next steps. A2 seems like a good choice for this project, btw - enough wear resistance to stand up to the basic chores it'll face, and tough enough to stand up to some power whittlin'! ; )
 
Thanks Matt. It will indeed be flat ground, to take advantage of the 3/32" stock and super slicing ability of a FFG and thin stock. As far as handle materials, I'm thinking either curly maple or stabilized curly Koa. I'd like to find a dark piece of it if I go with Koa.


On the subject of dovetailing bolsters, how do I do it and keep the edges curved like shown?
 
I agree that the mosaic pin doesn't seem to fit the design.

One big problem I see is the pin placement, especially the butt pins. They are WAY too close to the edge. By the time you curve the handle and sand things down, they will barely be there. This is a common problem that many new makers make. Save yourself the heartache and move them in more.
Personally, I would not double all the pins, but just use single placement on the center-line. Then you could use a mosaic pin if you want.
There is a reason the standard placement is centered - That way they don't get ground down and become useless or weak, as well as aesthetic flow.

Try this:
Flip the blade over to the unmarked side.
Draw a thin line down the center of the handle, following the curve.
Mark two pins in the bolster, and two in the handle on this line. ( or three in the handle with he center one a larger mosaic)
Look at both sides and see which looks better.

Also, while the Micarta will be easier to shape, the metal bolsters will be nicer.
 
...or just skip the bolsters and let the wood walk!

I agree with Stacy on the pins following so close to the edge, especially on a piece that will have handle scales rounded off the way I envision this one. Another thought on the pin thing - maybe add a lanyard tube at the back, and a single small pin toward the front? That's a look I like, too. Almost all of these things come down to aesthetic choices of personal preference, but you asked! ; )
 
I've done some sketching on the blade. Matt can attest, my original design called for a single pin close to the "neck" and no bolsters. I'm headed back to that idea. I'd really like to do some new things with this knife, stuff that I've never done so as to keep challenging myself. That's why I added bolsters, but it's only 7" OAL. That a pretty small knife to start adding vertical design elements that break the curving horizontal.

Educate me on lanyard holes? It's down to either that or a hidden pin. I'd almost rather do a hidden pin towards the butt end to let the wood speak. I guess I don't know how to do hidden pins either.

More pictures soon. Hopefully I can get the handle reshaped tonight. If I get real adventurous, I might even do a handle mock-up from oak just to test the handle shape. For those who don't know, carpet tape works well to hold mockup scales to the tang while you test shapes and different stuff. I've used it before to great effect.
 
If you are using wood, not Micarta, for the handle, you may want to stay with the bolster. That thin neck on the tang can be the spot where a handle cracks, especially in a burl wood.

My suggestion on this would be one piece canvas Micarta or G10 handle in orange or red, with three pins. The center pin can be larger and/or a mosaic. I use three Corby bolts on a nearly identical knife I produce.
If it is to be a food prep knife, but for camp use, the Micarta/G10 will be more sanitary and hold up to the repeated washing and hot water better. The orange/red color will aid in finding the knife if dropped on the ground, as well as make it look "outdoorsy". A orange handled knife on the belt will look appropriate when camping. The canvas Micarta/G10 will also have a good grip for cutting tasks with wet hands.
 
Slight update. I had five free minutes and was able to sneak out and get the handle profile taken care of. I also slightly reshaped the front of the grip and plunge side of the blade.

I think it flows better now.

IMAGE_1000001139.JPG
 
Back
Top