AFAustin
Gold Member
- Joined
- Jun 8, 2004
- Messages
- 2,508
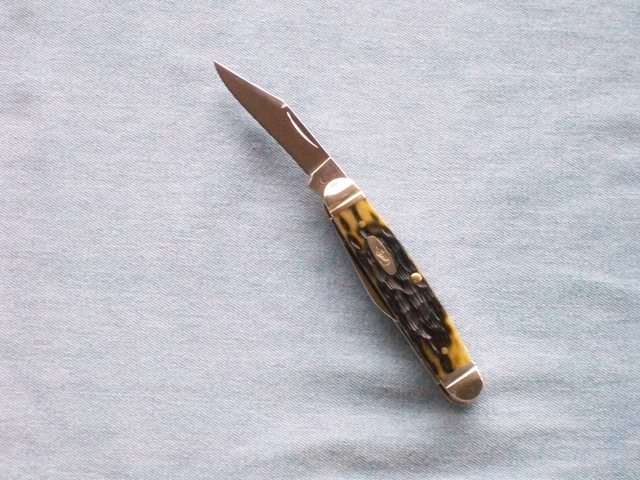
First off, I want to thank my friend, Rick (Railsplitter), for bringing this nice pattern to my attention (and a look at Dadpools gorgeous model with its stunning deep red bone didnt hurt, either!). I think Rick and I share some tastes in knives, as evidenced by our common affection for the Case Humpback Stockman, and so when I came across a thread or two where Rick was singing the praises of his Case 63090 Stockman, it got my attention. I particularly liked the size---at 3 3/8" its more compact than most stockmans, but with a stout little cigar/equal end frame. A short time later, I lucked into a nice example in olive green bone with pinched and fluted bolsters, at a very attractive price, and I jumped.
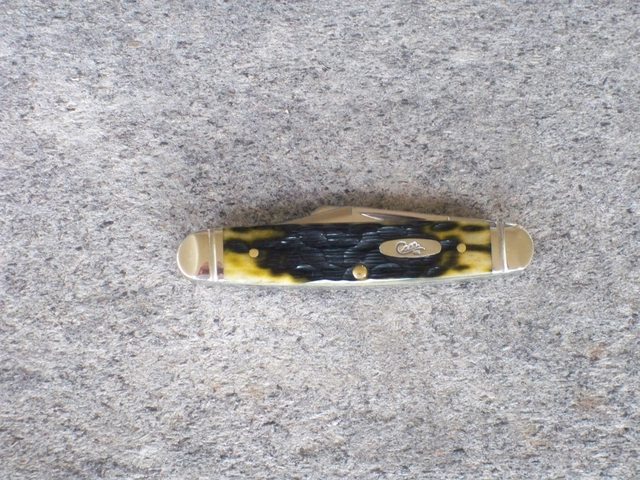
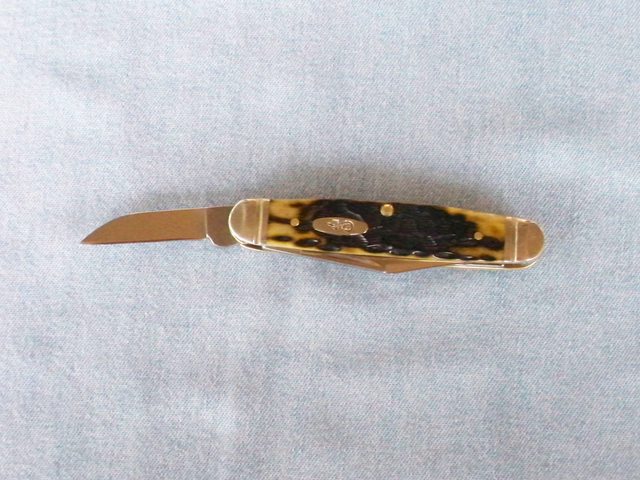
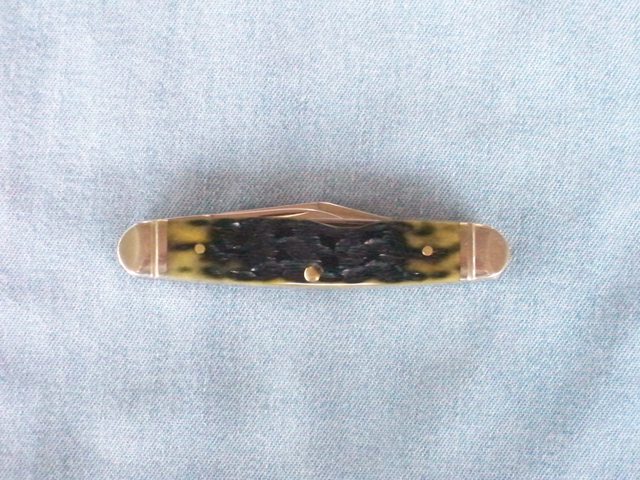
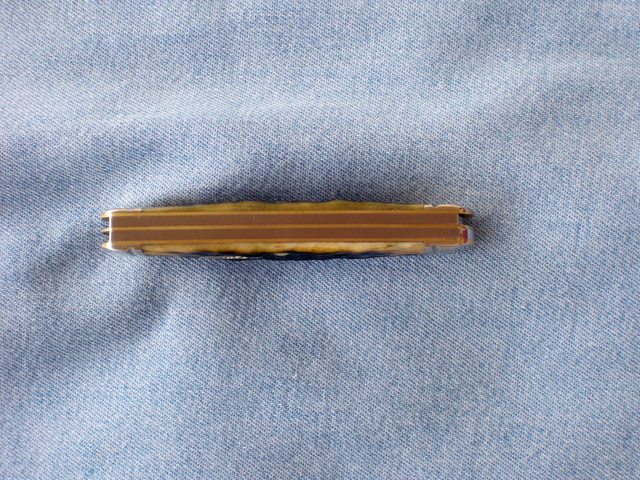
"As Received" (except for the cut-out---see below) pics:


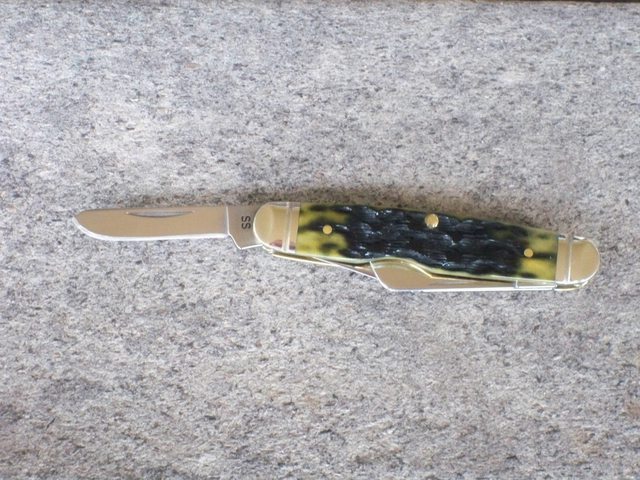
 
When it got here, I had a few initial impressions:
* Although described as "new and unused" it has a few gouges in the bolsters, as well as scuffs on the backsprings, which will need to be addressed.
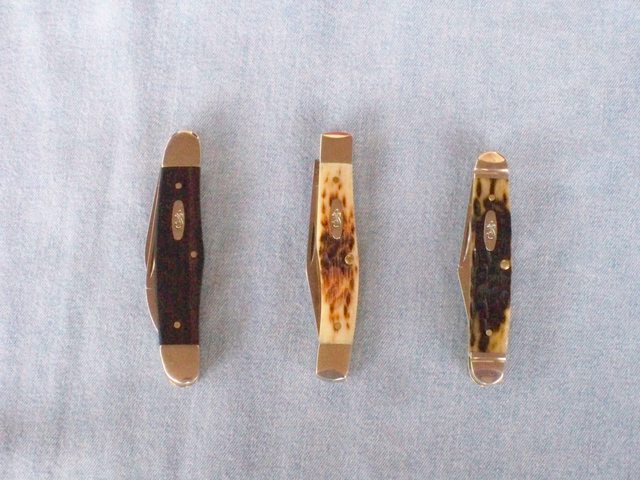
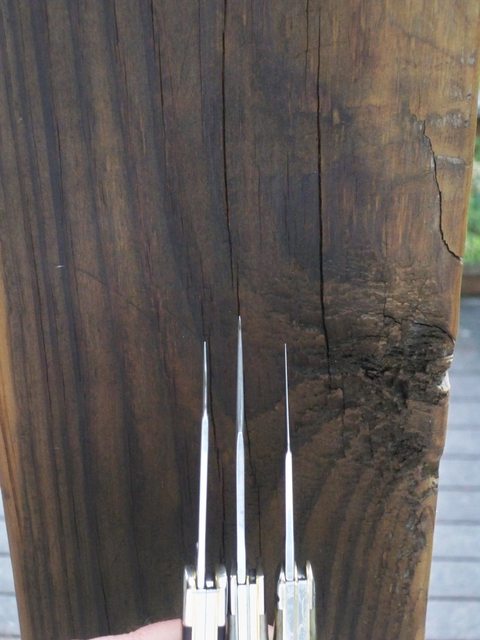
* The compact size and light weight (1.9 oz.) are indeed great. I have a real liking for pocket knives in the 3 1/8" - 3 3/8" range, as while small and easily carried, they usually afford at least a "three-and-a-half finger" grip, and I find when theres a little room for the pinkie on the butt, it allows for a lot more control. (Ive included a pic of the 63090 next to a Humpback Stockman and a Texas Jack for size comparison purposes.)
 
* I really like the green/yellow and black colors of the scales (it's not just my poor photography---the mark side is a little more "yellowish" and the pile side is a little more "greenish"), and the pinched and fluted bolsters are a nice touch. Also, the pile side (but not the mark side) jigging has some flattened out areas, like little mesas in a range of hills, that is different and attractive, to my eye at least.
* The edge grinds are not very well done, especially on the two smaller blades, and are below par for Case (whoever was manning the belt grinder was having a bad day!). They are not very even and also wider than I like from the factory, which means I dont really have a choice of narrow vs. wide bevels when I do the initial sharpeningtheyll have to be wide on this one.
* There are some small gaps between the springs and linersto be expected, though, and fairly modest.
* The pins are all nice and flusha big thing for me as I really dislike proud pins and Id rather not spend any time sanding them down.
* The pull on all blades is light-to-moderate, which is fine by me, but theres a "gummy" feel to them, very common on an unused knife.
Im hoping a good cleaning will remedy that.
* Theres a bit of blade rub, but its pretty minimal, no doubt mitigated by the blades being offset rather than crinked, which is a very nice feature. They nest beautifully in the knife.
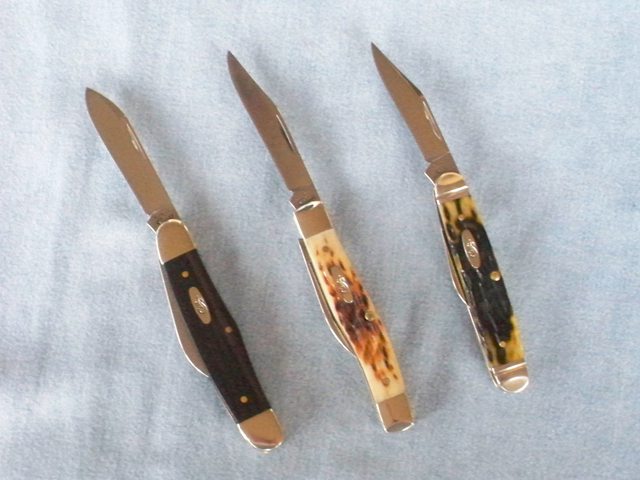
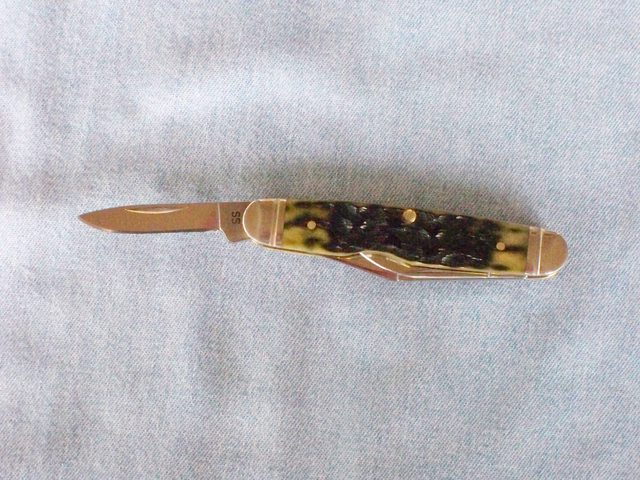
* The master (clip) blade is pretty short, and it looks like theres room in the well to have extended it a bit, so I dont quite understand that. On the plus side, the clip is very thin on the forward portion beneath the nice swedges, and I like thin blades! (Pic of same 3 comparison knives attached.)
* The sheepieactually, its so squared off it almost qualifies as a coping blade--- rides pretty low for a Case stockman, and fits comfortably between my 2nd and 3rd fingers when using the clip, and between my 1st and 2nd when using the pen. High riding sheepies are another dislike of mine, and Im usually inclined to lower the kick and/or alter their sillouette, but this one would probably be fine left as is.
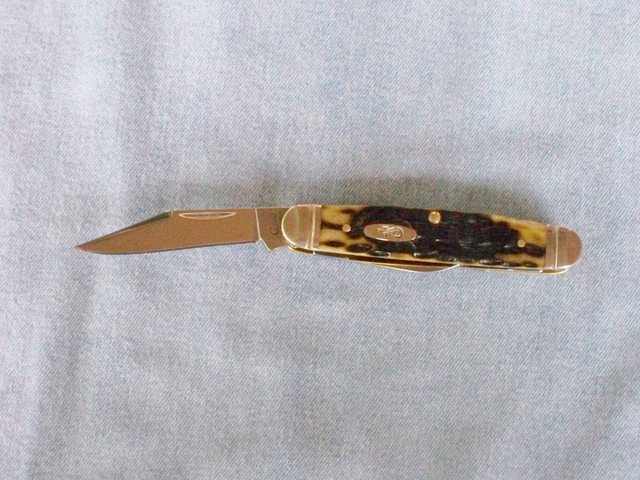
* Finally, the cut-out for the spey blade strikes me as a little odd---the brass liner has a good sized crescent cut in it, but the bone has only a very shallow scoop---it looks almost unfinished. (I later noticed that my Humpback Stockman has an identical cut-out, so its clearly a design feature and I guess makes senseit makes the cut-out very subtle as seen from the side, but the deeper inner portion still allows good access to the blade.) Please note: When I took the "As Received" pics above, I'd actually already enlarged the cut-out---the version on receipt was much shallower.
 
Overall, I like this little knife and believe its a candidate for some serious elbow grease to address its issues and hopefully enhance it a bit.
So, first to those annoying little gouges in the bolsters. Some scuffing on bolsters I can live with, but when you can feel the little protrusions in your handno, no, nowhat kind of worry stone is that?! So, a progression of Micro-Mesh cloths, wrapped around a small flat rod, addresses this and it takes longer than expectedthe gouges are pretty deep. Im left with a subtle satin finish on the bolster in question, so the next task is to lightly satinize the other three so they more or less match. Micro-Mesh pads also make short work of the scuffs on the backsprings.
Now for a vigorous wash and scrubbinga good idea in any event with a new knife but essential here due to the "gummy" action. Once dry, a drop of Nano Oil goes to each joint. Thankfully, this does the trick and I'm rewarded with a very acceptable snap on each blade.
Next, not yet realizing that the shallow cut-out is a design feature, I decide to deepen it a little (which also ended up helping with accessibility when I later slightly lowered the formerly-spey-now-pen a bitsee below). My tool selection, like my talent for these things, is limited, so I looked around the house for a small cylinder I could use for the sanding, and the best candidate ended up being a Chapstick! Wrapped with 320 grit wet and dry, it quickly deepened the cut-out more to my liking. I polished a bit with some 600 and then 1000, and that was done.
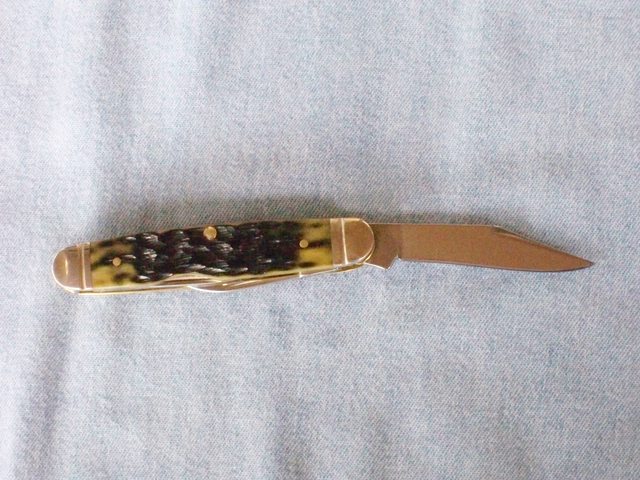
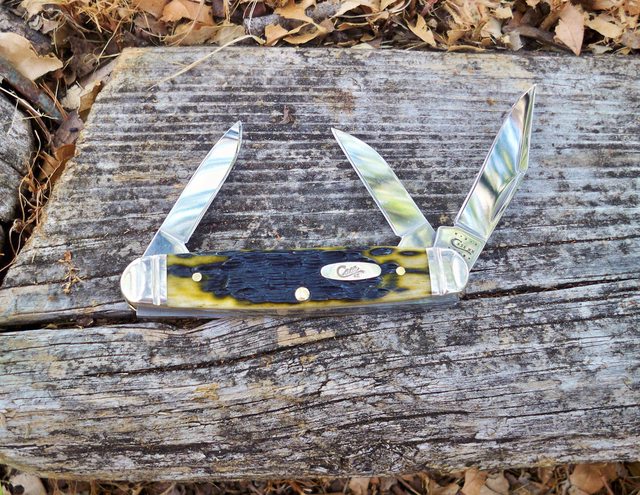
OK, the preliminaries were now finished, and time to move on to the more serious work! First thing is the spey. Im not generally a fan of the small spey blades and prefer a pointy pen blade instead. So I fire up my trusty Work Sharp Ken Onion and set to it, with two aims: first, as said, convert the spey to a pointy pen. Second, in the conversion process, make sure that the spine is lowered enough to give some additional space for accessing the nail nick of the sheepie after I have (later) lowered the kick on it. Things go well, and the spey is now a pretty nifty little drop point pen, with a nice acute point.
Now on to the sheepsfoot (aka coping blade). As mentioned, this one already rides pretty low for a stockman and theres not a whole lot of kick lowering to be done. But there is some and I grind off a bit. Then, since I did make a more generous cut-out for the spey/pen, I decide I can actually lower that blade just a little, which provides a bit more breathing room for the sheepie nick and I can then take down its kick just a little more.
OK, everythings looking pretty good and I could very easily stop the modding here and get on to the last order of business, the initial sharpening. But I have a serious problem with knowing when to leave well enough alone (my wife could tell you some stories), and so I decide to venture on and make the sheepie even more unobtrusive by changing the shape of the spine. I got to it and rounded off the spine, and once again, couldve stopped there with a traditional looking sheepsfoot (more rounded than the original square shape). But, Ive been on something of a "pointy blade" mission recently, spending way too much time on getting sharp points, so I decided to take it all the way and fashion a small wharnie. It came out pretty well (my poor pics almost make it appear that the nail nick was intruded on, but it wasn't). So "whew" enough with the mods already, and time for the last step sharpening.
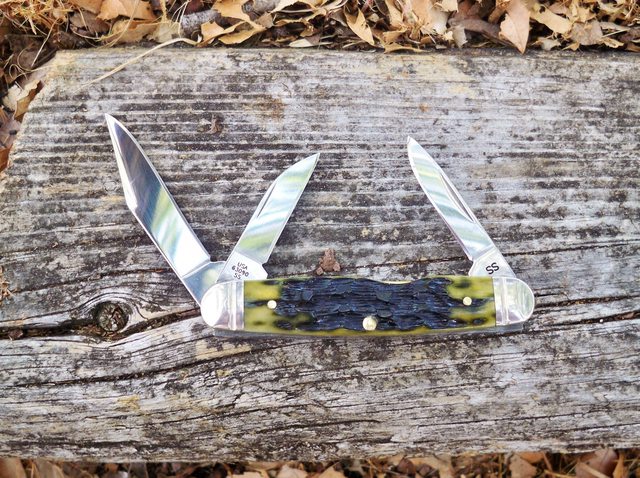
I always set an initial bevel with my Work Sharp KO, and so my KO now pivoted from poor mans modding tool to its true callingsharpening. I know a lot of tradionals fans may shudder at the thought of using a powered system on knives with small thin blades made with relatively soft steels, and its a fact that you really have to focus and use great care or you can very quickly take off too much steel too fast. The WSKO helps, though, in that you can simply start with a finer grit belt and also dial the speed down. I dont like the guides, especially for small knives, and so always freehand. A better "guide", IMO, is to use Sharpie on every belt in your progression, and check your progress constantly, with very good light and also with a loupe. And once the initial bevels are set, a knife rarely needs to return to the Work SharpI can pretty easily maintain the edges with my Sharpmaker and denim-on-wood (with compound) strops.
I know a lot of people dismiss Case Tru-Sharp stainless as a mediocre steel, but my personal experience after owning and sharpening a lot of Case knives, is that it is really quite good, for my purposes at least. Maybe it doesnt maintain an edge as long as some other harder steels, but I dont use my pocketknives hard and so for me whats more important is that it sharpens easily and takes a very fine edge. And indeed, the initial sharpening on the Case #63090 went well, and all three blades took very nice edges and are quite sharp right off the Work Sharp (I have a leather belt for it, with DMT diamond paste applied, and its great for finishing). I also tidied up the point on the clip main, so all three blades are now nice and pointy.
So there you have itmore than you ever wanted to know about this little knife.") But I confess I'm really liking it and glad I spent the time I did on it. The reasons a knife guy really likes one knife more than another are often hard to spell outits not just this feature or that, but rather the way the whole thing comes together and has a look and a feel that just puts a smile on your face. At the moment, on this nice relaxing Sunday afternoon, thats exactly what this little Case 63090 is doing for me.
But I confess I'm really liking it and glad I spent the time I did on it. The reasons a knife guy really likes one knife more than another are often hard to spell outits not just this feature or that, but rather the way the whole thing comes together and has a look and a feel that just puts a smile on your face. At the moment, on this nice relaxing Sunday afternoon, thats exactly what this little Case 63090 is doing for me.
Thanks for reading and looking.
Andrew
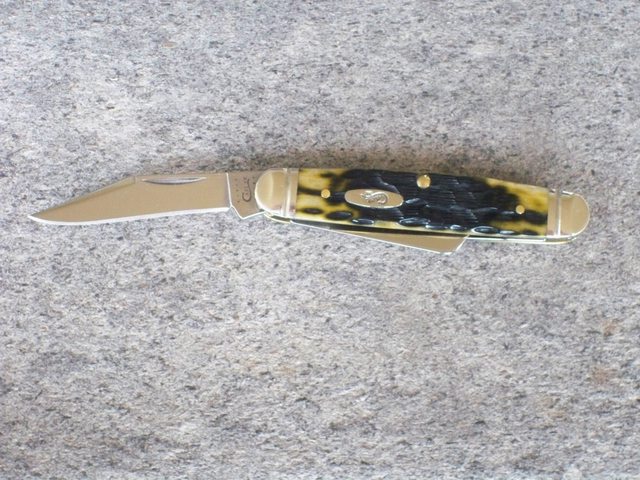
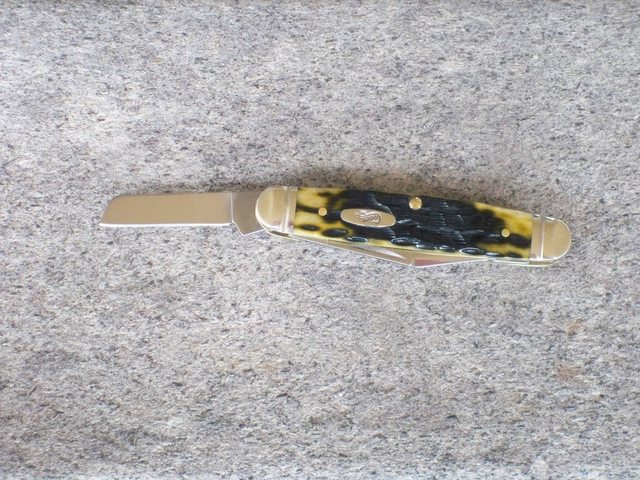
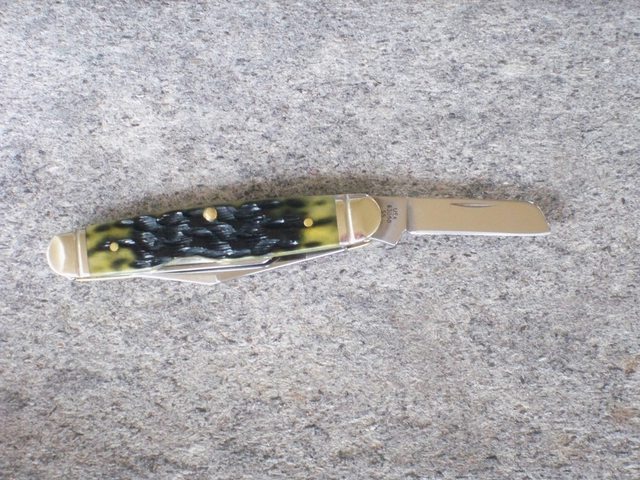
"After" pics:


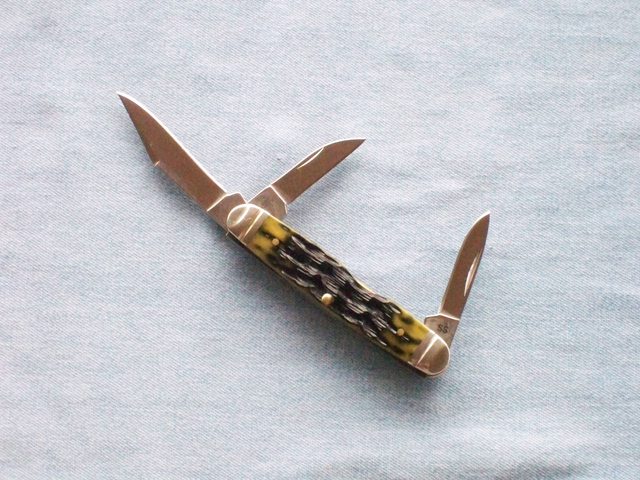


"As Received" (except for the cut-out---see below) pics:
 
When it got here, I had a few initial impressions:
* Although described as "new and unused" it has a few gouges in the bolsters, as well as scuffs on the backsprings, which will need to be addressed.
* The compact size and light weight (1.9 oz.) are indeed great. I have a real liking for pocket knives in the 3 1/8" - 3 3/8" range, as while small and easily carried, they usually afford at least a "three-and-a-half finger" grip, and I find when theres a little room for the pinkie on the butt, it allows for a lot more control. (Ive included a pic of the 63090 next to a Humpback Stockman and a Texas Jack for size comparison purposes.)
 
* I really like the green/yellow and black colors of the scales (it's not just my poor photography---the mark side is a little more "yellowish" and the pile side is a little more "greenish"), and the pinched and fluted bolsters are a nice touch. Also, the pile side (but not the mark side) jigging has some flattened out areas, like little mesas in a range of hills, that is different and attractive, to my eye at least.
* The edge grinds are not very well done, especially on the two smaller blades, and are below par for Case (whoever was manning the belt grinder was having a bad day!). They are not very even and also wider than I like from the factory, which means I dont really have a choice of narrow vs. wide bevels when I do the initial sharpeningtheyll have to be wide on this one.
* There are some small gaps between the springs and linersto be expected, though, and fairly modest.
* The pins are all nice and flusha big thing for me as I really dislike proud pins and Id rather not spend any time sanding them down.
* The pull on all blades is light-to-moderate, which is fine by me, but theres a "gummy" feel to them, very common on an unused knife.
Im hoping a good cleaning will remedy that.
* Theres a bit of blade rub, but its pretty minimal, no doubt mitigated by the blades being offset rather than crinked, which is a very nice feature. They nest beautifully in the knife.
* The master (clip) blade is pretty short, and it looks like theres room in the well to have extended it a bit, so I dont quite understand that. On the plus side, the clip is very thin on the forward portion beneath the nice swedges, and I like thin blades! (Pic of same 3 comparison knives attached.)
* The sheepieactually, its so squared off it almost qualifies as a coping blade--- rides pretty low for a Case stockman, and fits comfortably between my 2nd and 3rd fingers when using the clip, and between my 1st and 2nd when using the pen. High riding sheepies are another dislike of mine, and Im usually inclined to lower the kick and/or alter their sillouette, but this one would probably be fine left as is.
* Finally, the cut-out for the spey blade strikes me as a little odd---the brass liner has a good sized crescent cut in it, but the bone has only a very shallow scoop---it looks almost unfinished. (I later noticed that my Humpback Stockman has an identical cut-out, so its clearly a design feature and I guess makes senseit makes the cut-out very subtle as seen from the side, but the deeper inner portion still allows good access to the blade.) Please note: When I took the "As Received" pics above, I'd actually already enlarged the cut-out---the version on receipt was much shallower.
 
Overall, I like this little knife and believe its a candidate for some serious elbow grease to address its issues and hopefully enhance it a bit.
So, first to those annoying little gouges in the bolsters. Some scuffing on bolsters I can live with, but when you can feel the little protrusions in your handno, no, nowhat kind of worry stone is that?! So, a progression of Micro-Mesh cloths, wrapped around a small flat rod, addresses this and it takes longer than expectedthe gouges are pretty deep. Im left with a subtle satin finish on the bolster in question, so the next task is to lightly satinize the other three so they more or less match. Micro-Mesh pads also make short work of the scuffs on the backsprings.
Now for a vigorous wash and scrubbinga good idea in any event with a new knife but essential here due to the "gummy" action. Once dry, a drop of Nano Oil goes to each joint. Thankfully, this does the trick and I'm rewarded with a very acceptable snap on each blade.
Next, not yet realizing that the shallow cut-out is a design feature, I decide to deepen it a little (which also ended up helping with accessibility when I later slightly lowered the formerly-spey-now-pen a bitsee below). My tool selection, like my talent for these things, is limited, so I looked around the house for a small cylinder I could use for the sanding, and the best candidate ended up being a Chapstick! Wrapped with 320 grit wet and dry, it quickly deepened the cut-out more to my liking. I polished a bit with some 600 and then 1000, and that was done.
OK, the preliminaries were now finished, and time to move on to the more serious work! First thing is the spey. Im not generally a fan of the small spey blades and prefer a pointy pen blade instead. So I fire up my trusty Work Sharp Ken Onion and set to it, with two aims: first, as said, convert the spey to a pointy pen. Second, in the conversion process, make sure that the spine is lowered enough to give some additional space for accessing the nail nick of the sheepie after I have (later) lowered the kick on it. Things go well, and the spey is now a pretty nifty little drop point pen, with a nice acute point.
Now on to the sheepsfoot (aka coping blade). As mentioned, this one already rides pretty low for a stockman and theres not a whole lot of kick lowering to be done. But there is some and I grind off a bit. Then, since I did make a more generous cut-out for the spey/pen, I decide I can actually lower that blade just a little, which provides a bit more breathing room for the sheepie nick and I can then take down its kick just a little more.
OK, everythings looking pretty good and I could very easily stop the modding here and get on to the last order of business, the initial sharpening. But I have a serious problem with knowing when to leave well enough alone (my wife could tell you some stories), and so I decide to venture on and make the sheepie even more unobtrusive by changing the shape of the spine. I got to it and rounded off the spine, and once again, couldve stopped there with a traditional looking sheepsfoot (more rounded than the original square shape). But, Ive been on something of a "pointy blade" mission recently, spending way too much time on getting sharp points, so I decided to take it all the way and fashion a small wharnie. It came out pretty well (my poor pics almost make it appear that the nail nick was intruded on, but it wasn't). So "whew" enough with the mods already, and time for the last step sharpening.
I always set an initial bevel with my Work Sharp KO, and so my KO now pivoted from poor mans modding tool to its true callingsharpening. I know a lot of tradionals fans may shudder at the thought of using a powered system on knives with small thin blades made with relatively soft steels, and its a fact that you really have to focus and use great care or you can very quickly take off too much steel too fast. The WSKO helps, though, in that you can simply start with a finer grit belt and also dial the speed down. I dont like the guides, especially for small knives, and so always freehand. A better "guide", IMO, is to use Sharpie on every belt in your progression, and check your progress constantly, with very good light and also with a loupe. And once the initial bevels are set, a knife rarely needs to return to the Work SharpI can pretty easily maintain the edges with my Sharpmaker and denim-on-wood (with compound) strops.
I know a lot of people dismiss Case Tru-Sharp stainless as a mediocre steel, but my personal experience after owning and sharpening a lot of Case knives, is that it is really quite good, for my purposes at least. Maybe it doesnt maintain an edge as long as some other harder steels, but I dont use my pocketknives hard and so for me whats more important is that it sharpens easily and takes a very fine edge. And indeed, the initial sharpening on the Case #63090 went well, and all three blades took very nice edges and are quite sharp right off the Work Sharp (I have a leather belt for it, with DMT diamond paste applied, and its great for finishing). I also tidied up the point on the clip main, so all three blades are now nice and pointy.
So there you have itmore than you ever wanted to know about this little knife.
But I confess I'm really liking it and glad I spent the time I did on it. The reasons a knife guy really likes one knife more than another are often hard to spell outits not just this feature or that, but rather the way the whole thing comes together and has a look and a feel that just puts a smile on your face. At the moment, on this nice relaxing Sunday afternoon, thats exactly what this little Case 63090 is doing for me.Thanks for reading and looking.
Andrew
"After" pics:
 
Last edited: