Caswell Finish and Maple Scales Questions - Build Thread

Fixedwing

Gold Member
Joined
Feb 17, 2024
Messages
287
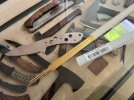
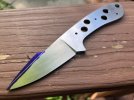
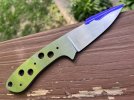
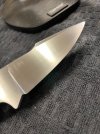
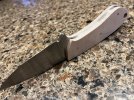
I am new to knife making but have a ton of experience working and fabricating with several different materials. I will be crafting some Winkler inspired knives and would like to finish them as such. I have searched this site and other sites for this information.

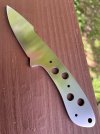
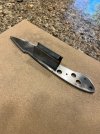
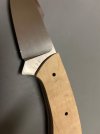
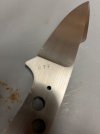
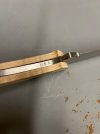
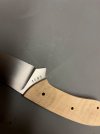
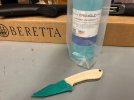
Is the caswell finish applied near the end of the process? I would like the spine between the scales to have the same finish as the blade so I'm assuming it will be done after the scales have been shaped/sanded. Do the scales need to be protected from the metal finishing solution (caswell) or does the entire knife get dunked into the solution?
 
It certainly looks like the whole handle gets dunked. No signs of handle finish/protection overspill on tang, no sign of local tang treatment overspill on handle, pinned handle, pins are flush ground, and pins and lanyard tube are darkened. If it isn't, it would be interesting to know how the effect and finish are assembled.


winkler-belt-knife-curly-maple-handle-black-caswell-finish-217.jpg


winkler-belt-knife-curly-maple-handle-black-caswell-finish-213.jpg
 
It certainly looks like the whole handle gets dunked. No signs of handle finish/protection overspill on tang, no sign of local tang treatment overspill on handle, pinned handle, pins are flush ground, and pins and lanyard tube are darkened. If it isn't, it would be interesting to know how the effect and finish are assembled.

Yes sir, that's what I'm thinking also...

Hopefully some experienced makers will stop by and share some experience, knowledge, and sageness. :cool:
 
I have no direct knowledge, but I suspect that it may have been done as one process.
The knife was finished, and curly maple handle sanded. The entire knife was dunked in the Caswell's black Oxide solution, then into water. It was then put in the "preservative". I have no idea which one would be best. It would be dried well and the handle rubbed with whatever finish was used.

The black oxide solution is an acid. What makes the curl show in the handle is an acid reacting with the sugars in the summer growth rings. Vigaroon and maple-magic are acids, so it might work. I would suggest you do a test blade of a small hinter and try it out. Let us know the results.


Thank you sir, I always enjoy reading your content on this forum. I'm a bit off from actually doing this, but I will post up here when I do. :cool:

If there is anyone else who may have first hand knowledge of this process, please let me know. Thanks in advance!
 
I'm guessing the caswell solution will react with the curley maple and darken the stripes and blacken the blade at the same time. :cool:
 
I have decided to start this project with a 3/16" 1095 blank I had laying around and some curley maple I got here on the exchange. :cool:
 

Attachments

  • IMG_7189.jpg
    IMG_7189.jpg
    667.1 KB · Views: 7
  • IMG_7190.jpg
    IMG_7190.jpg
    491.7 KB · Views: 7
  • IMG_7191.jpg
    IMG_7191.jpg
    593 KB · Views: 7
Last edited:
Can someone point me in the right direction? I'm looking for a checkering file to mimic the jimping on this operator. So far all that I can find is 20, 30, and 40GPI files and that is too many grooves per inch. Any help is greatly appreciated. Thank you!
 

Attachments

  • IMG_7192.jpg
    IMG_7192.jpg
    381.8 KB · Views: 7
20LPI is what most use for jimping. Jimping is to give the thumb a grip, not to shred it into pieces. Those knives with huge jimping have got to be hot on the thumb.Semd me a message with your address and I'll send you a new 20LPI file. I have a box of them.
 
20LPI is what most use for jimping. Jimping is to give the thumb a grip, not to shred it into pieces. Those knives with huge jimping have got to be hot on the thumb.Semd me a message with your address and I'll send you a new 20LPI file. I have a box of them.
You are very kind sir! Thank you :cool:
 
Spent about 3 hours this morning sanding and leveling both sides of this blank and edges by hand to 320 grit. The magnet was a game changer. I'm at a point now where I will jimp the spine, begin cutting in the bevels, and shape the swedge prior to heat treating. My brass pin material came in yesterday. My hands Hurt!!! :cool:
 

Attachments

  • IMG_7262.jpg
    IMG_7262.jpg
    256.8 KB · Views: 2
  • IMG_7261.jpg
    IMG_7261.jpg
    135.5 KB · Views: 3
  • IMG_7260.jpg
    IMG_7260.jpg
    196.7 KB · Views: 4
  • IMG_7258.jpg
    IMG_7258.jpg
    279.1 KB · Views: 3
  • IMG_7257.jpg
    IMG_7257.jpg
    254.2 KB · Views: 3
  • IMG_7255.jpg
    IMG_7255.jpg
    282.6 KB · Views: 4
  • IMG_7254.jpg
    IMG_7254.jpg
    231.9 KB · Views: 6
  • IMG_7253.jpg
    IMG_7253.jpg
    404.7 KB · Views: 3
Last edited:
I got the primary bevels cut in today; next will be shaping the swedge along the scribe lines in the blue Dykem. After that will be adding some jimping and sanding out the grind lines prior to heat treating. :cool:
 

Attachments

  • IMG_7267.jpg
    IMG_7267.jpg
    263.7 KB · Views: 4
  • IMG_7266.jpg
    IMG_7266.jpg
    311.1 KB · Views: 4
Last edited:
I have some grind lines near the spine that I'm having trouble removing. I have tried wet sanding with 320. This picture was taken after profiling the swedge, wet sanding, and scotchbrighting. Any special technique for working that area near the spine? Also, once finished, this knife will be an EDC, have a 3.25" blade, and be 7.625" overall length. Based on those parameters, is there a finished target weight that I should shoot for?
 

Attachments

  • IMG_7269.jpg
    IMG_7269.jpg
    186.1 KB · Views: 4
Last edited:
Got the scales dry fitted and contoured late yesterday. Still waiting for the brass lanyard tubing.
 

Attachments

  • IMG_7272.jpeg
    IMG_7272.jpeg
    667.3 KB · Views: 2
I ordered some Aquafortis for revealing the curly part of the maple and it came in today. It is applied liberally to the surface and then heat is applied to darken. (2nd picture) After that, I applied the water based dye stain. I had a little time today after work to play around with these products to see how things will turn out. After the stain drys overnight, I will apply some Wicked Wax and see what that does.
 

Attachments

  • IMG_7333.jpg
    IMG_7333.jpg
    169.3 KB · Views: 2
  • IMG_7334.jpg
    IMG_7334.jpg
    112.5 KB · Views: 2
  • IMG_7335.jpg
    IMG_7335.jpg
    184.1 KB · Views: 1
Last edited:
Back
Top