-
The BladeForums.com 2024 Traditional Knife is available! Price is $250 ea (shipped within CONUS).
Order here: https://www.bladeforums.com/help/2024-traditional/
You are using an out of date browser. It may not display this or other websites correctly.
You should upgrade or use an alternative browser.
You should upgrade or use an alternative browser.
Checkered spacer, how could i make one?
- Thread starter hodgescl
- Start date
- Joined
- Dec 6, 2010
- Messages
- 1,154
Any pictures of something similar? Not sure what you mean by "that goes all the way around the handle"
james terrio
Sharpest Knife in the Light Socket
- Joined
- Apr 15, 2010
- Messages
- 22,618
I think I would take a piece of red material and a piece of white the same thickness, and cut them into equal strips 1/8" wide. Lay them side by side on a flat surface like another sheet of sacrificial spacer material, red-white-red-white and superglue them all together, making sure there is glue between the sides of the red-white-red-white strips. Make it at least four times as long and a little wider than the handle will be. When it sets up, sand off the sacrificial piece, and cut the alternating colors piece in half lengthwise. Now glue one half back down on the first, making sure to offset it by one strip. So when you look at the side you will see:
(R)(W)(R)(W)(R)(W)(R)(W)(R)(W)(R)(W)(R)(W)(R)(W)(R)(W)(R)(W)(R)(W)(R)(W)
(W)(R)(W)(R)(W)(R)(W)(R)(W)(R)(W)(R)(W)(R)(W)(R)(W)(R)(W)(R)(W)(R)(W)(R)
<--------------------------- handle length times two------------------------------>
Now when that sets up, cut it half again and you have two spacers for a full tang knife. It should work but you may have a strip of just one color showing at the very end of the handle. Hope this makes sense, it sounds like a pain to do but I think it would work. Then again it could all fall apart so maybe it would be best to leave the "sacrifical" piece on there, just use the same red or white. When you cut it in half, glue the alternating sides together and only sand off one solid-color piece. That would give you a pinstripe around the checker pattern:
(RRRRRRRRRRRR)
(R)(W)(R)(W)(R)
(W)(R)(W)(R)(W)
(RRRRRRRRRRRR) <----- sand away
Last edited:
- Joined
- Oct 27, 2010
- Messages
- 8,721
Take two flat slabs of material and glue them together one on top of the other. Run it through the band saw lenghtwise the width of the checker you want. Take that piece and flip it over and glue it back in place. Repete until all the way across is alternating. Now do the same cutting shortwise across the piece. You will end up with a solid checkerboard piece that then can be split in two for handle scales. There is a maker that does mosaic wood handles like this, and I forget who he is, but I think he is on here. Don't forget to account for blade width as loss in your cuts.
-Xander
-Xander
")
- Joined
- Dec 7, 2008
- Messages
- 7,187
About a year ago Mark Knapp did a WIP where he made a mosaic handle.
Here is a link to the thread.
Might be something there that will help with your project.
JT's way will probably be the easiest though.
Here is a link to the thread.
Might be something there that will help with your project.
JT's way will probably be the easiest though.
Stacy E. Apelt - Bladesmith
ilmarinen - MODERATOR
Moderator
Knifemaker / Craftsman / Service Provider
- Joined
- Aug 20, 2004
- Messages
- 38,478
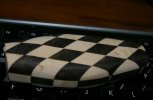
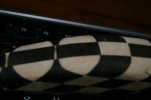
The problem with laminating a checkerboard block up is that it will look like a checkerboard only as long as all the sides are at 90 degrees. Once you start to shape it into curves, it becomes diamonds, arcs, and other shapes. This can look pretty neat, but not a checker pattern.
I occasionally laminate ebony and holly to make such handles.
Stack the contrasting materials and glue them up. You need a 3" tall stack of layers about 4X8" in size. In your case, red and white micarta would work, or dye up some holly.
Once the stack is bonded, cut into slices and shift the stack to make the pattern. The size of the slices and the angle that you cut can greatly vary the final pattern. use a 45 degree cut to make diamonds, etc.
Once the slices have been glued up into the pattern, trim the block to square the sides, and slab the block into slabs that are the thickness of the pattern segments. Re-stack the slabs so the pattern is alternating from the side. The pattern from the side will be squares and rectangles. Glue up the stack.
Trim the block to a rectangular block and make your handle from this. It will have some really interesting shapes in it.
I shot a quick photo of one in the cabinet I did a while back. It gives you an idea of what I am talking about. It si only rough shaped, and the shapes will have more curve when finished.
Attachments
About a year ago Mark Knapp did a WIP where he made a mosaic handle.
Here is a link to the thread.
Might be something there that will help with your project.
JT's way will probably be the easiest though.
Thank you, i think thats what ill do as soon as i find a band saw i can use. now i just need to find some red and white stuff to use. now where to get red and white wood...
The problem with laminating a checkerboard block up is that it will look like a checkerboard only as long as all the sides are at 90 degrees. Once you start to shape it into curves, it becomes diamonds, arcs, and other shapes. This can look pretty neat, but not a checker pattern.
I occasionally laminate ebony and holly to make such handles.
Stack the contrasting materials and glue them up. You need a 3" tall stack of layers about 4X8" in size. In your case, red and white micarta would work, or dye up some holly.
Once the stack is bonded, cut into slices and shift the stack to make the pattern. The size of the slices and the angle that you cut can greatly vary the final pattern. use a 45 degree cut to make diamonds, etc.
Once the slices have been glued up into the pattern, trim the block to square the sides, and slab the block into slabs that are the thickness of the pattern segments. Re-stack the slabs so the pattern is alternating from the side. The pattern from the side will be squares and rectangles. Glue up the stack.
Trim the block to a rectangular block and make your handle from this. It will have some really interesting shapes in it.
I shot a quick photo of one in the cabinet I did a while back. It gives you an idea of what I am talking about. It si only rough shaped, and the shapes will have more curve when finished.
Do you think that curve effect would be reduced if the checkers were square to the blade instead of diagonal? Thats what im trying to do.
Stacy E. Apelt - Bladesmith
ilmarinen - MODERATOR
Moderator
Knifemaker / Craftsman / Service Provider
- Joined
- Aug 20, 2004
- Messages
- 38,478
It depends on where the pattern is used....but where the handle curves, the pattern will NOT be squares.
An idea would be to make the block up with the square checks on the top and bottom of the handle. When the handle is shaped the areas near the tang will be checks and the sides will be alternating stripes.
I made one like this and it looked pretty cool.
One way to accentuate the checking is to make the checks as small as possible. 1/8" would be best...1/4" about max for a good check look. You might take a look through some woodworking catalogs or sites for laminated boards you could stack and build up.
Another possibility is making an assembly of laminated pen blanks;
http://www.woodcraft.com/Search2/Search.aspx?query=laminated boards
Last edited:
You could look at the techniques used by makers of segmented wood turnings. The short description of the process is gluing a bunch of "wedge" or "keystone" shaped pieces of material into a ring, and then gluing a stack of similar rings into a blank that can be turned into a bowl or vase. The techniques could be applied to a small blank suited for a knife handle. The advantage would be that the squares would stay mostly square as the handle was shaped, although some would be bigger than others depending on the diameter and shape of the handle at any given point.
Stacy E. Apelt - Bladesmith
ilmarinen - MODERATOR
Moderator
Knifemaker / Craftsman / Service Provider
- Joined
- Aug 20, 2004
- Messages
- 38,478
Mahoney,
That works pretty easy for a 10" bowl with eight segments, but is a bit trickier for the tiny wedges on a knife handle...but makes a really good looking handle.
To make an eight segment checkerboard handle ( I have done it):
For your project you want red and white checks. Some choices might be maple and paduak, or red dyed maple and natural maple. Red dyed holly and natural holly would be a really good choice.
Whatever you choose, get two 3/4" thick boards of contrasting wood colors. They should be 12" long by 6" wide.
Divide the number of segments into 360 degrees to find the apex angle....which comes out to be 45 degrees.
Set the blade angle on the table saw to 22.5 degrees. By flipping the board over on every cut, you will cut 45 degree wedges. Edge glue the handle wood to a 6-8" wide piece of scrap wood, so you can safely cut up all the strips without loosing fingers. Cut with the grain and make 12" long wedges from both boards.Use a sharp, fine tooth blade. To make one cylinder you only need four of each color strip. I would suggest cutting up the entire piece, giving you a stack of each color strips, and making several handle blanks. Murphy never sleeps.
Get some good grade laminating glue. Tightbond III or a clear epoxy like System 3 or West Systems are good choices. If using epoxy, use the slow set type.
Put on some rubber gloves ( you will get covered in glue), and work over a piece of scrap plywood...... preferably outside.
Place two strips of masking tape, sticky side up, on the work surface about 6" apart. Set eight wood wedges on the tape alternating colors. Apply a liberal coat of glue to the strips, and roll up the assembly. Rubber band the assembly and work the wedges snugly together with your fingers. Don't worry about the center being perfect, just make the wedges go tight together. When all is right, set aside to cure. Make the other assemblies the same way. Let cure for 48 hours. Grind off the tape and rubber bands and leave the cylinders roughly round. Cut each into 3" sections.
Here is a great trick for center drilling any wood block or cylinder:
Mark the desired drilling spot on both ends of the handle blocks.
Put the desired size drill bit in the drill press and drill a 1/2" deep starter hole in one end of each piece being drilled.
Now, clamp a block of scrap wood in the vise. Drill a 1" deep hole in the wood. Place a 1.5" piece of brass rod (the size of the drill bit) in the hole.This leaves a 1/2" peg sticking up. It is a good idea to chamfer the ends of the peg. Place a handle block on the peg, using the starter hole, and drill from the other end to a depth of just over half the block length. Flip the block around and drill the hole the rest of the way. You will get a perfect center hole with no drift.
BTW, this is the only good way to drill a bowie handle at an angle or to drill out stag tapers and crowns.
Do the above technique with a 1/4"drill bit. Purchase a 1/4"dowel in a color that matches, or contrasts, with the wood you laminated up. The dowel will be the new center of the handle block, when assembled.
OK, now you have a pile of center drilled cylinders and a dowel. Go to the band saw, and slice the cylinders up into rounds that make the colors wedges squares. They will be somewhere around 1/4" thick slices. Test fit to the dowel. They should be a smooth sliding fit...you do not want a tight fit. Sand the dowel if needed.
Assemble enough slices on a 12" dowel to make a 6" cylinder, apply glue liberally, and snug them up to each other. Rotate the slices carefully to make the checkerboard. Drill out two scrap blocks and slip on the dowels, and clamp the assembly. Double check the alignment and adjust any checks that are not right. Let cure in the clamp overnight.
Within reason, you can make the checkerboard cylinder any length you wish when doing the final glue-up, but 6" works best for most knife handles.
This works well with ebony/holly, maple/walnut, maple/paduak, maple/cocobola, etc. If using cocobola or ebony, wipe down with acetone just before glue-up.
Once the checkerboard handle blank is cured, grind the surface smooth and look at your stunning cylinder.
If using the block as scales, edge glue it to a scrap board, and slice it in half on the band saw or table saw.
If making a hidden tang knife, leave a short stub of dowel sticking out on one end if possible. Go back to the drilling jig, and stick the dowel in the hole, and drill out the center as deep as needed for the hidden tang. Cut off the dowel stub and sand the end smooth.
This sounds a lot harder that it really is. It is mostly just repetition, and that is why making a batch of handle blanks at one time is a good idea.
OK, lets see those new checkerboard handle now.
- Joined
- Feb 7, 2006
- Messages
- 1,327
Here is a thought on how to do it...also maybe you can just use these.....
http://www.mudhole.com/Shop-Our-Catalog/Cork-Rings_2/Checkerboard-Accent-Rings-with-Exotic-Woods-14
http://www.mudhole.com/Shop-Our-Catalog/Cork-Rings_2/Checkerboard-Accent-Rings-with-Exotic-Woods-14
Stacy E. Apelt - Bladesmith
ilmarinen - MODERATOR
Moderator
Knifemaker / Craftsman / Service Provider
- Joined
- Aug 20, 2004
- Messages
- 38,478
That is exactly what I was giving the directions for. Those would work,but will cost $21 per inch.
I never said it would be easy...but "not easy" does not seem to stop anyone around here...I was actually thinking of some of the mosaic vases I've seen with 100's of pieces glued up.
If I was doing this, I would be tempted to use plastic of some sort, something easily glued, maybe acrylic?
One thing to consider, at the risk of making yourself a bit crazy with the details, is to make sure your wedges will yield a square at the average diameter of your finished knife handle. As you shape the handle and reduce the diameter in places, you cut further into your wedges and reduce their width, but their length along the axis of the handle stays the same and your squares become rectangles. If you really want squares, you'll have to do a bit of math.
Im thinking of using white paper micarta for the white, but not sure what to do for the red. Im looking for a brite "flag" red, but no luck as of yet.
it will be a while till I get to this because of college, but when I do ill be sure to take lots of pictures.
it will be a while till I get to this because of college, but when I do ill be sure to take lots of pictures.