Clamping Dovetails

Joined
Aug 5, 2014
Messages
378
I just did my first attempt at dovetailed front bolsters of black micarta with natural micarta on the rest of the handle. My question is if anyone has good tips and tricks for clamping them up when you’re gluing just the scales (not on the knife yet). Due to the 45deg angle you can’t just push them together. I clamped them from the top and then on the ends and it worked well enough but one scale had a tiny glue line. Thanks
 
One method is in the classic WIP by Nick Wheeler: Wheeler's Steel * Stuck in the metal with you
Couple a fixture like this with some clamps holding the scales on would do the trick.
A simpler one would be a 2x4 with a slot cut in it so that you can slide the blade into it up to the bolster, held in a vice and then use rubber bands to hold the scales tight to the bolster from the back while clamping the scales together.
 
Last edited:
I do them with hidden pinns. I shape everything, then glue all parts to the tang at once.
 
I guess I should have clarified this is for a full tang. I glued up the scales, as in bolster and main handle, on a surface plate not on the tang. Then I shaped and drilled pin holes with the preglued scales before glueing them to the liners and tang. Thanks for advice so far!
 
I guess I should have clarified this is for a full tang. I glued up the scales, as in bolster and main handle, on a surface plate not on the tang. Then I shaped and drilled pin holes with the preglued scales before glueing them to the liners and tang. Thanks for advice so far!
I guess I'm not sure what you mean, then. Could you show pics?
There's a couple of ways the 45 degree cut can be oriented.
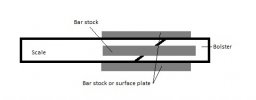
One way would be to do what you did, but take a piece of flat stock to clamp the 2 pieces flat against your surface plate while clamping them together from the ends.
Or use 3 pieces, one to keep it flat against the surface plate, and the other 2 to keep it from sliding up and down (edge to spine-wise).
Just make sure you use wax paper or some other method to make sure you don't epoxy the flat stock too the scales.
 
Last edited:
Yes that is basically what I did. The scales are oriented so when you look at the spine the transition makes an arrow pointing forward. The “bolster”overlaps the scale, sorry I don’t have a picture. Maybe the glue line is from non flatness but it was done on my disc and looked good.
 
but it was done on my disc and looked good.
Do you ave a machinist square to check for flatness? If not, I suggest getting one. It's amazing how little of a rock or variation of exactly equal pressure it takes to ruin flatness.

Don't forget, just because the disc or platen is perfectly square to the rest, the sandpaper is not exactly flat, and that's enough to make a difference. It took a while, but I finally resigned myself to having to do some hand sanding clean-up when I want things perfectly flat.

Also, attaching the paper to a granite block with spray adhesive does make a difference. Sometimes the paper will bow up on the leading edge, ruining the flatness unless it's stuck to the surface.
 
Back
Top