Compact Forge Plans (pics of my forge)

Joined
Nov 24, 1999
Messages
4,981
Feel free to put this on your website any way that you want Darren, I just figured I'd upload stuff here a little bit at a time rather than try to email it since my connection is so slow.


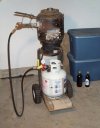
I wanted to make a compact forge that still had decent capacity. It also had to be easily moved. This design allows me to roll it around the shop whereever I want, and it can stand in the corner when I'm not using it.

The body is made out of an old commercial grade propane tank. I took the valve out and cleaned the inside with degreaser and water before cutting it up.
The top is held on with small studs I welded all the way around so that I can lift it off and work on the lining as needed. Makes it very easy to get your hands in there and put the kaowool in and all that.
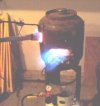
The floor is made out of 2" thick soft firebricks, and the rest is lined with 2" inswool from Darren, with a good coat of Satanite on it. Have ITC100 but haven't had time to put it in and haven't needed it yet either, although I haven't tried welding.
The block floor sits on about an inch of sand so that they stay flat, and the corners are cut off so that the first layer of inswool can go all the way past them to the bottom making a nice seal. Hint: if your cutting blocks, you can use a hacksaw. The teeth will wear off real fast but you can grind new bigger ones in with a bench grinder. They don't have to be sharp just square.
The second layer of of inswool sits on top of the blocks and lines the walls, making a bucket shape, and then 2 more layers (cut in circles to match the tank) lay on top capping it all off. That makes the refractory about 4" thick on all sides, and makes the interior a 7" wide 5" tall cylinder. Its not big enough to do monster bowies but it suits my needs so far.
 

Attachments

  • Shade Forge 2 BFC.jpg
    Shade Forge 2 BFC.jpg
    41.2 KB · Views: 359
The hole for the burner is approximately 2" X 2" and the main opening is about 2" X5".
The burner is my modification of Ron Reil's design for a venturi burner. I've posted plans on here before.
The regulator is is a high pressure regulator that runs from 0-85 psi. I haven't needed to go over 4psi yet :eek:

The pic below is with her burning at 2lbs of pressure. Notice how the flame curves as it comes out of the forge. Thats due to the inside of the forge being round, and the burner being mounted on a tangent to it. This design breaths pretty well. Strong winds coming into the shop bother it, but it has not got to chugging on me or anything yet.
The arm the burner is hanging from folds, and the burner is hung on peices of wire so that it can be lifted off and used as a torch (it runs very well in open air) or for another forge should I want to make a different set up and swap back and forth.
 

Attachments

  • Shade Forge 5 BFC.jpg
    Shade Forge 5 BFC.jpg
    18.7 KB · Views: 174
Here's a pic of it after its been running for 3-4 minutes at 2 lbs of pressure. I think the color from the picture is a little deceiving. Its not quite that bright. I'm not sure you could weld with it at that heat. But as you can see its plenty hot enough to forge or heat treat with. And that is without ITC100, its a very efficient little set up from what I can tell. Pretty much everything but the shell around the two openings stay cool enough to touch no matter how long you run it. There is a handle welded onto the back so that you can easily tip it onto the wheels and roll it out of the way without waiting for it to cool off all the way.

Its mostly made from scraps of steel we had from other stuff. I bought the angle iron to make the legs and the tray but the rest of it was scrounged, including the tank. I don't remember exactly what it all came to cost wise since I didn't have the tank or regulator or anything but its well under $200 and fits my shop perfectly.

Hopefully this helps anyone thinking of building a forge, let me know if you have any qeustions or want more details on how something is done. Thanks for looking :D
 

Attachments

  • Shade Forge 6 BFC.jpg
    Shade Forge 6 BFC.jpg
    16.3 KB · Views: 96
do you have plans on your burner? Nd where did you find your regulator? I am trying to build a burner but my luch wasn't so good.....
 
Here's burner plans. It requires no forging or anything and all the materials can be found in the plumbing section of a lowes, sears hardware, home depot etc.
attachment.php


I bought the regulator from Valley Natural Gas. Its a very large distribution center about 15 miles from where I live. They put together all the plumbing for me except for hooking it to the burner. Cost about $75, which is a little steep, but they had all the fittings needed so I didn't have to go running all over looking for them. I've seen similar regulators online for less.
 
Excellent, thanks Matt, I'll add this when I do the next update! Thanks for letting me post this to the site! With everyone's help, We'll all build a great resource for forge building! :)

-Darren
 
Great-looking forge! You're scaring me though with that flame blowing right over the tank! :eek: I can just see some flux dripping on the hose or a blade falling on it.
 
Yes , that's definitely a safety problem ! Tank ,hose and regulator must be protected ,remember Mr Murphy !
 
Thanks Guys :D
Sorry to take so long to respond, working 2 jobs has kept me out of the shop and off the net lately. I've been working on the same folder for 7 weeks :eek:

Thank you Darren
For making the site, and selling the materials. I wasn't sure how I was going to round it all up before I found your site.


As for the hose and tank, its not as bad as it looks in the picture. It actually loops well off to the side, and the tanks sits back directly under the forge so that nothing can land on it. That was the first thing I checked when I got it running, you can hold your bare hand on any part of the hose, tank, regulator, even the back end of the burner and top of the forge while its running. I don't think I would go with this set up if it was for damascus but I have to learn basic forging first. I may end up welding a shelf on the front level with the bottom of the inside of the forge so I can sit longer peices in there, that would also serve to protect the tank even more. I don't know if I'll just go with 1/8" mild steel or if I'll make a bracket for firebricks to sit in (cutting one to match the curved face of the forge doesn't sound fun)

Thanks again guys
 
A very symple and very efective burner can be made by using an iron pipe 10mm diam. close at the end and drill a hole 1 to 2 mm (metric) about 8cm from the and (4") Take a pipe with a diameter off 2" of max 8" drill a hole off 10mm thru near one ends (1,5"). shift that tube over the thin on and fix it the small hole being in the middel of the pipe by welding two small rings on the 10mm pipe but the big pipe is aloud to swing around.
Fix the thin pipe so that the small hole is aimed at your oven (that could be well made by heatfroof briks held tight together by bands of steel.) Put gas throuh the thin pipe with the long end of the thick pipe against the oven. light the gas. This will start up the oven. Ones the oven glows a bit after only a few minutes, turn the big pipe around leaving the short end aimed at the oven. Gas (propane or butane) will take the exact richt amount of oxigen and will burn in your oven where the temperature is going up to the exact temperature you need for making the finest blades even damast. This is a fast and cheap way to start a wonderfull hobby. if you start with suspension-blades from a small car (shape it first with a blowtorch) and harden it by heating it up until it is cherry red and then putting it in oil edge first you can make great blades that are really hard though and won't even rust that easy if you blacken them using linsead oil.
good luck, Kurt ;)
 
I've got no drawing since I made it by heart. First You make the oven. Don't make it too big fore knife making. The bigger the oven the more gas you need. The front is open and accesible. At the back there is a narrow opening where the gas/air comes in (ofcourse o2 will come from the front aswell. Just axperiment with a few fire proof bricks until You got what you like.
About the burner start with a very small hole 0,5 mm for a small oven (you can easily make it bigger) Then experiment with the pressure you got availeble. Key factors are the direction of the small hole. The turnable pipe should lean on/in the oven when using the long (start-up-end) to make the short end lean in the right direction take a 30 cm thin iron bar weld((or screw) it on the big pipe en bend it so that the short end is aimed toward the opening. You really can't miss. I've just moves and most of My stuf is stored at my dad's. I even got an old cole fire with a treadmill (i think its called). It works fine but you can't look throu he cole so the heating is less presice. If it becomes to hot it burns and you can throw it away. Now I just keep it for good memories. It was in the family for a long time. Me beeing the oldest son of the oldest son.... all blacksmits. making coaches/cars etc. (and I was stupid enough to go and get an MBA degree)
Good luck and keep me posted.
 
If you're making swords make sure there is a small opening at the back you can stick the sword throu. theat way you can heat bit by bit staying in control and not using too much gas. :D
 
Back
Top