Comparison of pre/post etching

Joined
Feb 4, 1999
Messages
5,786
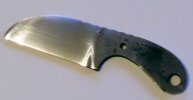
Thought it might be woorth showing too those who don't do this stuff already... The pics are awful (too lazy to bust out the light tent... sorry, Coop!), but they get the job done. The first one is a little Tactical Orange Peeler (actually, won't have any orange on it, so I probably need to call it a Tactical Koa Peeler!) I am working on hand rubbed to 600 grit. The second one shows it after chilling out in my ferric chloride for about 30 seconds, washed and rinsed in soap, and steel wooled with 0000 steel wool. Big difference!

Oh, and in a related note, I doubt these pics show it, but I'm starting to get the hang of this grinding business! :D What I did on this one was grind, tuned it up a bit with my files, then back to the grinder. Worked out well. I thought I could ditch the files forever after the Coote came in, but not so. Oh well! Whatever works! This one has a convex grind. Some discussion between bgoode and me on another forum has lead me to the conclusion that my platen is as flat as Colorado, so I need to do some stuff before I can get anywhere with the flat grinding.
 

Attachments

  • orangepeeler1.jpg
    orangepeeler1.jpg
    8.8 KB · Views: 127
  • orangepeeler2.jpg
    orangepeeler2.jpg
    15.1 KB · Views: 128
pretty cool. Is that 1080 or 1095 steel? I assume it is a plain steel since the line doesnt go straight like on 5160 or O1. What did you use for clay and quench in? :D
 
Thanks, Terry. The pics are awful. That is 1084, and according to what I know about metallurgy, that means it could be darn near anything in the 10xx series depending on who's selling it. I clay coat using stuff in a little tub you can buy from Lowe's. Sounds stupid, but it works great. I used to get caulking tubes full of the stuff, but that was discontinued. Probably absorbs into the skin and turns you crazy! Too late!

Anyway, they have this stuff in a little tub for a few bucks in the furnace/heating area. It's a black/dark gray, smooth furnace cement. Lay it on just like the instructions for using Satanite. Probably about 1/8" is plenty. It sucks up a lot of heat. I usually smear it on and go straight to bringing up to critical temp, and the stuff will puff up quite a bit because of the moisture left in it. I've let it dry overnight, too, and the only difference I've seen is that if you let it dry overnight then heat treat, it sticks to the blade like crazy, whereas doing it the fast/lazy way I mentioned the clay pops right off after quenching. And, for quenching, I use vegetable oil. Sick, huh? Oil fanatics are cursing their monitors right now, but that's what I use and have used for 4 years and it's always worked just fine for me. Doesn't stink up the kitchen when I temper it in the oven, either. "Mmmmm... popcorn? Nope! Knives!"

Very low tech, very easy, very predictable. That's why I use these simple steels.
 
Good stuff C-75, thanks for the pictures and the comments. I'm going to pick up some of that goop at Lowe's next time I'm in San Antonio. Can you give a product name from the tube? I'm guessing that it's premixed, since it's in a tube, so this may be a very handy product for several of the guys that use clay as a heat sink.
 
Nope. If I remember I'll look when I get home. Sorry! It's in the furnace section, a little tub that's around and about 3" tall with a yellow label and white top. I'll see if I can remember to write the name down...!
 
Order yourself a piece of tempered glass the same size as your patten. We use it on all of our grinders. even the 6x48. :cool:
 
Okay, I actually remembered to do this! Here's a picture of the stuff. According to the label it can withstand up to 2100°F. It's 8 oz, and I'll bet for a 4" blade knife I may use a tablespoon of the stuff, tops, so I could probably get a good 40-50 small knives out of this stuff, for under $5. That said, you can order 5 pounds of Satanite from Darren Ellis that will be a lot more economical, particularly if you're doing large blades or high quantity, and you can get 50 pound bags of the stuff for under $40, which will last you for ten lifetimes, so this is an affordable product to use for small blades/small volume/experimentation, but I don't think it's the best way to go for everyone. I got a PM last night about doing some tutorials, which I think I'm going to start working on. I used to have a step by step Concealex sheath tutorial, but that was a LONG time ago. Also had a mosaic pin tutorial on my old website and some other things, but they're long gone. I think I'll come up with some things because people are interested in some of the methods I use, which would be informative for other amateurs like me, so I'll do my approach to heat treating first, then work backward from there. Eventually!
 
DUH! I do that with attachments in email, too! Bonk! I use maybe a tablespoon of this junk on a 3.5-4" blade in 1" width steel. So, it will go a long way, but just looking at the finances of it, if you're doing high volume, big blades, swords, etc, you'll want to eventually get a few pounds of Satanite from Darren Ellis. Or a 50 pounder from a local refractory supply place if you're making a HUGE sword! :D
 

Attachments

  • imperial.jpg
    imperial.jpg
    9.8 KB · Views: 26
Back
Top