Cord wrapped handle any tutorials

AVigil

Adam Vigil working the grind
Platinum Member
Joined
Feb 17, 2009
Messages
7,310
I am making a verison of a "StrongBoy" and I am considering a cord wrap like this one. Any ideas who it is done. I have looked at a lot of ways to wrap but do not seem to be able to find a technique the matches it.

3941-1.jpg
 

Attachments

  • 3941-1.jpg
    3941-1.jpg
    25.2 KB · Views: 11
Not to be cute, but did you do a google search?
I am on my work computer, and don't have my stored links here, but a 30 second search showed a dozen or so with "Cord Wrap Handle Tutorial".
 
Stacey,

I did many google searchs and did not find a one that showed that wrap pattern. Please be so kind to point me to that style of wrap. It is eluding me.
 
Us riggers call that fancywork or plaiting. Maybe head to your local library and check out the Ashley Book of knots. Khww.net might have it on there. Search for member Stormdrane (maybe spelled Stormdrain, I don't remember) on here and youtube, he is known for his paracord projects.


-Xander
 
I've been looking at that too. Pohan has a bunch like that. I can't even master the turks head, much less something like this....lol
 
It looks to me like there are 2
rows of drilled holes in the tang, weave the cord in and out.

paint stick prototypes may help.
 
Last edited:
I've been looking at that too. Pohan has a bunch like that. I can't even master the turks head, much less something like this....lol

Pohan has been very helpful and thought I would give him a rest ;)
 
Us riggers call that fancywork or plaiting. Maybe head to your local library and check out the Ashley Book of knots. Khww.net might have it on there. Search for member Stormdrane (maybe spelled Stormdrain, I don't remember) on here and youtube, he is known for his paracord projects.


-Xander

Wow thanks. There is an entire subculture I did not even know about.... very cool
 
Actually, it looks like he just replicated the wrap work done with silk wrap for a tanto with an oval or D notch on the end for the last wrap. I think Rick Marchand did a tutorial for this type of wrap on here somewhere but I'm not sure exactly when.
 
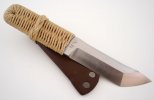
The handle is cut out, or skeletonized. The cord is woven in and out ( from both sides), wrapping around the previous strand. Once you have the first plait done, the rest is just repetition.

I will try and describe it in words,as far as I can guess the procedure, but it looks pretty basic:
The cord starts with the center of the piece of cord over to top at the front.
Bring the ends down ,around, and back through the open center ( from each side).
Go under ( around) the previous cord, over the top, and down through the center.
Continue going under the previous cord, around the edge, through the center,.......
Keep the order of the cords 1-2-1-2-1-2 as they go around the top and bottom so it all looks evenly plaited. An easy way to keep the ends straight is to make one red and one black with a sharpie.

When you reach the end,bring one end out on the top, and the other out on the bottom.
Wrap one end round and round the end of the metal tang. Once it reaches the other side, pull it through the plaiting and tie in place temporarily. Then, take the other end and make the same wrapping loops, going between the previous loops. Pull tightly as you go. Once you reach the end, pull it through the plaiting along side the other loop, glue with a dot of super glue, and trim flush.
Note - If there isn't enough room for the second looping to make it without bunching up, pull a few of the first end's loops out .

That may not be the exact procedure, but it should get you started in figuring the plait out. A little trial and error should get you a nicely plaited handle.

A way to estimate how much cord it will take to plait the handle is to wrap the cord tightly around the tang from the ricasso to the butt. You will need approx. three to four times that length. Try four times on the first time you plait it, and see how close the estimate is . An ancient plaiting proverb is:
"It is far easier on one's soul to waste 1 foot of cord than to wish for 1 inch of cord".

Some other tips:
Before you start, to make the plaiting easier, pull the cord ends tight, and apply super glue for about 2", letting it cure under tension. When dry, cut the ends cleanly to make Aglets from the stiff ends ( Aglets - your word for the day - Thank you Rosemary Rae). A pair of hemostats is also very useful in pulling the ends through the bights.
 
So they have a slot in the center milled out? or 2 slots in the handle milled out. Hard to tell by looking alone.
 
Here is a quick video tutorial I put together, it covers cord wrapping basics and eitching as well. Hopefully this helps somebody out.

[video=youtube_share;xLWs4x5FG34]http://youtu.be/xLWs4x5FG34[/video]
 
Ok, I figured out how to do the wrap, on one side at least :)

Stared at it for hours and traced each strand. Now I have to figure out how to do the same patter on the opposite side :grumpy:
 
Start with the cord looped in a "U" on the front.
One side has a cord and the other side has a cord.
Just do the same from both sides at the same time.
Each cord will end up doing a "figure 8" and come back to to top ready to repeat the plait.


Make an oversize practice "Knife" from a piece of wood. Make it about 2" wide.
The handle is just a long oval frame, with the center cut out.
Use paracord to do the oversize plaiting practice. (Thin Paracord is a good choice for the final handle ,too)
 
Thanks

I have seen a bunch of those videos but none of them have the pattern on the StrongBoy.
 
Joe Paranee currently owns that Strongboy and before that my buddy owned it for several years. It's a nice one and have seen it in person on several occasions!

I made this ghetto tutorial on how to do it...each photo is the knife handle turned over and over. One knot, then flip...and interlace with the knot before on the corner. A LOT Easier than a turks head knot to master.

knottying.jpg
 
Last edited:
Thank Pohan,

I really appreciate you taking the time showing me how to do it. You are always so helpful and courteous.

Much respect brother!
 
Back
Top