couple of knives with hamons, one p-weld cable

Joined
Dec 18, 2008
Messages
760
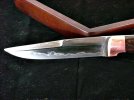
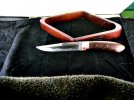
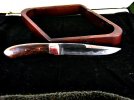
I have been off of the forum for a couple of months. I haven't really made many knives lately due to personal stuff. I made a couple to get back into the swing before I try some full-sized stuff. Plus, I wanted to get my heat treating and polishing down with subtle pattern welded stuff that has a visible grain and hamon. So, here are some of the test pieces made along the way. Two of these, the cable one and the one with ironwood scales and a vivid hamon, I did not finish fully. They were just "test" pieces to look at the heat treatment and blade grain with eips cable for the little blade and 400 layers of random low manganese 1075 and w2 for the bigger blade with ironwood scales. I like to use this full-tang construction on things I am putting together fast and for fun. These will all be gifts to family and friends, and they make really good users.

The blade that is is fully finished, it is just w2, no pattern welding. It has texture on the spine from hammering left on, but is fully finished. The apparent waves in the grind line are due to the hammer texture, not to me losing my vision or something.

thanks for looking. Let me know what you think about the approach of subtle pattern welding with a hamon to imitate traditional techniques. These are all about me learning things so I can imitate traditional knife and swordmaking (especially Chinese and Eurasian, at least that's my plan now).

take care,

Kevin

IMG_0344.JPGIMG_0315.JPGIMG_0372.jpgIMG_0373.jpgView attachment 233962IMG_0367.jpg
 
Last edited:
Here are a couple of pics of the pweld with low mang 1075 and w2.
This is the best hamon I have ever created/polished. It is iridescent, and you could see it change when you turned the knife in the light.

Please Remember - I know that this knife is not "finished" fully, I spent a great deal of care working on the blade and heat treatment. I spent almost no time putting it together after that. It was just a test vehicle to see what the pattern welding and heat treatment combo looked like. So, I know that I did not dress the plunge cuts or get all of the tooling marks out, and the grind lines aren't as straight and crisp as my "real" work, and that a handle scale slipped a hair during glue-up. I didn't intend for this to be anything but a way to study technique. I appreciate comments on the steel grain, pattern, heat treatment, etc. I gave this knife to a friend who is not into custom knives. It was never meant to be a "show" piece or something to sell. Just a study of technique in welding, heat treating, and polishing. That's what this whole group is.

that said: I welcome comments, opinions, insights, etc. regarding the structure and heat treatmen of the blades, tips, things I don't even know I am doing wrong, etc...
thanks,
Kevin
 

Attachments

  • DSC01700.jpg
    DSC01700.jpg
    94.2 KB · Views: 55
  • DSC01702.jpg
    DSC01702.jpg
    75.7 KB · Views: 38
  • DSC01709.jpg
    DSC01709.jpg
    63.4 KB · Views: 33
  • DSC01717.JPG
    DSC01717.JPG
    55.1 KB · Views: 40
Last edited:
They are awesome. :thumbup:
I love making hamons myself too, but I never get anything like that - probably because I use oil :)
just like you, I spend more time finishing the blade than doing anything else.
 
things that will make a huge difference.
1. quench in water
2. (parks or houghton bioquench is a close second)
3. etch using vinegar or lemon juice
4. knock the oxides off from the etch in two different ways. Below the hamon use FFF pumice, emphasize it and rub very hard right along the hamon. I don't even use a slurry, just dry pumice.
5. above the hamon, use either 2500 grit sandpaper or Mother's alum mag polish. Mother's is a little better.
6. repeat the etch, knock off oxides, rinse and degrease, etch process at least 3 and maybe 8 or 9 times. You can do the first two in ferric to speed things up, but the next 4 or so should be in vinegar or lemon juice. The milder acids do better at differentially-etching the hard verus soft material, and the difference is huge. I was giddy the first time I tried it (on a blade I had already polished using ferric for etchant). I got the idea from Walter Sorrells' video. I did not make it up myself. the pummice idea comes from JD Smith, the Mother's from Walter. I am just using what they taught.

kc
 
Wow... those are beautiful. I am not usually impressed, but damn... those are beautiful. The blade just jumped out at me as soon as I saw the picture. I love the edge, the curve of the handle, and the hamon pattern. I also like your decision not to do a finger guard; it makes the profile of the design very smooth and dangerous-looking. Really, it works very well together.

Two thumbs up.
 
Those are great, Kevin, the hamons are very nice. Once I started trying the lemon juice I got a little giddy myself at how it "highlighted" the hamon. Great job!
 
things that will make a huge difference.
1. quench in water
2. (parks or houghton bioquench is a close second)
3. etch using vinegar or lemon juice
4. knock the oxides off from the etch in two different ways. Below the hamon use FFF pumice, emphasize it and rub very hard right along the hamon. I don't even use a slurry, just dry pumice.
5. above the hamon, use either 2500 grit sandpaper or Mother's alum mag polish. Mother's is a little better.
6. repeat the etch, knock off oxides, rinse and degrease, etch process at least 3 and maybe 8 or 9 times. You can do the first two in ferric to speed things up, but the next 4 or so should be in vinegar or lemon juice. The milder acids do better at differentially-etching the hard verus soft material, and the difference is huge. I was giddy the first time I tried it (on a blade I had already polished using ferric for etchant). I got the idea from Walter Sorrells' video. I did not make it up myself. the pummice idea comes from JD Smith, the Mother's from Walter. I am just using what they taught.

kc

How do you do the etch? Do you just brush the blade with vinegar and let it sit for a while? How long do you let the vinegar sit on the blade before washing it off for the next etch? Do you fully remove the oxides between etches?
 
I use lemon juice that's been warmed to almost boiling - speeds things up.
I plan on trying aluminum oxide in 800 - 1200 grit on the blade I work on now. Also Walters dvd :D
 
I think you will get the same basic result from the a. o. that I get from pumice. I couldn't find any loose aluminum oxide for cheap so I went with pumice.
Thanks for the compliments, guys. This shape is modelled after a hunting knife that my family used to take apart the deer we killed off of our farm each year. You can get this shape inside places but won't slip with cold fingers.

I have a pvc tube full of vinegar, I just hang the clean blade in vinegar for an hour or two while I hang out with my wife, even 3 or 4 won't hurt with vinegar. Every now and then go downstairs and knock the oxides off with mother's and pumice and go back to hanging out. By the time I get to this point on a blade, I have done a marathon of polishing, and I want to relax.

kc
 
Back
Top