The collar is called a ferrule. On Japanese knives, it is called a fuchi.
As a former oboist, I can tell you that a reed knife must be thin but rigid, have an absolutely straight edge, and be at very shallow angle. The best steel is a high carbon simple steel like W2 or Hitachi white steel. ( Yes, back in the 1960's, I was a fairly accomplished oboist. I was even offered a scholarship interview to Oberlin, but wanted to pursue physics.)
As for making ferrules, it is very simple. There are two types - One is a simple sleeve that keeps the handle end from splitting. This requires a pretty close fit of the handle to the tang, as the opening will show. The other has a solid metal end on it. The solid end type is great, because it allows the tang hole in the handle to be larger, since it will be covered.
Copper is an excellent choice. On a small knife like this, use regular copper pipe and fittings from the hardware store. Copper can be annealed to make it soft for shaping by heating to a dull red color and then quenching in water. In places where the ferrule needs to have a size reduction, like your photo, sometimes the reducer fittings used to mate different size pipes will work. It is best to keep things simple and not try to complicate things.
Start with a piece of pipe or a coupling in the desired size. If the exact size isn't available, use a smaller size, anneal it, and stretch it by hammering on a tapered mandrel or just hammering with a round rod inside the piece. By hammering around the piece, it can be stretched a lot. You may have to re-anneal the copper a couple times if you work it a lot. If you work it with a polished ball peen hammer , the little divots look quite attractive. Just hammer hundreds of little dimples. The piece will stretch as you hammer. Once it is the shape and diameter you wish, you can trim to the needed length and sand the ends smooth and use it as a sleeve ferrule, or add an end plate. I almost always add an end plate.
To do that, cut out a piece of copper sheet ( or cut down the side of a piece of annealed pipe and flatten it out). The piece should be a bit larger than the sleeve. Flatten it and sand clean. Flatten and sand the end of the sleeve. Place them on each other sitting on a fire brick or other fireproof surface. Braze them together with hard silver solder, using a small torch tip. I like to use the 1200°F "hard" sheet type silver solder. (Note- this is not the soft solder used to put guards on blades. That 400°F stuff will not work.) Once the solder has flowed, allow to cool undisturbed and after it is cool, trim off excess copper and file the plate flush with the sleeve. You can also stop filing just shy of flush, and leave a tiny rim if desired. Pickle the piece in sodium bisulphate or jewelers pickle, and sand clean. 4-O Steel wool is good for getting a final finish. For a black look, similar to shakudo, soak in livers of sulphur several times until a dark silvery black. Wash and rub with the steel wool after each soak, and repeat until the desired depth of color is attained.
Cut a slot to match the blade tang in the collar and fit the handle to it. Fill hole in the handle with epoxy, assemble blade/ferrule/handle, wipe off any squeeze out with denatured alcohol, and let the resin cure.
For a more advanced project, you can make the sleeve from silver sheet stock. You roll a piece up and hard solder the side seam. From there is is pretty much the same as above.
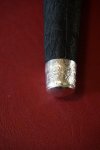
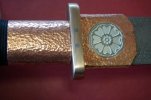
Here are some photos of finished ferrules and fuchi made by the above techniques: