- Joined
- Jan 27, 2006
- Messages
- 497
OK,....so there are lots of posts on modifications of the Cold Steel T-Hawk, but a search here showed "nuttin" on the CRKT CMJ 2730 Chogan T-Hawk.
What have you all been waiting for!")
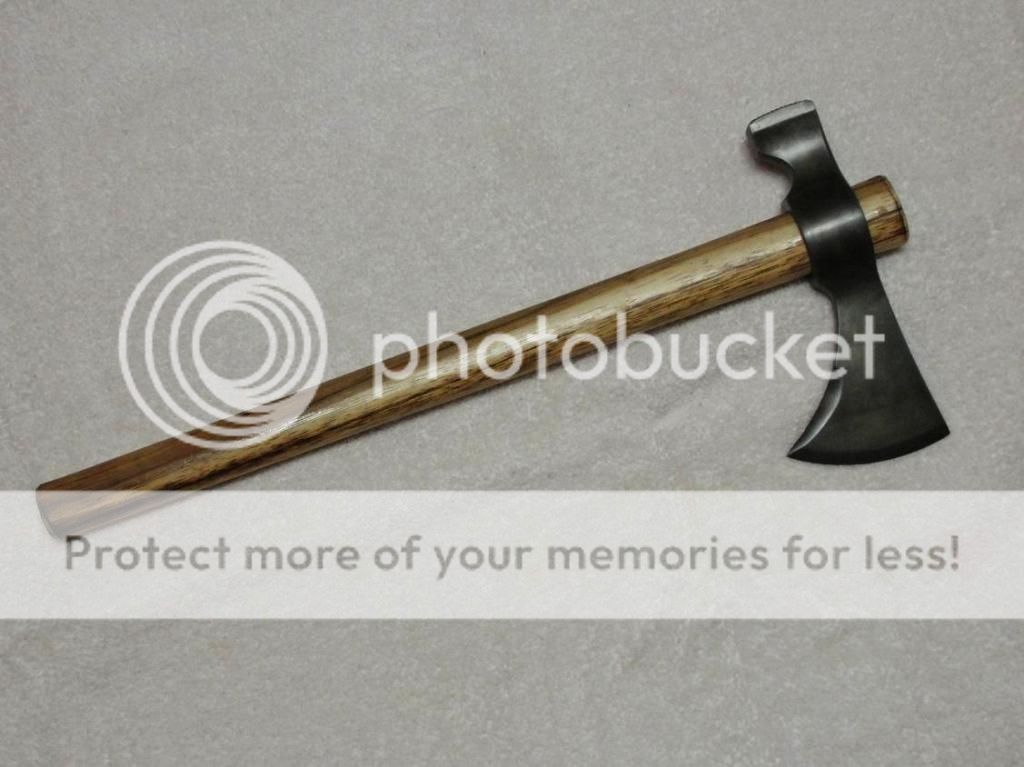
I just picked one of these up on Amazon and it was delivered a few days ago. The blade was fairly sharp, but needed a bit of work to get an edge I was satisfied with. While I was at it, I decided to do a few modifications of the Bit at this time. I never imagined I would be putting almost 7 hours into this one, but once you get started it's addictive to get it just the way you want it! My previous 35 year career Jewelry repair "fussiness" at work even here.
Initially I thought I would add some file work to the top (and possibly the underside?), but decided this T-Hawk best represents a workhorse design, and to "pretty" it up a bit was out of character for it's intended use.
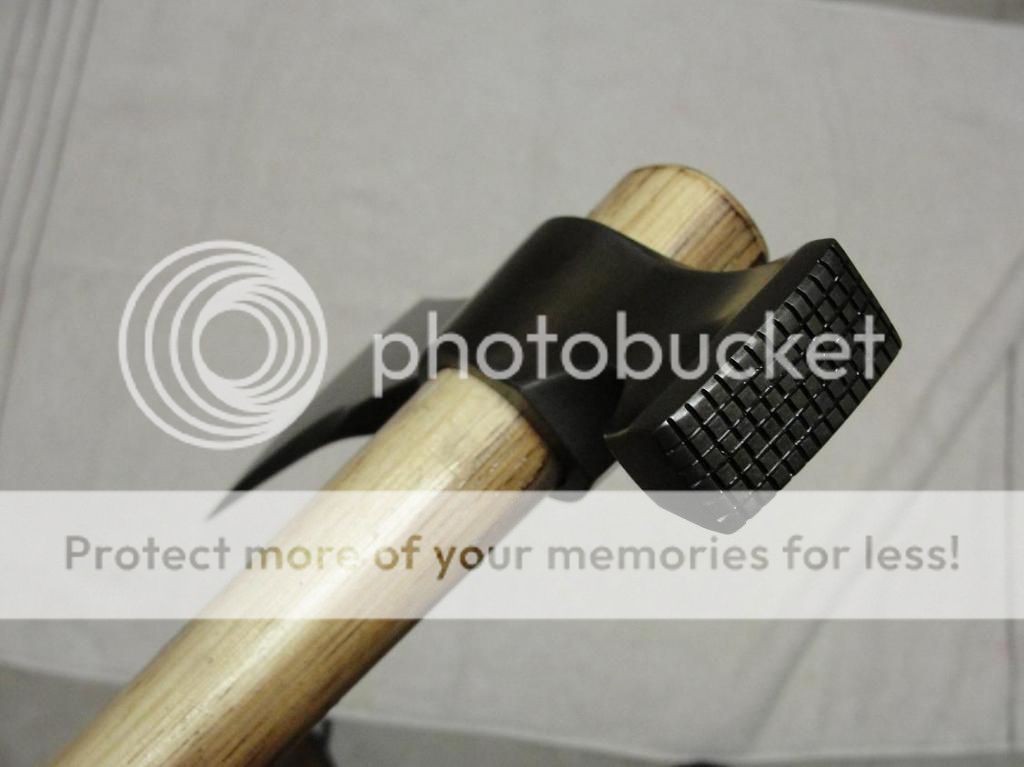
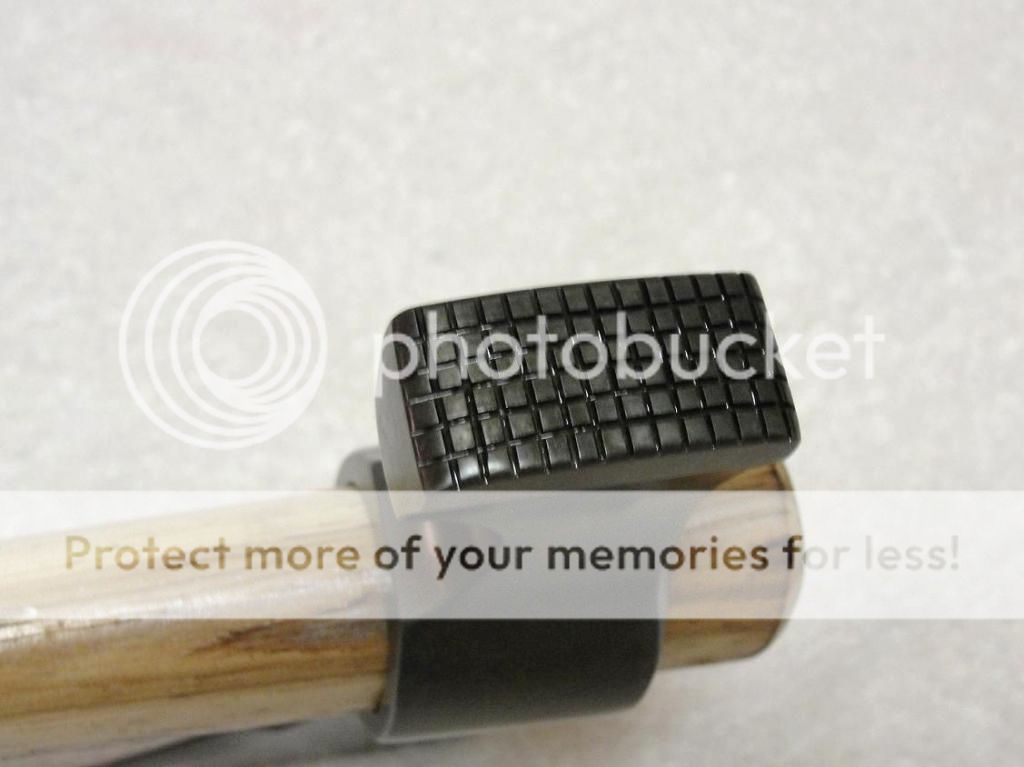
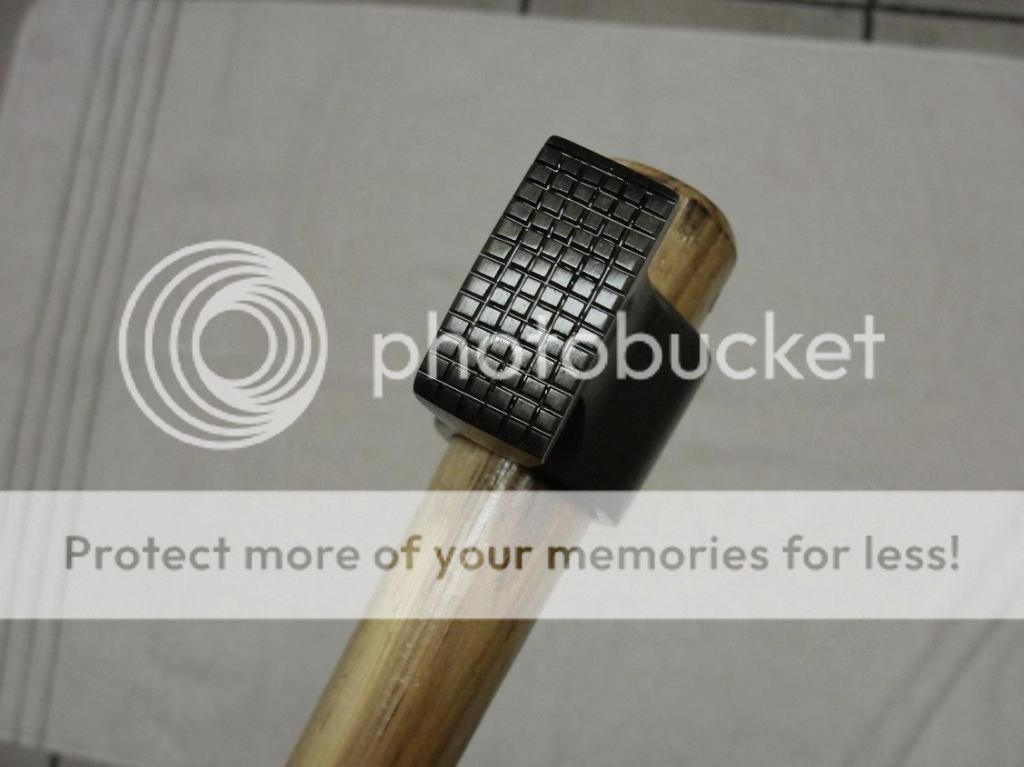
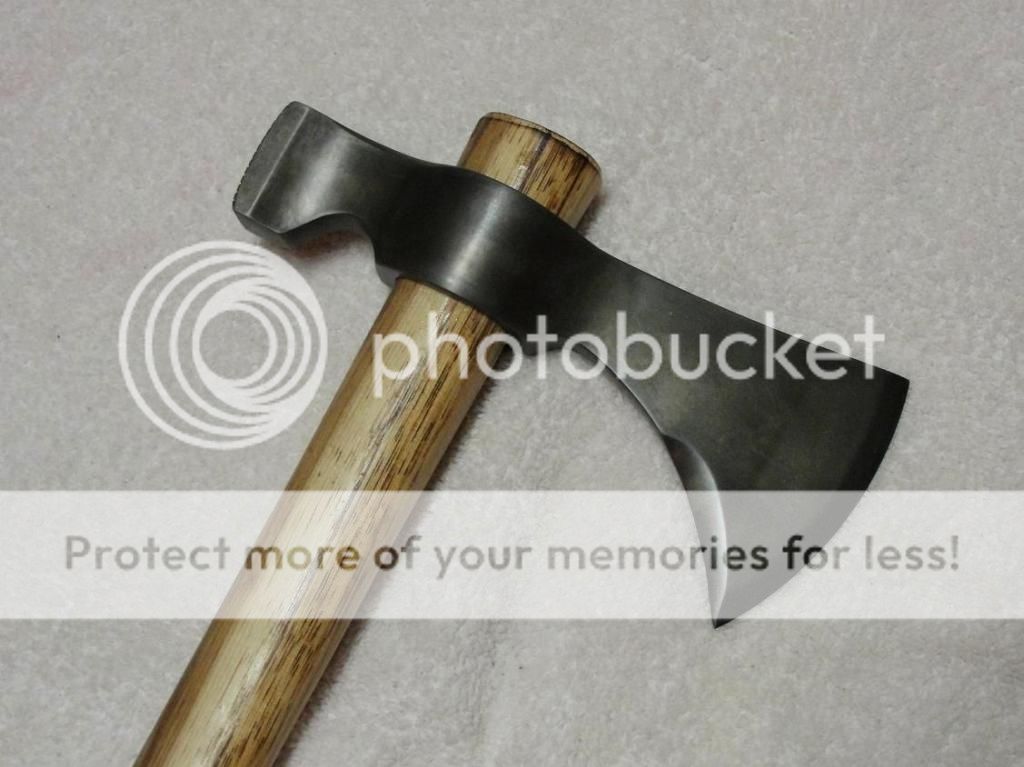
The first thing that I did was add some "teeth" the the hammer poll, as on reviewing a post on another T-Hawk having that feature it really DOES aid in keeping hand made wooden/branch tent stakes and animal trap stakes from slipping off. (especially when the wood is wet!)
I was concentrating so much over the last 3 days working on this, that all the pics are of the completed work, including a hot bath for 15 minutes in some Apple Cider Vinegar to get some protective "blue" on the carbon steel bit. (for a "primitive" blue look) I also figured that if you already own this T-Hawk, you already know what the stock version looks like.
The hammer poll was "checkered" simply but effectively with just a 1" cut off disc in my hand held Foredom flexible shaft machine,....much like a Dremel but more of a pro level construction. (used one over 35 years in Jewelry repair) Efforts were made to keep the depth of cuts as even as possible for cosmetic reasons, but not functionally important of course.
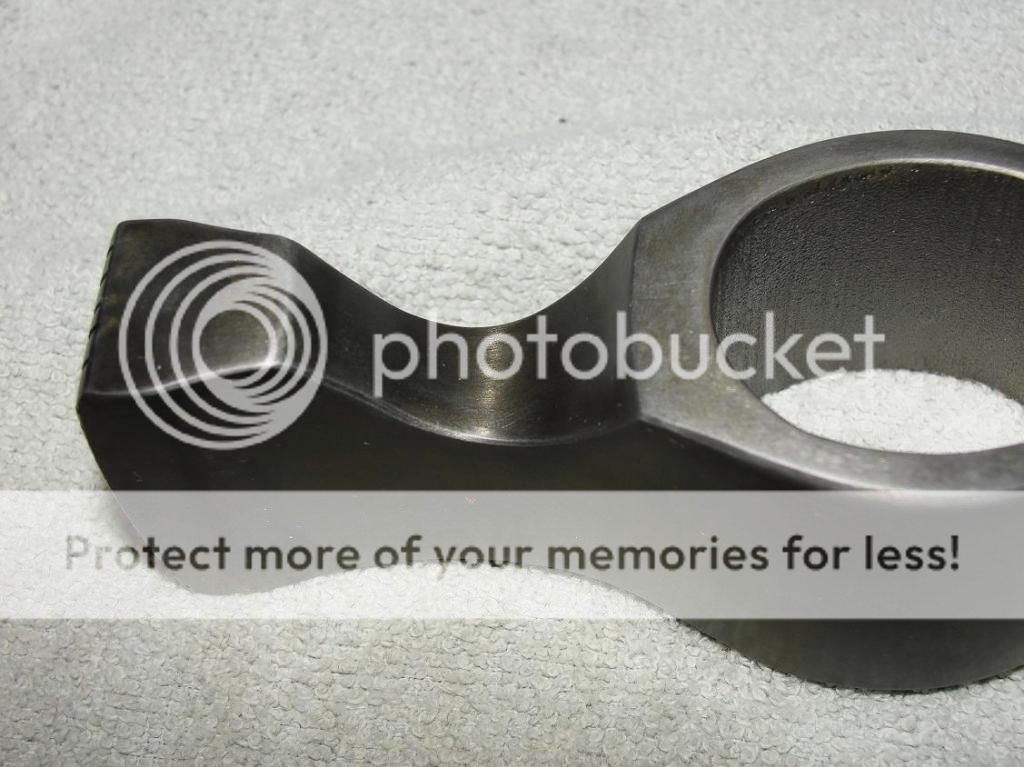
Before I stripped off the paint, I used a sharp set of dividers to mark off the lines so that they would be fairly even throughout the hammer poll area. I decided for now not to bring the squares to any sort of point, as I found that they work quite well like this,....with just the approximately 90 degree cuts and sharp edges. Also, diamond points would chew up plastic or aluminum stakes much more, and this works fine as is.
I suppose the wooden stakes "compress" a bit into the 1.5mm deep channels when struck, so that there is some "bite" into the tops of the wooden stakes.
By the way, cutting the squares freehand took maybe 1 hour previously, and I used a 2.5 power magnifying headband to see the scratched in lines and protect the eyes also. You only have one shot to get the lines straight and in the right place, so take your time.
I found that grinding in a very light scratch first on ALL the lines was a bit safer, and then go back and deepen each one to the depth you want. This allows you to correct a small position error, and any missteps can later be sanded out flush at the end. The light starting grooves also tend to guide the cutoff disc, but work slow to get it right.
Overall the "look" of the hammer poll came out sweet, and as a freehand job tough to better with my 58 year old eyes and bum shoulder. (very painful calcific rotator cuff tendonitis for 4 years now! :grumpy: )
A few pics of the poll area:
As you can see, all the original paint was removed, as well as the PITA "hammered" finish in the steel. Initially I used a 1/2" rubber drum sander to remove all the paint (fairly thin coat), as well as all the hammered finish "dimples". (relatively deep in this hardened steel) THEN the real work began, with HAND SANDING using a small wooden block and 220 grit sandpaper to get the surface as flat as possible. 600 grit followed and I stopped there as this IS a tool after all, and not a wall hanger!")
The hand sanding is tedious for sure, and took over 5 hours in total, split up over 2 days as it's tough on the fingers and I have a painful shoulder besides. The sanding time is of course compounded by dealing with already hardened steel. (takes lots of pressure to dig in) Next time I'll search out a small angle grinder / sander to save some effort, although you'll have to be mindful to keep the bit fairly cool. Hand sanding NOT an issue with heat on this hard stuff!
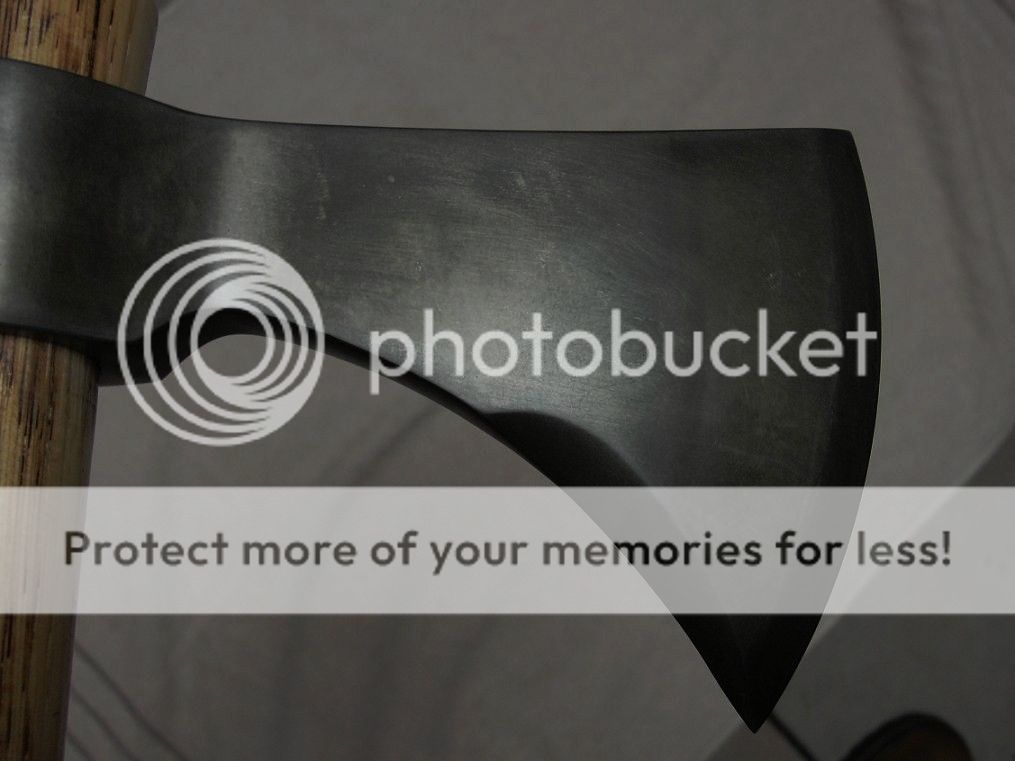
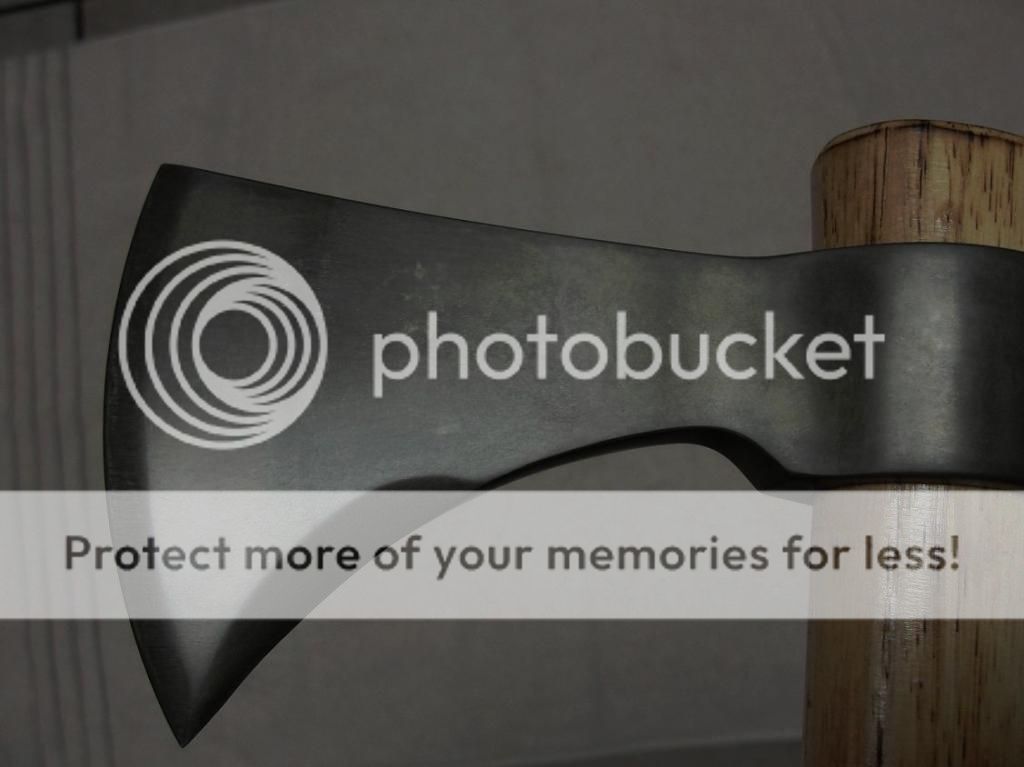
The Apple Cider Vinegar gave a decent "vintage" blue look to the T-Hawk Bit, but I noticed an interesting dividing "line" emerged where I believe the bit was differentially hardened for the blade edge, and lesser but still noticeable at the hammer poll area. Apparently the harder the steel, the more color it accepts off this primitive bluing method.
It would seem to me that this very easy and quick primitive "blue" is especially suited to a hard working tool who's head, which can be easily removed and touched up as needed thru use. :thumbup:
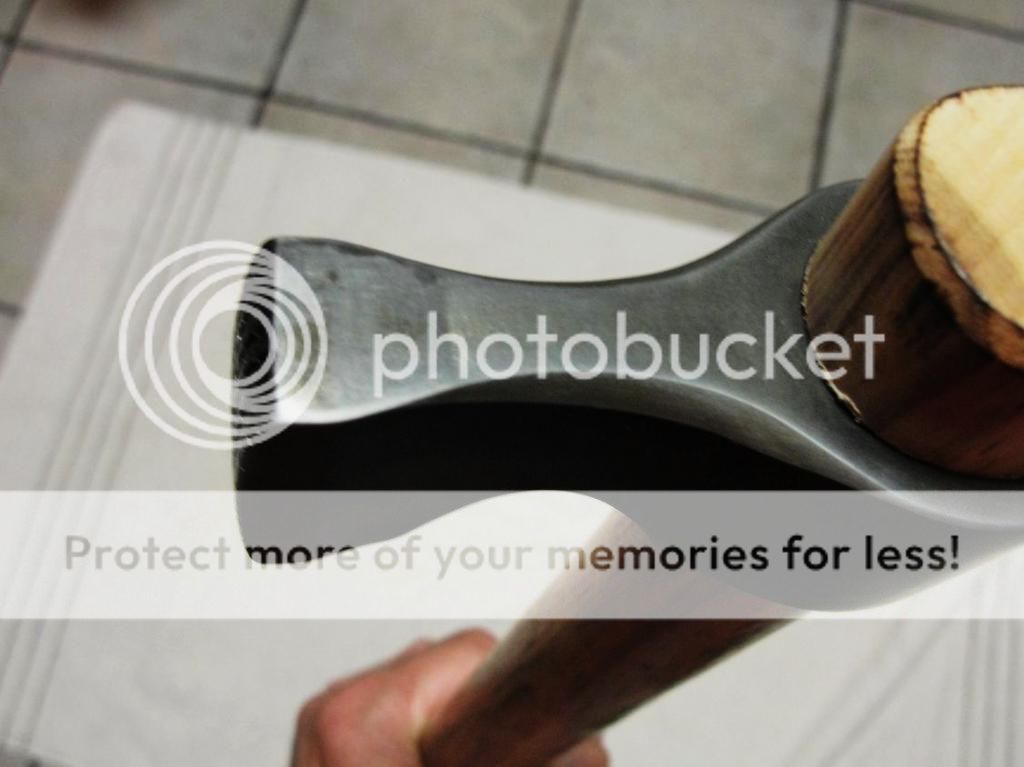
Less pronounced, but still a dividing line appeared at the poll end due to the bit harder steel there:
Of course I slightly beveled the previously sharp edges to the shaft opening (both top and bottom), so that the handle seats more securely and with less scuffing to the wood. ALL original bevels were also smoothed up (along the beard and also along the working blade edge), as they were too coarsely ground for my taste. They blend in much better now with the much smoother overall finish. (feels buttery S M O O T H now :thumbup: )
I'm surprised CRKT doesn't offer a better finished and blued version of this, even at double or triple the price. Considering what custom makers often get on a forged T-Hawk,.......I'd thing they'd sell quite well at $110 to $140 range maybe. (My Amazon purchase for this was only $40 shipped)
I still plan to do a little work on the handle, such as adding a lanyard hole (possibly some "grip" material also?),...and removing the marks left at both ends from turning the wood at the factory. I may also carve into the wood above the bit the letters "CRKT", and possibly "2730" or "Chogan", but haven't settled on that yet.
The piece of Hickory this came with is fairly nice, with some nice grain lines. But I plan to strip off the finish and add a bit more color as one side is lighter than the other, and put on a hand rubbed in finish.
.....still a work in progress,......but the rest will be easy!
What have you all been waiting for!
I just picked one of these up on Amazon and it was delivered a few days ago. The blade was fairly sharp, but needed a bit of work to get an edge I was satisfied with. While I was at it, I decided to do a few modifications of the Bit at this time. I never imagined I would be putting almost 7 hours into this one, but once you get started it's addictive to get it just the way you want it! My previous 35 year career Jewelry repair "fussiness" at work even here.
Initially I thought I would add some file work to the top (and possibly the underside?), but decided this T-Hawk best represents a workhorse design, and to "pretty" it up a bit was out of character for it's intended use.
The first thing that I did was add some "teeth" the the hammer poll, as on reviewing a post on another T-Hawk having that feature it really DOES aid in keeping hand made wooden/branch tent stakes and animal trap stakes from slipping off. (especially when the wood is wet!)
I was concentrating so much over the last 3 days working on this, that all the pics are of the completed work, including a hot bath for 15 minutes in some Apple Cider Vinegar to get some protective "blue" on the carbon steel bit. (for a "primitive" blue look) I also figured that if you already own this T-Hawk, you already know what the stock version looks like.
The hammer poll was "checkered" simply but effectively with just a 1" cut off disc in my hand held Foredom flexible shaft machine,....much like a Dremel but more of a pro level construction. (used one over 35 years in Jewelry repair) Efforts were made to keep the depth of cuts as even as possible for cosmetic reasons, but not functionally important of course.
Before I stripped off the paint, I used a sharp set of dividers to mark off the lines so that they would be fairly even throughout the hammer poll area. I decided for now not to bring the squares to any sort of point, as I found that they work quite well like this,....with just the approximately 90 degree cuts and sharp edges. Also, diamond points would chew up plastic or aluminum stakes much more, and this works fine as is.
I suppose the wooden stakes "compress" a bit into the 1.5mm deep channels when struck, so that there is some "bite" into the tops of the wooden stakes.
By the way, cutting the squares freehand took maybe 1 hour previously, and I used a 2.5 power magnifying headband to see the scratched in lines and protect the eyes also. You only have one shot to get the lines straight and in the right place, so take your time.
I found that grinding in a very light scratch first on ALL the lines was a bit safer, and then go back and deepen each one to the depth you want. This allows you to correct a small position error, and any missteps can later be sanded out flush at the end. The light starting grooves also tend to guide the cutoff disc, but work slow to get it right.
Overall the "look" of the hammer poll came out sweet, and as a freehand job tough to better with my 58 year old eyes and bum shoulder. (very painful calcific rotator cuff tendonitis for 4 years now! :grumpy: )
A few pics of the poll area:


As you can see, all the original paint was removed, as well as the PITA "hammered" finish in the steel. Initially I used a 1/2" rubber drum sander to remove all the paint (fairly thin coat), as well as all the hammered finish "dimples". (relatively deep in this hardened steel) THEN the real work began, with HAND SANDING using a small wooden block and 220 grit sandpaper to get the surface as flat as possible. 600 grit followed and I stopped there as this IS a tool after all, and not a wall hanger!
The hand sanding is tedious for sure, and took over 5 hours in total, split up over 2 days as it's tough on the fingers and I have a painful shoulder besides. The sanding time is of course compounded by dealing with already hardened steel. (takes lots of pressure to dig in) Next time I'll search out a small angle grinder / sander to save some effort, although you'll have to be mindful to keep the bit fairly cool. Hand sanding NOT an issue with heat on this hard stuff!

The Apple Cider Vinegar gave a decent "vintage" blue look to the T-Hawk Bit, but I noticed an interesting dividing "line" emerged where I believe the bit was differentially hardened for the blade edge, and lesser but still noticeable at the hammer poll area. Apparently the harder the steel, the more color it accepts off this primitive bluing method.
It would seem to me that this very easy and quick primitive "blue" is especially suited to a hard working tool who's head, which can be easily removed and touched up as needed thru use. :thumbup:

Less pronounced, but still a dividing line appeared at the poll end due to the bit harder steel there:


Of course I slightly beveled the previously sharp edges to the shaft opening (both top and bottom), so that the handle seats more securely and with less scuffing to the wood. ALL original bevels were also smoothed up (along the beard and also along the working blade edge), as they were too coarsely ground for my taste. They blend in much better now with the much smoother overall finish. (feels buttery S M O O T H now :thumbup: )
I'm surprised CRKT doesn't offer a better finished and blued version of this, even at double or triple the price. Considering what custom makers often get on a forged T-Hawk,.......I'd thing they'd sell quite well at $110 to $140 range maybe. (My Amazon purchase for this was only $40 shipped)

I still plan to do a little work on the handle, such as adding a lanyard hole (possibly some "grip" material also?),...and removing the marks left at both ends from turning the wood at the factory. I may also carve into the wood above the bit the letters "CRKT", and possibly "2730" or "Chogan", but haven't settled on that yet.
The piece of Hickory this came with is fairly nice, with some nice grain lines. But I plan to strip off the finish and add a bit more color as one side is lighter than the other, and put on a hand rubbed in finish.
.....still a work in progress,......but the rest will be easy!

Last edited:

