Deep pouch dangler sheath tutorial

Joined
Jun 4, 2002
Messages
3,930
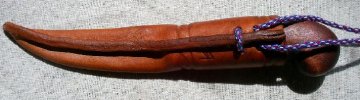
Yvsa asked me if I would do a quick rundown, with pics, of how I make wet molded, single seam, traditional style knife sheaths. Before I get started, let me just make clear that I obviously don't know everything, and there's always more than one way to do something. This just happens to be the way I go about it.

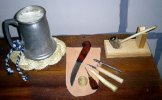
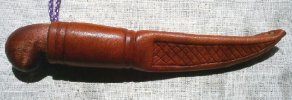
Okay, first pic, got my tools and materials laid out. What we've got here (besides my homemade pipe and ale mug) are some 8 ounce veg tanned leather (about as thick as two pennies stacked together), some waxed nylon thread, saddlemaker's needles (they're poking out of that cylindrical wooden needle case), a leather punch that makes 1/8" diameter holes, and the tip of a deer antler (used for smoothing seams and tooling designs).
*Some notes for fellow po-boys, if you can't get your hands on saddler's needles, or proper thread, and there ain't a leather craft or hobby store around, there probably will at least be a fabric store where the gals go to get their sewing stuff. Go in there and find you some tapestry needles, they've got fairly big eyes, and fairly blunt points just like saddler's needles, and work just as well. Now, for thread, look in the section with stuff for upholstery work, and you'll more than likely find some strong waxed nylon thread used for sewing buttons onto couches and stuff. Good to go. Don't have an awl? You can make a good'un out of an old ice pick. The one in the picture was made from a chainsaw file, with a hunk of rosewood, and brass from an M-16 cartridge for the handle. Scrounge around, be creative.

attachment.php
 

Attachments

  • Picture 001.jpg
    Picture 001.jpg
    54.5 KB · Views: 223
Pic #2, getting started
First, dampen your leather, don't soak it, just wet it enough for it to become pliable. Then, using your fingers (tools leave marks), start gently molding the leather around the knife (it's a good idea to tape the edge and point, but I don't do that anymore, I just work carefully). Obviously some knives, like those with guards and such, don't adapt well to this style of sheath, but there's some tips and tricks I'll share with you in the wrap-up about how to work around some problems.

Work slow, be patient, if the leather's too damp, it'll be soft and not want to hold it's shape at first. As it starts to dry a bit, it'll begin to stay pretty much in the shape you mold it into. You want to mold the leather around the knife, so that it comes together at the center in the back, like in the picture. You'll note that I've already thrown a couple stitches in down at the point end, to sort of mark and hold the point. I always work from the point end up, so I can better adjust the fit as I go.

attachment.php
 

Attachments

  • Picture 004.jpg
    Picture 004.jpg
    45.7 KB · Views: 218
Thanks for doing this Sarge. I'm going to try it on a current knife.
 
Pic #3 Stitching
Using the awl, pierce your stitching holes. Then using two needles attached one on each end of a piece of thread about 4 times as long as the finished seam will be, saddle stitch the seam. You won't see any scribed lines, or marks from an overstitch wheel in this pic, might be useful to do so, but to me that's just more tools to buy, and my old eyeball works pretty good.

Do not punch all your holes and then stitch. The leather will shift and adjust as you draw the stitching down tight, and you'll wind up with a warped and ill fitting sheath. Just punch about three to four holes, then stitch 'em. Take note of whether or not your intended line has shifted, and adjust your next batch of holes accordingly.

Another important note; Look where I'm putting the holes, not snug down against the knife, but slightly away from it. The stitching draws the leather tighter, and it will shrink slightly, tightening up a skosh more, when it dries. If you get fixated on getting things nice and tight, you'll wind up with a sheath you can't get your knife out of.

When you get to the end of the seam, you don't need to tie knots, just double back and throw in three to four more stitches following the ones you just stitched.

attachment.php
 

Attachments

  • Picture 006.jpg
    Picture 006.jpg
    39.4 KB · Views: 215
Pics #4 and #5
Now you get to see what I use that antler tip for

Trim away your excess leather from the back with a SHARP knife. You want to trim down close to the seam, but not so close you cut into your stitching. Then use something smooth and hard (like an antler tip?) to burnish (polish) down the trimmed seam. I've carved the pointy end of my antler tip into somewhat of a stylus, and that's what I use for tooling in a bit of decoration.

The punch is used to put in four holes for threading the suspension cord that the sheath will dangle from. There's other methods/approaches you can use, but I like this one best (duh, it's simple).:D

attachment.php


attachment.php
 

Attachments

  • Picture 009.jpg
    Picture 009.jpg
    35.2 KB · Views: 214
  • Picture 010.jpg
    Picture 010.jpg
    36.7 KB · Views: 216
Picture #6 and #7

Finished sheath, dyed, sealed, and with suspension cord in place. Like that red white & blue cord? It's Japanese Kumihomo round braid. A simple eight thread braid like that can be learned by most folks in just a few minutes, and you can cut out the necessary jig from a piece of cardboard. It's a skill I love teaching to kids, because they have a lot of fun with it (maybe a future tutorial?).

attachment.php


attachment.php
 

Attachments

  • Picture 011.jpg
    Picture 011.jpg
    44.1 KB · Views: 212
  • Picture 014.jpg
    Picture 014.jpg
    60.9 KB · Views: 207
So, no glue? How do you seal the leather?
 
aproy1101 said:
So, no glue? How do you seal the leather?

Neat Lac, Super Sheen, whatever floats your boat really. There's a plethora of stuff out there you can use. Of particular interest to you though Andy, is that this style of sheath just loves the old hot wax dip. ;)

Glue, for what? :confused:

Sarge
 
Wrap up

As you can see by this pic, the wet molded, single seam, sheath is fairly adaptable to a variety of knives, but works best for guardless, reasonably straight bladed knives.

attachment.php


Obviously, the sheath I used in the tutorial is one I quickly knocked out last night for that purpose, but you can get fancy with 'em if you take your time.
A really stout, cool, sheath can be made by carving a wooden inner scabbard, inserting the knife into it, and then molding the leather around the whole rig.

Where will you run into problems? Well, if the blade is wider than the handle, and you mold the leather directly around the knife, guess what ain't coming out of the sheath? In those cases, I simply whittle a wooden shim and tape it to the handle, so it mimics the blade continuing up the knife, until you hit a point where the handle is wider. If that don't make sense, take a close look at a couple of the knives in the above picture, and you'll clearly see what I'm talking about. The sheaths are molded to the handles, but you'll see a little ridge jutting out that makes room for the blade to be withdrawn/inserted.

By tinkering around with shims, and spacers, you can make these sheaths fit dang near anything within reasonable parameters.

I hope this thread proves useful to y'all, and that you enjoyed it. :D

Sarge
 
Thanks Sarge. Yes. Very useful. Very suprised you used 8 oz leather too. Neato.
 
aproy1101 said:
Thanks Sarge. Yes. Very useful. Very suprised you used 8 oz leather too. Neato.

I use thicker leather for larger, heavier, knives, but I've never really fretted about 8 oz this or 10 oz that. I buy my leather in shoulders and they tend to fluctuate a bit in thickness. That way I've got thinner leather for smaller knives, and thicker leather for big knives and other stuff. I'll just grab a shoulder and slice me out a piece from where the leather is the thickness I want for whatever I'm working on. The simpler I can make life, the happier I am. :)

Sarge
 
That philosophy beams through you like a flashlight in a tent. I'm learning from it without telling you when it happens. As a student of life, and master of nothing, you gentlemen around here are worth more than gold to me.
 
Great sequence and tutorial.

I notice the ale was not in the later pictures. Do you use it for some special treatment in the process?:D
 
Kismet said:
Great sequence and tutorial.

I notice the ale was not in the later pictures. Do you use it for some special treatment in the process?:D

It's used to lubricate the leatherworker ;)

Sarge
 
Wado Equa Sarge! Much appreciated!!!!:thumbup: :D
I would never have thought of sewing just a few stitches at a time so I'm really glad you clarified that. I'd also probably got the leather to wet as well even though I know better. It always helps to have a guide, mentor, or master teacher when learning new things, saves a lot of waste, for me at least.

There's a fellow ndn here in Oklahoma that is making traditional Cherokee knives and sheaths that are worn around the neck.
The knives are quite a bit larger than the average run of the mill neck knives with blades up to 4-1/2"-5" long and with substantial handles. They aren't made to wear concealed though as they're highly decorated, at least some are anyway.
I can have pretty things, just have to keep 'em on the simple side so it's better that I make my own.;) :)
 
Thanks Yvsa, I hope folks will post some pics of their sheaths as they try their hand at this style. Got some fast learners out there, be putting me to shame lickety split.

Speaking of pics, I like this one, because it so clearly illustrates one of my philosophies; "Don't just collect things, collect the skills to make those things, and you'll never be without them".

attachment.php


The pipe, scrap whitetail deer antler with a wooden stem burned out with a red hot wire. The pipestand, scrap cedar from building a birdhouse, held together with a knife whittled mortise and tenon, no glue, nails, et cetera. The coaster the mug is resting on, scrap sisal rope from another project, woven into an "ocean braid" mat. The table everything is setting on, handmade with hand cut joinery, held together by wooden pegs driven into bored holes, no nails, no screws, just wood.

I gather skills like casting a fishing net, throw the net wide and see what it catches. Put back what you don't need, and keep what you do. And don't forget to share what you have with others. :D

Sarge
 
May I say here that I think the Puukko concept, in blade, handle and sheath is the perfect all around combination.
 
Sylvrfalcn said:
Do not punch all your holes and then stitch. The leather will shift and adjust as you draw the stitching down tight, and you'll wind up with a warped and ill fitting sheath. Just punch about three to four holes, then stitch 'em. Take note of whether or not your intended line has shifted, and adjust your next batch of holes accordingly.

I've encountered this problem. Thanks for the tip!
 
Sarge, my admiration for your skills is unabated.:thumbup:

Thanks for sharing.

Steve
 
Back
Top