zyhano
Gold Member
- Joined
- Dec 3, 2009
- Messages
- 1,593
Hey guys,
here's a howto post on how I made my latest strop. I needed one for my straight razors and had some questions on how to make strops by various people.
There are many ways to make a strop and here is what works for me at the moment. Another good thread on how to make a strop by sharpening expert knifenut can be found here: http://www.bladeforums.com/forums/showthread.php?t=640503
the results that I get of these homemade strops is this:

hair whittling sharp edges.
So no, you don't need to buy strops to get to this sharp. And if you get to this sharp, do you think that you can really go a lot sharper by spending more $$ on expensive strops? It depends on what you want of course and what you want to try out.
You do need to buy the components to make one, but those can be a lot cheaper.
so let's go trough the process.
what is needed to build a strop?
I bought a piece of pine wood, nothing special, just straight flat pine wood from the store.
You could buy hardwood, mdf even a metal plate etc as well. Do not worry about the wood. Requirements are just that it is straight, stays straight and you can make it in the right dimensions for you. Some woods will be more suitable than others, but this simple piece of pinewood of 18 millimeter high, 94 millimeters width and 2 meters long cost me about $7 dollars in a regular store.
I have bought a piece of leather in the past of about 4 mm thickness, vegetable tanned cowhide from the neck. I bought it directly from a leather factory and it cost me about $40 give or take. This was about 1 square meter surface area.
I've made sheaths of this leather (http://www.bladeforums.com/forums/showthread.php?t=723628&highlight=leather+sheath+sebenza) , experimented with the stuff, used it for maybe about 8 strops, some larger some smaller and I still have about 3/4 left. So this piece will last me a long time I guess. It is not hard to obtain smaller pieces for a smaller amount of money, just be creative.
There are two variables: quality of the leather and hardness/softness of the leather.
Quality? I don't know how to tell you if leather is quality. Just go for a source that you like or trust. It's about the finish, tanning, pores, smoothness etc etc. You can google or search on the forums here to find out more about that.
Hardness and softness? That is about how much the leather depresses when you go over it with the metal and this has everything to do with how straight or convex you want the edge angle to be. An excellent visual guide to this process can be found here: http://www.bladeforums.com/forums/showthread.php?t=750008. The thickness of the leather can obviously play a part in the softness/hardness
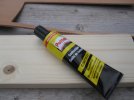
I bought some glue at a leather shop which works fine, but today I bought some other glue in the store, both were around $3. Any glue that says it glues leather and wood will probably work fine so don't worry about it. Some glues have a little more give to it than others, making it possible to have less tension on the material when it dries.
Essentially what you need is that the wood acts as a base for the leather. How you fix the two is not really important, it just has to stick together. Of course you wouldn't want something that you'd have to apply in large quantities so it saturates the leather.
You need a stropping compound or paste. I used to go with Cr2O3 (chromium oxide, the green stuff) and got sharp knives, but not hair whittling. I think that is because I bought low quality stuff, and the abrasive particle size wasn't uniform or too large. You can get high quality Cr2O3 and it should be at about 0.5 micron partice size.
I switched to diapastes by the dmt company recently, got them in 6 micron, 3 micron and 1 micron, so I have strops for each variant. The pastes allowed me to get to hair whittling sharp on my knives. You can get all three for around $22 together.
and finally, you need some tools.
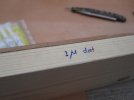
In my case, a knife to cut out the leather, a handsaw to get the right length of the wood and some sandpaper. 60 grit sandpaper for smoothing out the wood (the sawcut) and 600 grit to lightly sand the leather. And a pen, to write on the strop what is actually on it.. You don't want to put different pastes on one strop.
Of course, you can make your strop as nice as you want, with wood carvings, handles etc, the works. That is nice if you want to but it does nothing for the sharpness of your knife or razor. So with these simple ingredients, you can really make a difference for the sharpness of your knives and for your sharpening skills.
I hope you all realize that you can vary the dimensions to what you like.
This strop I build here is wider than my other strops, but that is specifically because I want to strop a straight razor with this one.
Other strops might be shorter, longer, less wide, thicker etc.
It depends on what you want.
Remember though, that the more surface area you want, the more stropping compound or paste you'll have to apply to coat the whole surface. This might make you go through your stash a lot quicker.
Some proper stropping technique is also nice, but this is about experience. There's loads of good threads here with good advice on how to strop so I won't go into that here. I also have a video on youtube telling a bit more about this, you can find it here: http://www.youtube.com/watch?v=-HNO8sPhz4Y
So let's go through the whole process with pictures. Total time to make the strop was 35 minutes including making the pictures, sawing, sanding, glueing, applying paste and stropping itself. The time to get the stuff at the stores is not included")
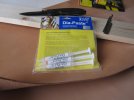
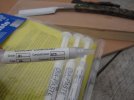
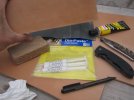
first, some ingredients. The original wooden board, glue, the diapastes, the leather stuff and a razor blade for size reference

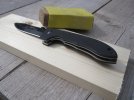
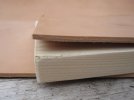
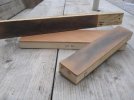
just sawed of a piece of 27 cm long, which is about the length of some of my benchstones. You can see the rough sides, which I'm about to sand with some sandpaper 60 grit.

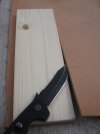
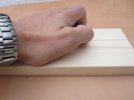
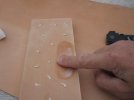
Here I've sanded off the sharp edges and the sawcut teared edges, with 60 grit sandpaper. I've also done the whole surface lightly, just to get the glue to hold a little better.

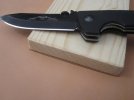
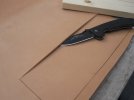
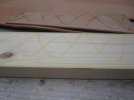
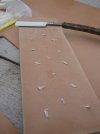
Put the wood on the leather, hold it tight and start to cut along the edges of the wood to get the leather to fit. See if you can find a good part of the leather with a 'grain' going in the direction of the movement you make while stropping. You can feel this since it will be softer to the touch.

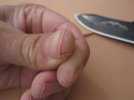
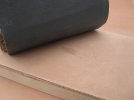
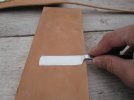
Close up of how I cut through it. You might make a couple of passes to go all the way through the leather. Be sure not to waste any leather, so pick a good spot and cut decisively.

here's a howto post on how I made my latest strop. I needed one for my straight razors and had some questions on how to make strops by various people.
There are many ways to make a strop and here is what works for me at the moment. Another good thread on how to make a strop by sharpening expert knifenut can be found here: http://www.bladeforums.com/forums/showthread.php?t=640503
the results that I get of these homemade strops is this:
hair whittling sharp edges.
So no, you don't need to buy strops to get to this sharp. And if you get to this sharp, do you think that you can really go a lot sharper by spending more $$ on expensive strops? It depends on what you want of course and what you want to try out.
You do need to buy the components to make one, but those can be a lot cheaper.
so let's go trough the process.
what is needed to build a strop?
I bought a piece of pine wood, nothing special, just straight flat pine wood from the store.
You could buy hardwood, mdf even a metal plate etc as well. Do not worry about the wood. Requirements are just that it is straight, stays straight and you can make it in the right dimensions for you. Some woods will be more suitable than others, but this simple piece of pinewood of 18 millimeter high, 94 millimeters width and 2 meters long cost me about $7 dollars in a regular store.
I have bought a piece of leather in the past of about 4 mm thickness, vegetable tanned cowhide from the neck. I bought it directly from a leather factory and it cost me about $40 give or take. This was about 1 square meter surface area.
I've made sheaths of this leather (http://www.bladeforums.com/forums/showthread.php?t=723628&highlight=leather+sheath+sebenza) , experimented with the stuff, used it for maybe about 8 strops, some larger some smaller and I still have about 3/4 left. So this piece will last me a long time I guess. It is not hard to obtain smaller pieces for a smaller amount of money, just be creative.
There are two variables: quality of the leather and hardness/softness of the leather.
Quality? I don't know how to tell you if leather is quality. Just go for a source that you like or trust. It's about the finish, tanning, pores, smoothness etc etc. You can google or search on the forums here to find out more about that.
Hardness and softness? That is about how much the leather depresses when you go over it with the metal and this has everything to do with how straight or convex you want the edge angle to be. An excellent visual guide to this process can be found here: http://www.bladeforums.com/forums/showthread.php?t=750008. The thickness of the leather can obviously play a part in the softness/hardness
I bought some glue at a leather shop which works fine, but today I bought some other glue in the store, both were around $3. Any glue that says it glues leather and wood will probably work fine so don't worry about it. Some glues have a little more give to it than others, making it possible to have less tension on the material when it dries.
Essentially what you need is that the wood acts as a base for the leather. How you fix the two is not really important, it just has to stick together. Of course you wouldn't want something that you'd have to apply in large quantities so it saturates the leather.
You need a stropping compound or paste. I used to go with Cr2O3 (chromium oxide, the green stuff) and got sharp knives, but not hair whittling. I think that is because I bought low quality stuff, and the abrasive particle size wasn't uniform or too large. You can get high quality Cr2O3 and it should be at about 0.5 micron partice size.
I switched to diapastes by the dmt company recently, got them in 6 micron, 3 micron and 1 micron, so I have strops for each variant. The pastes allowed me to get to hair whittling sharp on my knives. You can get all three for around $22 together.
and finally, you need some tools.
In my case, a knife to cut out the leather, a handsaw to get the right length of the wood and some sandpaper. 60 grit sandpaper for smoothing out the wood (the sawcut) and 600 grit to lightly sand the leather. And a pen, to write on the strop what is actually on it.. You don't want to put different pastes on one strop.
Of course, you can make your strop as nice as you want, with wood carvings, handles etc, the works. That is nice if you want to but it does nothing for the sharpness of your knife or razor. So with these simple ingredients, you can really make a difference for the sharpness of your knives and for your sharpening skills.
I hope you all realize that you can vary the dimensions to what you like.
This strop I build here is wider than my other strops, but that is specifically because I want to strop a straight razor with this one.
Other strops might be shorter, longer, less wide, thicker etc.
It depends on what you want.
Remember though, that the more surface area you want, the more stropping compound or paste you'll have to apply to coat the whole surface. This might make you go through your stash a lot quicker.
Some proper stropping technique is also nice, but this is about experience. There's loads of good threads here with good advice on how to strop so I won't go into that here. I also have a video on youtube telling a bit more about this, you can find it here: http://www.youtube.com/watch?v=-HNO8sPhz4Y
So let's go through the whole process with pictures. Total time to make the strop was 35 minutes including making the pictures, sawing, sanding, glueing, applying paste and stropping itself. The time to get the stuff at the stores is not included
first, some ingredients. The original wooden board, glue, the diapastes, the leather stuff and a razor blade for size reference
just sawed of a piece of 27 cm long, which is about the length of some of my benchstones. You can see the rough sides, which I'm about to sand with some sandpaper 60 grit.
Here I've sanded off the sharp edges and the sawcut teared edges, with 60 grit sandpaper. I've also done the whole surface lightly, just to get the glue to hold a little better.
Put the wood on the leather, hold it tight and start to cut along the edges of the wood to get the leather to fit. See if you can find a good part of the leather with a 'grain' going in the direction of the movement you make while stropping. You can feel this since it will be softer to the touch.
Close up of how I cut through it. You might make a couple of passes to go all the way through the leather. Be sure not to waste any leather, so pick a good spot and cut decisively.


")
