- Joined
- Nov 24, 1999
- Messages
- 4,981
I've just about got my forge finished. I have to order refractory and line it and I'll be set. Right now I have the burner finished and have been using fire bricks.
I tried the Ron Reil EZ burner, and wasn't quite happy with how things came out. Having a proper flare for the burn tube is the difference between success and failure. The problem with forging one, is you have to have something to get it hot (kind of tough when your burner isn't done") ), I'm too cheap to buy one, and the other modification I found looked like a total pain in the ass.
), I'm too cheap to buy one, and the other modification I found looked like a total pain in the ass.
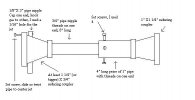
So I came up with this. I'll try to attach a crude drawing.
I get about a 12-15" long bright blue cone shaped flame with it running at about 5 psi Probably not as gas efficient as some other set ups, but it friggin hot considering there's no blower or anything.
You build the back half the same way described in the ez burner plans. For the flare you need a 6" or 8" long 1" pipe nipple. Cut it off so that its only threaded on one end and and about 4" long. Fit a 1 1/4" reducing coupler onto the threaded end of that.
Drill the non threaded end for set screws, I used 4 equally spaced. Slip the 1" pipe over the 3/4" burn tube. You can slide it forward or backward to tune the buner and then tighten it down.
Hopefully your results are as good as mine
I tried the Ron Reil EZ burner, and wasn't quite happy with how things came out. Having a proper flare for the burn tube is the difference between success and failure. The problem with forging one, is you have to have something to get it hot (kind of tough when your burner isn't done
), I'm too cheap to buy one, and the other modification I found looked like a total pain in the ass.So I came up with this. I'll try to attach a crude drawing.
I get about a 12-15" long bright blue cone shaped flame with it running at about 5 psi
Probably not as gas efficient as some other set ups, but it friggin hot considering there's no blower or anything.You build the back half the same way described in the ez burner plans. For the flare you need a 6" or 8" long 1" pipe nipple. Cut it off so that its only threaded on one end and and about 4" long. Fit a 1 1/4" reducing coupler onto the threaded end of that.
Drill the non threaded end for set screws, I used 4 equally spaced. Slip the 1" pipe over the 3/4" burn tube. You can slide it forward or backward to tune the buner and then tighten it down.
Hopefully your results are as good as mine