edgepro apex users....help!

Joined
Dec 19, 2003
Messages
17
i just got my sharpener today and tried sharpening some of my hunting and kitchen knives but i cant seem to get the hair popping sharpness that i am looking for, how do most of you sharpen your blades using this system? on the instruction manuel it shows the knifes back against the 90 degree corner of the blade guide, i would think that the blade and the guide should be flush with one another similar to a lansky sharpener, the knife came with three stones a 180 ,320, and a 600 grit i tried both methods of sharpening using the corner of the guide and having it flush, but still not sharp enough. any suggestions would be appreciated.

thank you
 
I posted this once on another forum and was told it was helpful, so here goes:

- Soak the stones in water for about an hour or a half hour prior to use. This is more important for the finer grits; the medium and coarse stones don't require as much soaking to be used effectively.

- Get a coarse stone for re-profiling. They work much faster than the medium stone. Another alternative is to try the diamond stones that Ben offers but doesn't advertise (I haven't tried them yet myself).

- Tape the blade with some blue masking tape if you don't want it to be scratched. You don't want to learn this one the hard way. Again, this is more of a problem with the coarse and medium grits.

- KEEP YOUR STONES FLAT! One more time, KEEP YOUR STONES FLAT! I'm still looking for the best way to do this, I'm probably going to try the Stone Pond from Lee Valley Tool. If the stones are dished, they don't work as well.

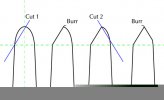
- Make sure you have established a burr on both sides before moving on to the next grit stone. The wear rates for the different grits are different, so the fine grit stones are generally thicker after a long period of use than the coarse and medium grits, which means they grind the bevel at a slightly different angle than the finer grits. You may need to put a little bit of time in with the fine stone to raise a burr even after establishing the bevel with the medium. This becomes less of a problem after multiple sharpenings with the Edge Pro.

- The magic marker trick is your friend. See the Edge Pro website for details.

- Keep the stones wet during use. They have a tendency to glaze over if you don't.

- Don't use too much pressure. It just dishes the stones quicker.

- If you have to grind with the stone for a long time to establsh a bevel, remove the stone from the arm periodically and flip it end-for-end before you reinstall it. This helps to even out stone wear.

- As a finishing step, I sometimes raise the arm very slightly on the guide rod, say 1/32", and make a few very light swipes along the edge. Alternate sides a few times and use minimal pressure. This can be done with the finishing tape too. It helps to knock off a persistent burr.

- When in doubt, call Ben. He's a great guy and will gladly help you out.
 
Roadrunner's advise above is excellent.
I would add one thing only.

It is my experience that allot of 'knife people' have never seen a burr.
Until you can see ( or feel ) the burr, and then can flop it from side to side with one pass of the hone, you are not sharp and have more steel to remove. And this is true with any type of sharpening system or stones you use.

On blades that have never been sharpened with the EdgePro, it takes quite a bit of time to get them all done right, even brand new, out of the box, blades.

Once done, re sharpening is so fast as you always go back to exactly the same settings.


And your progression to forming the 'burr' is greatly helped with the felt tip trick. A 'sharpie' should always be close at hand.
 
Nosmo said:
And your progression to forming the 'burr' is greatly helped with the felt tip trick. A 'sharpie' should always be close at hand.

I think that's the key. If you get the burr part right you don't have to be quite as anal about some of the things Roadrunner is suggesting.

Here's some other suggestions:

-Hold the knife STILL, even if it means going slower or not pressing as hard. Practise. Sometimes, depending on the knife grinds it's REALLY hard to keep the sucker still while you're working on it.

-It's OK to work on one side ONLY until you get the burr and then flip it over. One side of the edge will be a little wider, but who cares.

-Do the push-pull back and forth motion on the coarser grits, but on the finest stone use the push stroke only and go a little lighter.
 
Nosmo and fulloflead are dead right, I should have mentioned the burr as well. It is the fundamental basis of effective sharpening with any system. Once you learn how to feel a burr you can sharpen just about anything.
 
After you get the second burr on the finest grit stone you could strop it off for the best possible edge. (If you search there are plenty threads on stropping.)
 

Attachments

  • BurrDiagram.jpg
    BurrDiagram.jpg
    14.4 KB · Views: 46
thanks for all the info, but....how do you hold the knife on the guide? do you hold the back part of the blade on the 90 degree corner of the guide like the instruction manuel shows or are you keeping the back of the blade flush with the guide?
 
The guide needs to be adjusted so that even the widest part of the blade hangs over the edge. It's also really important that you hold the blade still and flat on the table and yeah even on the Edge Pro it takes a long time to get that first edge on. Work on one side (start with the lowest grit) get your knife steady on the table and work the stone with a light amount of pressure. Do it as long as you think is necessary, then add a good 5 minutes and when you change sides, wipe the stone with a soaking wet towel and then wipe once with a damp paper towel (keeps the metal from clogging the stone). I think that the most important things I learned about getting a really sharp edge on the Edge Pro was to keep the blade steady and having the patience to work each side long enough to get a burr. I can't see a burr as well as I can feel it. By running my fingers lightly over the blade, I've been able get a good feel for the burr and also parts of the blade that have burrs and parts that don't. Also I use my thumbnail to flick the the burr off. And finally I strop it on an old leather belt.
Calling Ben would also be a good idea if you are still having problems. I've trying to sharpen knives for almost 30 years and I was never able to get knives as sharp and as consistantly as I do with the Edge Pro. That consistant angle will keep your knives very sharp with minimum metal removal. :cool:
 
reggie38. All the advice given has been great. The thing with the edgepro is that the knife edge should be kept parallel with the edge of the knife table. Lay the knife blade on the table so that the knife edge is parallel with the table edge and overhangs it. Then adjust the knife guide so that it is in contact with the back of the knife (spine). Depending on blade shape and size more of the guide may contact the spine not just the corner as shown in the directions. Remember that per the directions you may have to slide the blade along the table, depending on blade length, and may even have to pivot the blade so that the tip is parallel to the table edge. Practice moving the blade across the table and adjust the guide accordingly. Sounds more complicated than it is. As I understand it the guide is just that a guide to help you keep the knife edge parallel to the table edge.

The edgepro seems to differ from the lansky in that the lansky clamps onto the blade spine and locks the two together. Also the lansky hone moves in an arc so that it follows the curve of the blade by the tip. The edgepro hone is supposed to be kept as parallel to the edge as possible. Hope this helps
 
Back
Top