What works for me is an old laboratory power supply with ac and dc.
One of those two removes steel the other darkens. That way the dark is in the material and you can go over it with fine sand paper for clean lines
Thanks Henglo, I have looked everywhere for a switchable power supply, cant seem to find one I will keep looking.
Thin characters cut the best.
Thanks Fitzo, That is what I have observed, any letter with a hole in it, for want of a better word, has not worked.
Call Patrica at img-electromark and she can talk you thru exactly what you'll need for the stencils. Either they'll make the stencils per your design, or sell you the stencil film and developer so you can do your own stencils. In years past model railroad controls were cheap and made good method of etching. You battery charger does half the work, and with just a tad of work you can get AC and DC both.
Thanks Ken, I am in England so for convenience have stayed local
I have an industrial etcher...... But I use a quick and easy (cheap & safe) etchant.
1/2 tsp salt
1/2 tsp vinegar
1/2 cup distilled vinegar
Mix, dissolve, damp etching pad. Not too wet.
Gently put on stencil for 3-5 secs. DC Remove for a bit. Repeat maybe 7 times.
Repeat with AC a few times. to darken
*careful, it gets Hotter with AC
Thanks Crag, I will be trying that recipe tonight!
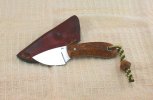
I have nothing useful to add but I saw the broken anvil pic and laughed. I assume you are from near Georgia and bought that anvil the dudes been trying to sale in fb market place/Craigslist for like 2 months? His pics were carefully taken so it's hard to see the whole rear is missing. Awesome etch btw, nice artwork.
Hi Aareeysee, that's not the one, I bought this from a farmer in Todmorden, in west Yorkshire, good job Its broken, I could hardly pick the bugger up as it is, whats left has gotta be 400lb, pleased that you had a chuckle. The artwork is from Silverfish Art in Southport, the steel type stencils are off the peg spine stencils(2mm) and he ships worldwide.
The bigger the surface you are trying to etch the harder it is to get good results. A bigger surface area will also probably need more amps to get the same results.
Use DC first to etch, then switch to AC to darken.
A proper enchant will also probably help. Plan on getting several and experimenting to see what gives you the best result.
Thanks A. McPherson, the first one is 2 amps but that's quite small, the second 3.7amps, the blurry letters I think is my fault, i looked at the mask later and there were lots of the little blue dots that had not stuck onto the steel, DOH! The anvil is a good 6 or 7mm square, if you get me, what amps would that need do you think?
")