- Joined
- Dec 3, 2005
- Messages
- 1,991
Hi guy's,
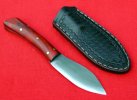
Here is my first try at a Nessmuck and more or less my first try at a "real" knife...
Styled after a 1920's era Nessmuck but I added more lift to the front, while keeping it a bit more "pointy" than the drawing I had to work with...I got tha feva from a post by Scott at Razorback knives and by seeing a few made by dale Chud...I couldnt afford to have one made so with the help of Cantanista Steve Ferguson (I cut it out and ground the bevels, he polished and sharpened it and applied the HT) I made my own and I gotta admit I am happy with it...Now I am working on a slightly smaller model, so I can give a few away this year at Christmas
It is as sharp as a razor and has passed all of my cutting test's with the exception of one...The brass rod test...Anyone wanna explain it to me??
Anywho...Let me know what ya think
Specs are
Steel...5/32 O-1
Blade....3.5"
OAL is...8"
Handle...Cocobolo
Brass pins
Sheath...9-10oz shoulder tooled and stitched by me
Photo by Steve Ferguson
")
")