Recommendation? File work on take down mammoth knife

Joined
Jun 26, 2020
Messages
164
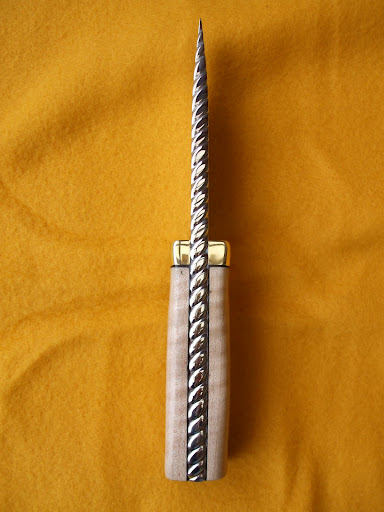
Hello everyone , been working on my first take down knife on which I would have to make filework after it was finished. All went good but now that I’m on to that part I feel nervous as I have not done it, here’s a test work I did on a plate , which one would you recommend me to do the chain or the rope ? I have not done each so any advice is welcome , I used round diamond head to make the round but it turned out as oval so I just did the rounds with a center punch , did the sides with a cone shape diamond dremel bit , should I risk it ? It’s a very expensive knife and last thing I want is mess it up , I’m sure whichever I will do won’t be perfect should I still risk making it ? Whole extra Buttpain was for that decorations on the spacer to make it takedown it will take the knife to next level but I’m nervous to messing it up as I’ve never done it.
8ab82ef41bb8.jpg


aec23ad36786.png


047b95316d70.png


any advice is very welcome! The rope is not made by me ,just as an example
 
I use a three corner file to start with. I finish off the fine adjustments with a knife edge file or a barrette file. You want needle files that stay sharp. I use Valtitan needle files ( 6-7" OAL) and sometimes use half-size needle files (3-4" OAL). Start with a #0 or #2/0 and finish with a #4/0.

The best tip is to mark lines along the surface with a fine point sharpie pen. Make the lines straight across the edge like ladder rungs. You can wipe it off with alcohol and adjust the spacing if it doesn't end right. Don't pick up a file until you have the spacing figured out!

Once you have it spaced right so it ends with even spacing, make angled cuts with the tri-square file at 30-45°( whatever angle you want the rope to lay at) going across the center of the lines. At first just make slight cuts.
Once you have gone all the way around, wipe off the sharpie marks and proceed to cut the rope. Start at one side with an upward angle, raise the file back to level as you reach the middle, and go back to a downward angle as you exit the cut on the other side. You also twist it into the cut and out of the cut as you do that (to make the rope segments "S" shaped It won't take long to get the feel of this "twist". Go around the edge and slowly shape the rope segments. Use the single edge file to make the rope segments rounded.
Practice this on the straight edge of a 1/8" sheet/bar of mild steel or brass. You can grind it back flat and use the piece again and again as you practice various file work patterns.

A tip for doing filework down the so=pine of a blade is to make the file work pattern tighter/smaller as you go down the blade to match the distal taper. This looks very professional.

Thanks for so much good info ! this is the files I have , el cheapo stuff I ordered from Finland , worked good for working on elforyn but I don't know if the edges are good/fine enough to do this work. I could order the ones you told me but it will take minimum 2 weeks until I am able to get it over here , will go in local shops to see if they have any of those fine files. I do have this smaller bolster file but its square...
One thing I think maybe complicated is that the spacer is bent , will that change anything or just continue lines paralel to each other?


ae8ab362dcfe.jpg

f5c7a87ff809.jpg
 
Use what you have to practice with. As I said, learn on a bar of steel first and then do the spacer for this knife. Order some good files and go buy a pack or two packs of the cheap ones from HF. By the time the good ones get here you should have figured the rope file work method out.
 
Use what you have to practice with. As I said, learn on a bar of steel first and then do the spacer for this knife. Order some good files and go buy a pack or two packs of the cheap ones from HF. By the time the good ones get here you should have figured the rope file work method out.
I have some Corradi rasps and they are just top notch , they needle files looks great , if I can figure out their shipping I will ge those.
Should I just continue simetrically on the top bent part as well?
 
Yes, just follow the curves around. You may have to put a slight chamfer on the mammoth on both sides of the spacer so it forms a smooth groove against the spacer once the rope work is done.
 
36b2aefe9b06.jpg
Yes, just follow the curves around. You may have to put a slight chamfer on the mammoth on both sides of the spacer so it forms a smooth groove against the spacer once the rope work is done.
On both sides it has 0.5mm thick brass spacers so I was thinking about that as well , will need to polish but they are barely super glued to the mammoth and I didn’t put the good size on the inside sadly I skipped on that and it rattles a little so if it comes off the mammoth it won’t be good when putting back together.
Found cheap needle files locally looks like they are the most aggressive cut , then I went over with my used needle file to make it a bit more smooth and then a polished it on buffing wheel , didn’t size them just eyeballed , now I’m gonna size them and continue practicing on this brass plate , any advice other then size on my current practice ?
 
Make sure you index carefully all the way around. You don't want nice even spacing until a mismatch where they meet.
 
If you read my post and the BEST TIP it said not to pick u p a file until the spacing lines are drawn with a sharpie and look right. Slow down and do it right next time.

Your "rope" is more like angled humps. You want to twist the file so they have an "S" shape with tapered ends. This image isn't really clear, but if you look close you will se that the rope segments have a tail on each end that curves off to give the overall "S" look to each lay. They also taper off as they go into the tail toward each side. This gives a navette shape to each segment instead of a straight hump.

September%202008%20004.jpg


This site has lots of photos of fancy filework and some guides to layout.
(4) Pinterest

Yes I read it sir but first wanted to do just the filework , now I duplicated the nickel part with scrap brass I had in same thickness , did the filework on it , decided to go with the one small one big twist , will make another one tomorrow and try to get better.


Ok. Looks good.
Thank you , the thing that amazed me is 2 sides on my triangular file I bought today are gone , I didn't have much hopes for the cheap files but to wear out so quick on soft brass, didnt expect that, is this something common?
The high quality italian files I'm looking at say they are hardened to 76-77HRC so I guess they are gonna last long , if i figure out theri shipping....

They are good files , they will last long if you don t forget that they work only in one direction .............:)
I have advice to you , 100 % perfectly done will look cool .Not perfectly done is the ugliest thing I ever seen on knife and will ruin whole knife :D Personally I wouldn't try it on that knife, even if I do it right ten times in a row on brass ..............
 
Last edited:
49424ae2a54e.jpg


Experimented today with the chain , don’t like to much so I’ll continue with the rope practice
 
Back
Top