Finalizing details of my first forge

Joined
Apr 5, 2009
Messages
169
I'm getting ready to pull the trigger on materials to build my first Heat Treatment forge and I have a few questions before I finalize the design.

The forge will be 12" x 18" outside diameter with 2" of Kaowool. I want to put in a refractory cement liner to even the heat out in the forge but I'm debating what thickness I should use. If I go 1", it will give me an inside diameter of 6" which seems about right. My concern is that the 1" of refractory cement is going to suck up more heat than its worth. I am not a big producer that will have the forge running for hours, I'll probably only be doing a few knives at a time.

Where is the balance with refractory cement of getting even heat without a huge warming up time?


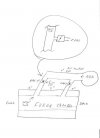
Then secondly. I was brainstorming today and wondered if this is even an option for burner design? Having two burners inside a 6"x16" chamber has got to be better than one, and I don't need double the parts. Thoughts?

dualburner.jpg
 
Last edited:
My first forge was an all cast refractory cement unit. If was close to two inches thick and took days to heat up. I scrapped that in a hurry.

The forge I run now is a 12 x 20 unit; its lined with three inches of kaowool covered with a coating of Satinite and ITC 100. You can lay your hard on the outside steel shell at any time and it is just warm. I run three burners. My forge is blown also.

I won't comment on your burner set up since I am not familiar with venturi set ups.
 
Sorry I should have labeled it "Forced Air" instead of just "Air". I have a blower for the burner....so if its a blown burner, do you think splitting it will work?
 
I won't be able to answer your questions, but I thought I'd pass along a little info. When you get done putting in the refractory cement, let it sit somewhere for a few days to slowly dry. Then when you think it's dry, put a light bulb / socket combo down into it and turn it on. Leave it in there for a while. It will heat up the cement and drive out more moisture. I did this and put a heavy piece of steel on top. Took it off after a few hours and found a small puddle of water on the very top of the cement. I just left it off after that. Hope this helps you out some.
 
It might work. I think you will find that having a separate line with a needle valve adjustment on each burner is a real plus. Its hard to fine tune a forge with out being able to control each burner. The location of each burner inside the forge body makes each one burn slightly different. If you cannot adjust for this it is hard to get that perfect burn.

Even though there are 5 burners on this forge I only run the middle three. You can see there is a needle valve for each burner. There is also a needle valve before the individual burner valves that controls the overall gas volume. You control the pressure at the regulator, the volume at the main needle valve and the burn is adjusted with the valve just before the burner. It may seem a bit much but if you want to control the forge atmosphere you'll want to incorporate some form of this set up.

Fred

Vulcan_s+Chariot-performance+sheet_+003.jpg


bigburn.jpg%252520014.jpg


bigburn.jpg%252520016.jpg
 
Last edited:
You are close on the burner design.
make an air manifold, and have the two burner tubes come off it at 70-80 degrees. have a separate gas inlet on each burner with a needle valve. that allows tuning the burners. As drawn by you it would be impossible to regulate the burners very well. I'll try and draw up a quick sketch.

Fred beat me to it
 

Attachments

  • air manifold and burner sketch 001.jpg
    air manifold and burner sketch 001.jpg
    17.2 KB · Views: 42
Last edited:
So in "Vulcan's Charriot" and also in your drawing Stacy, does the gas entering the "T" have a tube that extends into the Air Tube so that it is centered for mixing, or does the gas line just screw into the "T" fitting and you call it good?

burner.jpg


It looks like you have 3/4" - 1/4" - 3/4" "T"s. Is that correct Fred?

Also I never really got a clear answer....do blown burners use the SS flares like the venturi burners do, or can I just use 1" black pipe?
 
No need for the SS flares if it's a blown burner.
Also, I'd use an elbow instead of a T at that bend in pic #1.
See Indian George's furnace for pics.
 
Last edited:
Any idea for how thick the refractory should be? I'm learning towards 3/4" or so
 
I've never made a two burner forge manifolded as you've drawn. However, you are choking your flow down prematurely by necking the inlet to the "t" to 1", especially if your blower isn't a high pressure (not volume) unit.
 
Diagram 1 is correct. No need to inject the gas, it mixes with the air flow just fine.

DCR - not sure what you mean about adding an elbow. Got a photo of one like that? The drawing is pretty much exactly as most are made. I weld a 1/4" NPT connector to the burner tube and drill out the hole. I thread a needle valve into that.
 
OK, I see now.

syvmn - As far as how thick to put the layer of satanite on the wool goes, any thickness from 1/4" to 1/2" is fine. After that is cured and fired, coat with a layer of ITC-100. A layer of bubble alumina on the floor will make the lining last longer,too.

A 1" to 2" poured refractory liner is very robust, but does take a long time to heat up. It will deliver very even heating for long forging sessions, but if you are just doing a few blades at a time, K-wool and 1/4" of satanite is fine.

I have a 30" long "Super Forge" build in the works and was considering a 2" poured liner, but it was working out to weigh about 300 pounds, so I will probably end up going with K-wool and satanite. When done, I will post a lot of info, but for the teaser - it has five separate turbine blowers and everything but the insulation/refractory is stainless steel. If Vulcan's Chariot mated with the space shuttle, this would be its love child.

When I have time ,someday, I want to experiment with 1/2" poured refractory liners and see how they hold up.
Another liner possibility I would like to investigate is using a clay chimney liner tile. They seem perfect for a forge liner with a K-wool wrap around them. A sealer coat of ITC-100 would be all that is needed. Anyone ever tried this?
I can't be the first person to see the similarity, can I? My worry would be cracking durring heat up. Maybe I'll just buld a 12" forge with one and see what happens.
 
As far as the satanite goes, if I get 5lbs of it will that be enough for me to line my forge and have some left over for coating blades?

Inside dimensions of the forge will be around 6"x15"
 
No need for the SS flares if it's a blown burner.
Also, I'd use an elbow instead of a T at that bend in pic #1.
See Indian George's furnace for pics.
The stainless steel pieces are actually just removable extensions so in case the ends of the burner tubes get burnt, they can be easily replaced.

How would inserting and elbow, to replace the tee improve the operation of the forge?

Fred
 
Ok I think I'm going to place the order at HTT. Here is the final plan. Let me know if it looks good.

1 inch Inswool HP - 6 foot --------------- $45.50
ITC-100 Refractory Coating Quantity: 1/4 Pint ---------- $14.95
Ceramic Platen Liner Quantity: 2x6 --------- $17.00
3 inch Soft Firebrick (includes shipping and Insurance - USA only) Amount: 3 Soft Firebricks --------- $32.45
Satanite Refractory Mortar Quantity: 10 Pounds -------- $28.00

12" pipe 18" long, 3" liner of inswool with a 1/4 layer of satanite and a topcoat of ITC-100. Two 1" burners tangent to chamber at 80 degree angle spaced 7" apart.

forgefinal.jpg
 
I would go about 3/8" thick on the satanite, and you could easily get away with a single piece of 2" thick Hi-Z kao-wool.


Check your math - six feet of 1" wool won't make a 3" roll with a 12" outer diameter. Pi*D=C 1'*3.414= 3.5' plus 10"*3.414=2.8' plus 8"* 3.414=2.3'
The total wool length of 1" thickness required would be approx 8.6 feet.
If you used 2" wool and had one layer it would only take 3.5 feet.

From the looks of it I don't think you can get more than $400 for that chef's blade.
 
Geez you're right. I looked at my notes and I had 8' written down. Glad I waited to press "Pay".

With the 2" of wool I will have an 8" inner diameter. Don't you think that is quite large? The 8"x 16" chamber would have 803 sq. in. Will my burners be able to handle that?
 
Geez you're right. I looked at my notes and I had 8' written down. Glad I waited to press "Pay".

With the 2" of wool I will have an 8" inner diameter. Don't you think that is quite large? The 8"x 16" chamber would have 803 sq. in. Will my burners be able to handle that?
I ended up with a 6 inch dia. working area using a 3 inch blanket and it is more than adequate. For the cost of the extra 1 inch layer I think it makes since. You'll use less gas to heat the 6 inch dia. area and retain the heat better as well. Building a forge is all about trade offs.

Fred
 
Back
Top