Finally finished one (pics)

Joined
Nov 24, 1999
Messages
4,981
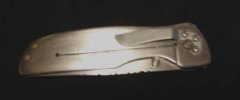
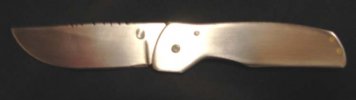
Here's a frame lock I finished up this afternoon. It was my dad's christmas present :foot:
He likes it though!

Specs:
1/8" 440C for blade, handle, and backspacer. All heat treated.
Flat ground blade
3/16" barrel type pivot pin
1/8" stop pin
Knifekits.com clip and thumbstud

attachment.php


attachment.php


attachment.php


Sorry for the blurry pics, should be one more showing the filework on the back of the blade, but it didn't load right. Have to try again later. Its just my makers mark, most of you have seen it before.

I think I'm going to switch to titanium for my handles. Heat treating everything is getting to be a pain, and I think something warped on me on this one. It all fit up really well before heat treat and I had nothing but trouble from then on.
Thanks for looking :)
 

Attachments

  • dad's1.jpg
    dad's1.jpg
    9.3 KB · Views: 358
  • dad's2.jpg
    dad's2.jpg
    12.9 KB · Views: 353
  • dad's3.jpg
    dad's3.jpg
    7.9 KB · Views: 350
Nice job on the knife. As far as the pictures. Make sure you put your camera in MACRO Mode for clear close-ups.:thumbup:
 
Great Knife! Unfortunately though, it looks as if you borrowed my camera and picture taking skills! That's okay, you can keep em I don't want them back!:D
Matt Doyle
 
Great looking knife. I've been wanting to try one of those framelocks but just haven't taken the time. Keep them coming.
 
Thanks everybody

I forgot to add that this is the one I showed in the 2006 achievements thread as an in progress pic.

attachment.php


I designed it with emachineshop. Would definitely recommend anyone looking to try folders do some experimenting with a CAD program of some sort before they hit the shop. It will save you alot of trouble laying things out.

Thanks for the advice on the pics too. I know absolutely nothing about taking pics, and had my mom take a few with her camera. Otherwise I'd have had to stick the thing in the scanner. I think her new camera probably has a macro function and she probably doesn't know about it though so we'll have to give that a try :D
 
Wow that is really a nice looking one. I love your makers mark that is insane. I look forward to seeing more of your work Matt.
 
very nice knife. after owning a few(ok a lot!!) I prefer handlelocks over linerlocks. Nice makers mark, very original!
 
Good looking folder, haven't tried a frame lock yet, keep meaning too, but I have to be in the rite mood to work on a folder, much less a frame lock!:thumbup: How did you cut the lock and face?
 
Good looking folder, haven't tried a frame lock yet, keep meaning too, but I have to be in the rite mood to work on a folder, much less a frame lock!:thumbup: How did you cut the lock and face?

I use a dremel with a cut off wheel for the lock. Scribe both lines and then drill the holes to make my corner and to end the cut. If I remember right, the cut off wheels (use the thin ones,not the reinforced ones) end up with about a 1/16" kerf, so I drill a 3/32" hole. I'd like the kerf to be thinner, and the holes smaller but without a mill this is about the best I can do.

To hold the blade, I clamp a 1X2 board in my bench vise and then C-clamp the handle slab to it so that its laying flat, and hangs out over the end a little bit. Cut all the way through at one end, and then work your way down the cut to the other end rather than try and work your way back and forth. This will keep the cut a lot straighter.

Once I have the slab cut, I dry fit the knife together. The blade tang is left long from the start. Just square the back of the tang off from where it hits the stop pin. This way, you can hold the blade against the stop pin in the open position, and use a #11 X-acto blade to scribe the lock tab onto the tang.

Next I set the work rest on my belt grinder to the angle (about 7 degrees) for the lock face and grind it CLOSE to the line on the platen. DO NOT GRIND RIGHT TO THE LINE! You want to leave a little room for fit up. Also, remember that the line you scribed is the short side, if you grind the angle backwards the lock tab will miss completely (don't ask how I know:rolleyes: ) Then I usually save final fit up for a file(before heat treat), or a steel block and wet dry paper after heat treat. But I've been known to get frustrated and go back to the belt grinder too, just have to watch how much you take off :D
 
Thanks Matt, I've got a mill, and I've been using slitting saws on my linner locks, so they should work on a frame lock. There 1/32", so if 16" is thin enough, a 32" should be.

Thanks, need to get buisy and try one.
 
Back
Top