Stacy E. Apelt - Bladesmith
ilmarinen - MODERATOR
Moderator
Knifemaker / Craftsman / Service Provider
- Joined
- Aug 20, 2004
- Messages
- 37,784
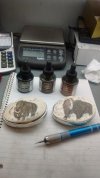
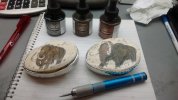
A while back a friend found a nice 3/4" thick slice of mammoth tusk in a pawn shop. I had him buy it for me for $100.
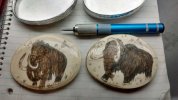
I cut it into two slices, smoothed the tops in a slight dome, and decided to make scrimshaw projects from them. I haven't done any scrim work in a while because my fingers aren't quite back to full dexterity since the problem with the nerve after last years surgery.
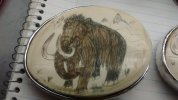
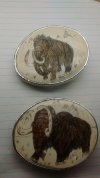
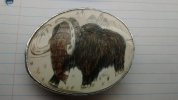
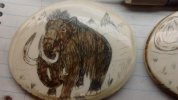
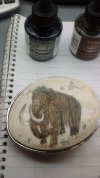
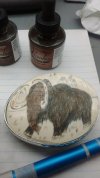
I thought a mammoth on mammoth ivory was a natural, so I got bust making sketches. I did a bull and a cow.
The bull is based on the life size model in the Royal British Columbia Museum.
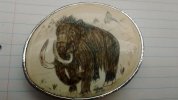
The cow is based on several images and is a composite. Bulls are larger, darker, and have bigger and curlier tusks.
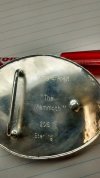
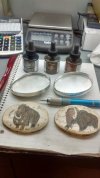
The 3.5" X 2.75" mounts are hand made sterling buckles that weigh 3.5 troy ounces each .... gotta be strong to hold a mammoth. The bezels are hammer worked to set the ivory. I used a 1/4" ball hammer to work the rim down. It is sphincter tightening when you are whacking away to put a hammer finish on the silver rim only 1mm away from the ivory.
The scrim was done freehand with a carbide point and the ink is brown and black blends. I started with the outline and them added the details. Slowly, the hair is built up to get the basic shape and form. It is done in brown and rubbed out to set the brown dye in those softer under hairs. The coarser guard hair is then added and done in black and dark brown. This starts making more of a 3-D effect. The final stages are shading and blending the colors. Every new color or shade is done by adding more new lines and filling them with the desired ink shade. Once the mammoth was done, I added some background and foreground scenery.
No telling how many thousands of lines there are in the final image.
Anyway, enjoy the photos, and if there are any questions, please ask.
I cut it into two slices, smoothed the tops in a slight dome, and decided to make scrimshaw projects from them. I haven't done any scrim work in a while because my fingers aren't quite back to full dexterity since the problem with the nerve after last years surgery.
I thought a mammoth on mammoth ivory was a natural, so I got bust making sketches. I did a bull and a cow.
The bull is based on the life size model in the Royal British Columbia Museum.
The cow is based on several images and is a composite. Bulls are larger, darker, and have bigger and curlier tusks.
The 3.5" X 2.75" mounts are hand made sterling buckles that weigh 3.5 troy ounces each .... gotta be strong to hold a mammoth. The bezels are hammer worked to set the ivory. I used a 1/4" ball hammer to work the rim down. It is sphincter tightening when you are whacking away to put a hammer finish on the silver rim only 1mm away from the ivory.
The scrim was done freehand with a carbide point and the ink is brown and black blends. I started with the outline and them added the details. Slowly, the hair is built up to get the basic shape and form. It is done in brown and rubbed out to set the brown dye in those softer under hairs. The coarser guard hair is then added and done in black and dark brown. This starts making more of a 3-D effect. The final stages are shading and blending the colors. Every new color or shade is done by adding more new lines and filling them with the desired ink shade. Once the mammoth was done, I added some background and foreground scenery.
No telling how many thousands of lines there are in the final image.
Anyway, enjoy the photos, and if there are any questions, please ask.
Attachments
Last edited: