- Joined
- Jan 11, 2024
- Messages
- 14
I'm trying to finish stabilized black palm wood on my knife handles does anybody have suggestions from experience.
The BladeForums.com 2024 Traditional Knife is available! Price is $250 ea (shipped within CONUS).
Order here: https://www.bladeforums.com/help/2024-traditional/
Thanks for your reply. I stabilized the wood using cactus juice in a vacuum chamber I built out of schedule 40 PVC. Because this was my first go around with stabilizing wood I did not want to invest too much money so I took a method I saw someone use on Youtube. To kill two birds with one stone I made a pressure chamber out of 4" schedule 40 PVC (for future use if needed) and placed my 3" schedule 40 PVC inside the 4" PVC using the 4" PVC as a vacuum chamber. Long story short it took 3 days for the bubbles to stop coming up then I gave it 6 days to absorb the cactus juice then I dried it in my toaster oven. You had mentioned using pressure and vacuum for stabilizing black palm would you please elaborate on that method? I have a couple of grinders so I think I will purchase a couple of buffing wheels and try out your suggestion.I did not get a chance to properly welcome you a few weeks ago - Welcome.
Fill out your profile so we know where you live and a bit about you. It will help with answers. There may be a nearby maker who can offer help, materials, and surplus equipment.
You had said you were stabilizing the wood. How did you "stabilize" it?
Black palm is a very splintery wood. It is also called porcupine wood. It needs a proper stabilization under pressure and vacuum.
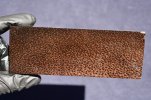
Many years ago, I came up with a method of cutting it I called "bias cut". It is cutting the boards (usually 1.5" thick and 5-6" wide) on the end-grain with the blade tilted 30° and the miter slide also at 30°. This double angle makes a really nice pattern like fish scales. I do this cutting after stabilizing the wood in 12" long sections. I showed it to Ben at Greenberg woods back then and he still cuts his black palm that way. It is less splintery at the bias.
As for finishing:
Sand it smooth to 220 grit.
Flood the surface with CA glue and let dry overnight.
Sand to 220 grit.
Flood again and let dry.
Sand to 400 grit.
If needed, flood again with CA and let dry.
Sand to final finish level and buff with a soft cotton/muslin buff and matchless pink.
You can also do wet-sanding with the CA glue but be sure to wear rubber gloves.
If you don't have a buffer, use finer grits of paper up to 1000-1500. The 3M polishing papers (the color-coded ones) are excellent for hand finishing handles.
Photo from Greenberg's website:
On top of my vacuum chamber I had a piece of clear 1/2" polycarbonate which acted as my seal/window into viewing the bubbles. After 3 days the bubbles had just about completely stopped.The Custom Search Engine in the Stickys will find many threads on home stabilizing and commercial setups. It is handy for finding past threads on almost any topic discussed here.
A bench grinder is NOT made for buffing. You need a buffer with longer shafts and no shield. Speed is also an issue with buffers. 1100 is a good max for most folks.
Most bench grinders are far too fast. Buffing without the necessary training and proper equipment can be very dangerous.
When you read up on stabilizing you will find that in commercial setups, the wood is submerged in the stabilizing liquid and vacuumed under high vacuum for a certain length of time, then the chamber is pressurized to several hundred PSI (or more). After some period of time the wood is removed from the resin, drained of excess, and cured in a temperature-controlled oven. PVC is not a suitable material for any pressure chamber. Steel is what you want. PVC should work for a vacuum chamber. I would highly recommend Sch80 for a vacuum chamber.
Out of curiosity, how did you observe the bubbles coming out of the wood.
.
I did not get a chance to properly welcome you a few weeks ago - Welcome.
Fill out your profile so we know where you live and a bit about you. It will help with answers. There may be a nearby maker who can offer help, materials, and surplus equipment.
You had said you were stabilizing the wood. How did you "stabilize" it?
Black palm is a very splintery wood. It is also called porcupine wood. It needs a proper stabilization under pressure and vacuum.
Many years ago, I came up with a method of cutting it I called "bias cut". It is cutting the boards (usually 1.5" thick and 5-6" wide) on the end-grain with the blade tilted 30° and the miter slide also at 30°. This double angle makes a really nice pattern like fish scales. I do this cutting after stabilizing the wood in 12" long sections. I showed it to Ben at Greenberg woods back then and he still cuts his black palm that way. It is less splintery at the bias.
As for finishing:
Sand it smooth to 220 grit.
Flood the surface with CA glue and let dry overnight.
Sand to 220 grit.
Flood again and let dry.
Sand to 400 grit.
If needed, flood again with CA and let dry.
Sand to final finish level and buff with a soft cotton/muslin buff and matchless pink.
You can also do wet-sanding with the CA glue but be sure to wear rubber gloves.
If you don't have a buffer, use finer grits of paper up to 1000-1500. The 3M polishing papers (the color-coded ones) are excellent for hand finishing handles.
Photo from Greenberg's website:
Your vacuum pump was running this total time? How many inches of Hg were you pulling?On top of my vacuum chamber I had a piece of clear 1/2" polycarbonate which acted as my seal/window into viewing the bubbles. After 3 days the bubbles had just about completely stopped.