- Joined
- Feb 28, 2002
- Messages
- 751
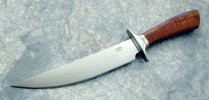
I posted a pic of the ground blade a couple weeks ago. I did the grind immediately upon receiving Rob Frinks's Rotary platten . I wanted to go back to doing some of my own heat treating, so I made it out of O1 steel. The blade is 8-1/8" , the knife is 13-1/2" OAL with a stabilized tiger maple handle.
I edge quenched this in Harley-Davidson 60W oil, which is mineral oil with a very spare additive package. My first quench was at non - magnetic and did not take. I found I had to heat it to non-magnetic, then a bit beyond and quench it quickly on the heat rise. Heating was done slowly and carefully with a small rosebud tip working up and down the edge & from side to side. It went tip first, rocking back to the ricasso. The oil caught fire (blew it out) and I held it there until the color was gone from the spine. I also normalized before the quench. A file lightly scratched the edge, but would not bite. The spine tested out soft. I did one a 1 hour temper at 385 & got a light straw.
Clean up yielded about an .025-.030 edge. Put an edge on with a 220, 3M707 (1" slack belt). Knocked the burr off on the buffer. Tested the edge in cutting, shaving and the brass rod test no chips or soft spots. I went back and polished the edge down to an A6 trizac and did a couple more passes on the buffer. It is as sharp as I have ever made an edge. The grind and initial thickness means this edge is about 1/16" high. I think the resulting geometry provides a great working edge that will not chip & although it is razor sharp, I'll bet it won't out cut some of the very thin (contest) edges I have seen, but will possibly last longer.
Next , I'm going to do some more oil tests and etch some blades. This one had a great temper line that you can see with the 1000 grit finish. I got some ferric choride today & will try that so I can see the transition lines. I have some O1 sacrificial knives ready to go the whole distance . Also got some 1084 and 5160. I know these steels benefit tremendously from forging, but I hope I can learn something at the stock removal stage.
BTW. I found a place that manufactures about 8 grades of quenching oil (and they have salts, too). I'm talking to their reps on Monday about a match for Texaco Quenchtex "A". The thing is, they seem to cater mostly to the large buyer, and I may have to pull some teeth to get some just 5 gallons to try. I'll report on what I find.
Bob