I first heard of the electrolysis process in talking with a fellow tool restorer Gary Bridge, who has been using electrolysis to remove dirt and oxidization from antique hand planes. I was impressed with how easy and effective it sounded. I had to try it, and Gary was generous enough to walk me through the process at his workshop in Spicer, MN. We used the process to remove the rust from a vintage Great Neck 3.5 lb axe head, and were quite impressed with the results.
This was just my first test. There's a lot more to this process than first blush; amperage, types of steel, homemade tricked-out electrolysis buckets. You can bet I'll be doing some more testing and research on this in the future
Here's the Great Neck before. It's not terribly rusty, but still in need of a clean up.

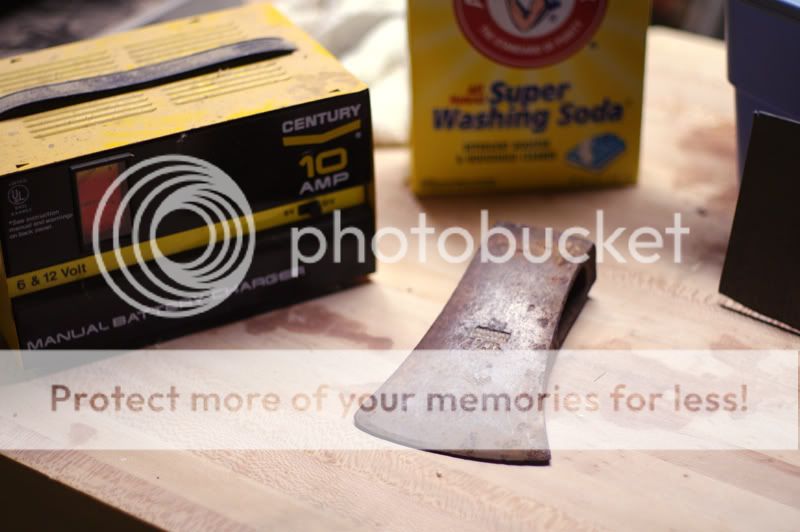
What you'll need:
A large, non-conductive container large enough to hold the tool and enough of the electrolysis solution to fully submerge it. We used a rubbermaid tub.
A battery charger capable of delivering 2 amps or more.
An electrolyte solution mixed in a ratio of 1 tbsp washing soda to 1 gal water.
This is an alkaline solution and will irritate the skin if not washed off. It will also irritate the eyes, so handle it carefully and flush with copious amounts of water and seek medical attention if it does get in your eyes.
A piece of mild steel to use as an electrode. We used a flat piece of 1/8" mild steel.
This is also called a sacrificial electrode. It will corrode with continued use. Stainless steel is not recommended, since the contained chromium will inhibit the passage of current, and can contaminate the electrolyte solution.
The tool you want to clean.
Clean it thoroughly with a degreaser before beginning electrolysis, this will ensure maximum conductivity.
A scotchbrite pad or soft bristle brush.
You will use this to gently clean the tool when the electrolysis is complete.
First off a word of safety: you are about to stick two electrodes into a bucket of conductive fluid. Do not stick your hands into the solution once the current is flowing. Secondly, this process produces hydrogen and oxygen, it's recommended that this process be conducted in a well ventilated area to prevent combustion. Do not cover the container once the process has begun.
What you need to do:
1. After you've degreased your tool, connect it to the NEGATIVE lead on the unplugged batter charger. You may need to clean a small portion of the tool with sandpaper to ensure good contact. Then place it in the non-reactive container. NOTE: If you accidentally connect the tool to the positive lead, the process won't work at all.

2. Add enough water to fully submerge the tool. Pay attention to how much water you add, and add the appropriate amount of washing soda in a ratio of 1 tablespoon to 1 gallon.

3. Connect your sacrificial electrode to the POSITIVE lead on the battery charger and add it to the tub with the solution. The charge will travel between the two electrodes in a 'line of sight.' This means that the side of the tool facing the electrode will have the best results. We stopped the process halfway and turned our axe head 180º so that both sides received the same results. Some folks create cylindrical sacrificial electrodes to eliminate the need to rotate the tool. It's also important that the tool and the sacrificial electrodes do not touch. The current between the two must travel through the electrolyte solution for the process to work.
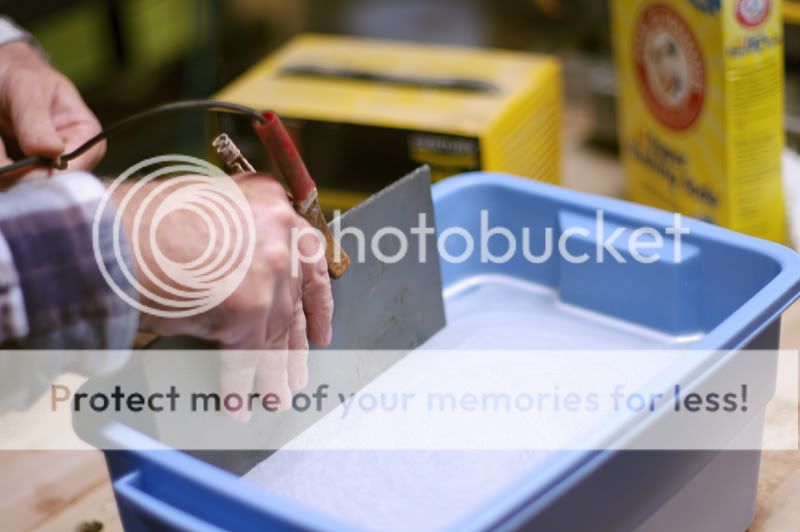
4. Once you have everything connected properly, and have double checked it, plug in the battery charger and turn it on. If you need to rearrange or rotate the tool, turn the batter charger off and unplug it before sticking your hands in the solution.
5. After you've initiated the electrical current, the tool should begin bubbling. These bubbles are the hydrogen and oxygen mentioned earlier. If you do not notice any bubbles, unplug the battery charger, double check your connections, and try again.
6. Let the tool 'cook' in the current for a couple hours. You should notice that the surface of the solution will become murky and gunky, this is all coming off the tool! It may take up to 12 hours to fully clean your tool. Check it periodically

7. Once the tool is free of oxidization it should appear dark, almost black. Unplug the battery charger and remove the tool. Use the plastic scouring pads to clean the remaining gunk off, it should come off fairly easily.
8. Rinse the tool well and dry it thoroughly. Once dry, coat it with oil or other anti-rust product. Often times the tool can begin to rust again almost immediately.
9. Dispose of the electrolyte solution down the drain or by pouring it out outdoors. Apparently, your lawn will love the iron rich solution.
And here's the Great Neck after:

Overall I was really happy with the results. It's no where near as loud as grinding and sanding, and not stinky at all like vinegar. Lately I've been finding that the etch on steel after a vinegar soak is pretty lackluster. It usually goes away with a coat of oil, but the electrolysis made the steel look really really good. There was a little paint left on the Great Neck, and it should be noted that paint comes off in the electrolysis as well as rust.
I should be rehanging the Great Neck sometime next week, and will have even more pics of it all cleaned up. Gotta find the right handle though. The eye is just a bit larger than standard.
This was just my first test. There's a lot more to this process than first blush; amperage, types of steel, homemade tricked-out electrolysis buckets. You can bet I'll be doing some more testing and research on this in the future
Here's the Great Neck before. It's not terribly rusty, but still in need of a clean up.
What you'll need:
A large, non-conductive container large enough to hold the tool and enough of the electrolysis solution to fully submerge it. We used a rubbermaid tub.
A battery charger capable of delivering 2 amps or more.
An electrolyte solution mixed in a ratio of 1 tbsp washing soda to 1 gal water.
This is an alkaline solution and will irritate the skin if not washed off. It will also irritate the eyes, so handle it carefully and flush with copious amounts of water and seek medical attention if it does get in your eyes.
A piece of mild steel to use as an electrode. We used a flat piece of 1/8" mild steel.
This is also called a sacrificial electrode. It will corrode with continued use. Stainless steel is not recommended, since the contained chromium will inhibit the passage of current, and can contaminate the electrolyte solution.
The tool you want to clean.
Clean it thoroughly with a degreaser before beginning electrolysis, this will ensure maximum conductivity.
A scotchbrite pad or soft bristle brush.
You will use this to gently clean the tool when the electrolysis is complete.
First off a word of safety: you are about to stick two electrodes into a bucket of conductive fluid. Do not stick your hands into the solution once the current is flowing. Secondly, this process produces hydrogen and oxygen, it's recommended that this process be conducted in a well ventilated area to prevent combustion. Do not cover the container once the process has begun.
What you need to do:
1. After you've degreased your tool, connect it to the NEGATIVE lead on the unplugged batter charger. You may need to clean a small portion of the tool with sandpaper to ensure good contact. Then place it in the non-reactive container. NOTE: If you accidentally connect the tool to the positive lead, the process won't work at all.
2. Add enough water to fully submerge the tool. Pay attention to how much water you add, and add the appropriate amount of washing soda in a ratio of 1 tablespoon to 1 gallon.
3. Connect your sacrificial electrode to the POSITIVE lead on the battery charger and add it to the tub with the solution. The charge will travel between the two electrodes in a 'line of sight.' This means that the side of the tool facing the electrode will have the best results. We stopped the process halfway and turned our axe head 180º so that both sides received the same results. Some folks create cylindrical sacrificial electrodes to eliminate the need to rotate the tool. It's also important that the tool and the sacrificial electrodes do not touch. The current between the two must travel through the electrolyte solution for the process to work.
4. Once you have everything connected properly, and have double checked it, plug in the battery charger and turn it on. If you need to rearrange or rotate the tool, turn the batter charger off and unplug it before sticking your hands in the solution.
5. After you've initiated the electrical current, the tool should begin bubbling. These bubbles are the hydrogen and oxygen mentioned earlier. If you do not notice any bubbles, unplug the battery charger, double check your connections, and try again.
6. Let the tool 'cook' in the current for a couple hours. You should notice that the surface of the solution will become murky and gunky, this is all coming off the tool! It may take up to 12 hours to fully clean your tool. Check it periodically
7. Once the tool is free of oxidization it should appear dark, almost black. Unplug the battery charger and remove the tool. Use the plastic scouring pads to clean the remaining gunk off, it should come off fairly easily.
8. Rinse the tool well and dry it thoroughly. Once dry, coat it with oil or other anti-rust product. Often times the tool can begin to rust again almost immediately.
9. Dispose of the electrolyte solution down the drain or by pouring it out outdoors. Apparently, your lawn will love the iron rich solution.
And here's the Great Neck after:
Overall I was really happy with the results. It's no where near as loud as grinding and sanding, and not stinky at all like vinegar. Lately I've been finding that the etch on steel after a vinegar soak is pretty lackluster. It usually goes away with a coat of oil, but the electrolysis made the steel look really really good. There was a little paint left on the Great Neck, and it should be noted that paint comes off in the electrolysis as well as rust.
I should be rehanging the Great Neck sometime next week, and will have even more pics of it all cleaned up. Gotta find the right handle though. The eye is just a bit larger than standard.