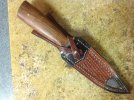
First overlay sheath

David Bates

Knifemaker/service provider
Joined
Mar 11, 2013
Messages
95
This is sheath #14 for me so I figured why not give it a try. My first time doing an overlay (used pig skin) because I don't have a splitter or 2oz leather. I also add a Sam brown button and a bow tie. Hand stitched and my first sheath type with integrated belt loop. It's no where near what I have seen on this forum but hopefully you'll see improvement in the future. Your feedback is appreciated.
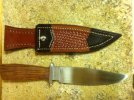
image.jpgimage.jpg

David
 
I think it's quite nice! The attention to detail is obvious, and I love the shape. The overlays look great.

The bow tie is also very nice. I've yet to do one.

Only thing I'd do differently is make the ends that go over the stud a little wider so the edges don't bulge. This is just something I've noticed and changed on my own work.

Nice work!
 
Very nice. I like the use of color and the contrast between the veggige tan and the pigskin. If ya can find some thinner thread for stitching down the overlay. That will give an additional level of refinement. How come you didn't stitch the top of the bottom overlay shield?
 
Nice work. Your lining roll looks great, and the stitching is very neat.

Paul
 
Dave
That shield on the bottom of the sheath is done with black dye. There is no overlay on that portion of the sheath, it just appears that way. I do need to get some thinner thread, any size recommendations?
Thank you for your feedback.

David
 
Jdk1
It is hand stitched.

Mr. Long, thank you for your feedback.

David
 
David, #69 thread is what I use for machine stitching on inlays and overlays and other trim work, but unless you can manage to punch some much smaller, closer holes it may not be the best choice for you for hand stitching. Awl holes tend to run together at 8 stitches per inch, and in addition the hole is too big for the #69 to fill up.

Also your comment about the toe of the sheath caused me to go back and look at it again. It may just be the angle and the lighting, but It looks like you beveled it backwards and instead of looking like and overlay to match the top chevron it looks more like an inlay. Should have beveled the other side of that line if what I see in the photo is correct. If it's the light and the angle ……..never mind! It's still darned good work!

Paul
 
David, what size/type/brand is your current thread?

I use 1mm waxed thread for my main stitching and .8mm for inlays and stitching at anything over 5 stitches per inch. I tried 1mm at 7 spi one time and it tore because of the hole size. Think zipper.
 
Mr. Long

Thanks for going back to critique it. Being as I hand stitch only, I currently use a #5 stitch wheel, and have a #6 but use very little. I actually hand punched the holes in the top and bottom of the upper chevron because I didn't have a tighter stitch wheel. I'm using waxed synthetic sinew on most of my sheaths. I tried some waxed black thread ( think I'm right) on a sheath but it was the similar in thickness as the sinew. I want to improve the detail of my stitching. The sinew appears dirty the further I get into my sheath. The wax tends to build up in the holes, I guess is not a bad thing, but I lose that level of detail I am trying to achieve.
What is the best way to achieve that goal, thinner thread or closer stitch?
Waxed or unwaxed?

Thanks for letting me know about the bevel. If I am understanding you correctly, the bevel should have been turned toward the top chevron and not the chevron on the toe of the sheath. Then that would give it a raised look.

Thank you again. Please comment if you notice anything else, that's the only way my quality will improve.

David
 
Last edited:
Mr. Alms
Do you hand stitch also?
It would be good to get insight from that perspective too.

Thanks for the thread insight. Where do you purchase your thread? I've tried tandy ( have store in Atlanta ) and zack white.


Thanks

David
 
Last edited:
SAHunter06, I tried waxed artificial sinew and also found it became filthy, picking up everything it touched. I also found that it broke if I tried to get a good, tight pull on a stitch. I'm just learning and am trying to figure out what works best. I'll say that your holes look great for hand stitching:thumbup:
 
I agree. It gives the sheath a nice look until it picks up the junk from the leather or other grim laying around even in a clean room.
What do you use now?
David
 
Ritza thread from any of a number of sources. You can buy from etsy or eBay. If you've broken a needle in the past try John James brand. They cost the same as others, but I've not managed to break one even using (taped or flat jawed) pliers.

You'll find that the above mentioned thread will not be overly waxed. It's perfect in that sense, it's also super strong, lays flat and is bright and stays that way.

In trying to help you with your current supplies, try pulling your thread/sinew through the eye of your needle to remove a bit of excess wax. It likely won't remove enough, but it'll help. You can also try pulling the thread through a piece of canvas held tightly. The friction from pulling quickly will also remove some of the wax.
 
Guess I will have to by some ritza from etsy then. Only source I can find colors like blue and red at reasonable prices.
 
Guess I will have to by some ritza from etsy then. Only source I can find colors like blue and red at reasonable prices.
Julius Kotch is in Denmark. Wonder if you could buy direct?

Edit- doesn't look like it, but you can try. Tiger/Ritza 25 is very popular in Europe though. Shouldn't be too hard to find?
 
Last edited:
Ritza thread from any of a number of sources. You can buy from etsy or eBay. If you've broken a needle in the past try John James brand. They cost the same as others, but I've not managed to break one even using (taped or flat jawed) pliers.

You'll find that the above mentioned thread will not be overly waxed. It's perfect in that sense, it's also super strong, lays flat and is bright and stays that way.

In trying to help you with your current supplies, try pulling your thread/sinew through the eye of your needle to remove a bit of excess wax. It likely won't remove enough, but it'll help. You can also try pulling the thread through a piece of canvas held tightly. The friction from pulling quickly will also remove some of the wax.

Thank you for that insight. I saw the john james brand needles . I use a 000 harness needle to get through multiple layers of leather. What size harness needle do you use?
will also give the Ritza thread a try.
 
Here's a cross compatibility chart for JJ needles, Ritza and LC.


Size 4*(004)-*Smallest Needles*(length 48 mm/Outer diameter 0.9 mm )*

Lin Cable -*Pairs*with*532, 632, 832*

Tiger Thread -*Pairs*with*0.6mm


Size 2 (002)- (Length 54 mm/Outer diameter 1.0 mm)*

Lin Cable:*Pairs*with*332 &*432*

Tiger Thread:*Pairs*with*0.8mm*


Size 0*(1/0)*- (Length 57 mm/Outer diameter 1.1 mm)*

Lin Cable:*Pairs*with*332

Tiger Thread:*Pairs*with*1.0 mm*


Size 00*(also known as 2/0)*-*(Length 57 mm/outer diameter 1.3 mm)*

Pairs*with*thread 1.0mm to 1.2mm*


Size 000 (3/0)*-*Largest Needles*(Length 62 mm/Outer diameter 1.6 mm )*

Pairs*with*thread 1.2mm+
 
Thanks for that. Very helpful. My holes are at times too big for the sinew but the needle fits tightly going through. I have to pull the needle through but then the thread doesn't quite fit the hole it seems. I'll keep trying different techniques. Maybe I am pulling on the sinew you too tightly causing the sheatht to buckle at times.
 
Back
Top