Travis, I have received several emails asking the same thing, so I will just put my thoughts on rigging knives in here.
First off, I have worked as a freelance rigger since about '98-'99. Everything from simple stuff on a pram to being the Bosuns mate aboard the T.S. Californian. Modern race boats and vintage cruisers. I race sailboats at a professional level as well. These features are just a few things I have found to work well and help avoid common pitfalls of mass market knives. These are my opinions, and you know what they say about opinions...
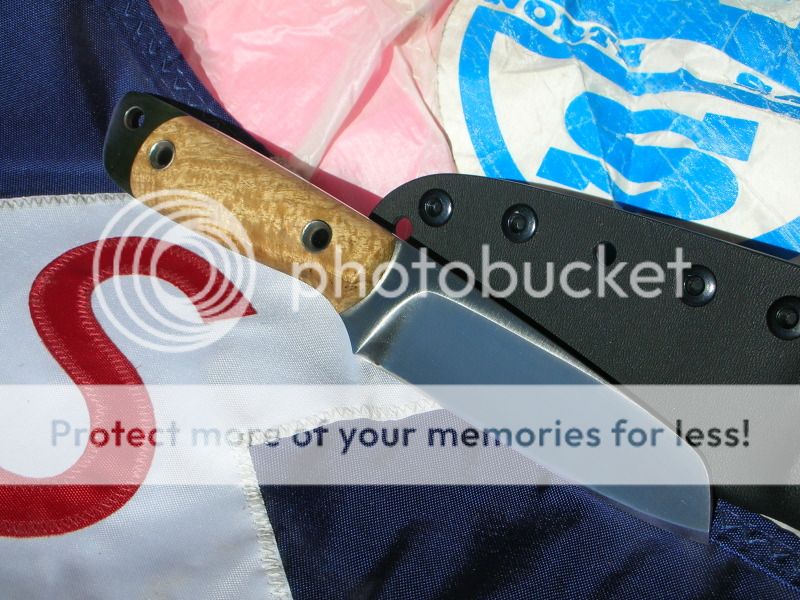
Blade: Sheeps foot or some derivation of it, nothing to pointy. Sails are under tremendous load and one may have to cut a loaded line near a jib or stays'l, they can litterally explode if cut when loaded. I know, Ive seen it happen. 3.5" to 5" blade length is common, personally I like 3.75" to 4.25" blade. Taller blade profiles are nice, this goes with the handle features below. The spine should be on the thick side for the size knife, 0.188" to 0.250" is common. Many people still use a mallet to get a clean cut on thick line, myself included. Flat grinds and hollow grinds seem to be the most popular. Convex or "appleseed" grinds dont work too well.
Edge: A smooth, continuous belly is nice, but if you like a flat edge section you can have it in the back 1/3 -1/2 of the blade. The belly doesn't have to be drastic, infact too round of a belly can make the knife slip when cutting tough rope. Edge geometries should be fairly standard, 30* to 35* inclusive works well. I like a #400 edge, but #180 and #220 work very well also. To echo what Darrin said above, an easy to sharpen steel is important. #180, #220 and #400 are common grits of sandpaper and are used when working on boats pretty frequently, so having a steel and edge geometry that can be sharpened by this is nice. Not having to take 10 minutes to sharpen a knife in the middle of a job keeps the boss happy.
Handle: Simple shapes are king here. Something without sharply defined finger grooves makes it easy to control with gloved, or cold stiff hands. Think of the puukko, it it designed to be used with mittens and still have control. Knuckle clearance is paramount! Much like a chef's knife, which this knife may be called on to do. When pounding a blade through 3.5" rope, you really dont want your knuckles to be the first thing to contact the chopping block. keeping the butt of the handle above the cutting edge should also be considered. Tang construction is up to the maker, I have seen and used full, stick and hidden tang knives equally well. Grippy materials should be considered, but that is up to the users environment. Lanyard holes should be no smaller than 0.250". A .250" OD with 0.020" wall is fine since that is a common size available. Trying to fit a frayed end of 3/16" line (4-5mm) through a small lanyard hole just doesn't work well. Same goes for shackles. Please be sure that the lanyard hole is outside of the normal grip position and close enough to the end of the knife to use a shackle if desired. Exposed tang is optional, much like camp knives. I use mine to pry and hammer, some don't.
Sheath: Kydex, I feel was designed for such knives. Unaffected by marine environments, zero maintenance, and good retention. But leather can and does work just fine with more maintenance. Be sure it has drainage! Many Kydex benders take a small dowel and lay it in line with the spine continuing from the tip to create a hole at the point of a folded "taco" style sheath. I like my sheaths to ride a little high on my hip, this keeps it out of the way when sitting, or when I have a harness on and working aloft. A slight tilt forward helps with deployment. For reference, the ricasso of my rigger (shown earlier in this thread) sits at the top of my belt.
The Marlingspike
Also spelled Marling spike, marlin spike, marlinspike or simply spike.
An excerpt from The Complete Riggers Apprentice, by Brion Toss. (This book coupled with the A.B.o.K is the go to reference material)
"The Marlingspike
All of rigging-right up through its most abstract engineering complications-is based on priciples and procedures relating to this tool. It is used for pulling seizings and lashings tight, making splices, loosening jammed knots, and tightening shackles. It's also called on to function as a crowbar, wrench, hammer, weapon, and musical instrument (ting!), so it pays to have a good one. By "good" I mean that it:
- Is made of smooth, hard steel, either carbon or stainless;
- has a long taper and small flattened point for easier splicing, prying, and such; and
- has a lanyard hole for tying the tool to your belt or rigging bag so that when you are working aloft, it does not accidentally become a weapon (thud) or a musical instrument (ting! Splash!).
Length depends on the job at hand and individual taste; 6 to 10 inches is a good range for shipboard use. Many people like the folding rigger's knife-spike combination, but I dont; a spike is too often needed in a hurry when you don't have both hands free."
For commercial spikes, the C.S. Osborne brand are the industry standard for working spikes. Tapers and lengths specifically designed for wire rope, but work well for fiber rope also. The following information was analyzed and compiled by the late Master Rigger Nick Benton. Design specifics for making your own should be based around these proportional dimensions (based on the diameter of wire you'll be working with). "X" represents the diameter wire intended. Overall length should be 24X, starting at the point; duck taper (ovoid cross section) 2X long to 3/8X diameter, then 18X length shank taper to 1 1/8X diameter, finally a 4X straight shank finished with a stout head like a nail of 1 5/8X diameter. So for 3/8 inch wire the spike would be 9 inches long and 9/64 inch at the widest part of the duck taper. Make sense?!
Myself, I rarely work with wire rope anymore. I don't use a traditional spike, mine is square in cross section and does not have a head. I find this to be a wonderful tool for my uses. This proves that you don't have to stay inside the traditional box when making such tools, hopefully this information helps you make a knife in
your style that will work very well for its intended purposes.
-Xander
")

