Stacy E. Apelt - Bladesmith
ilmarinen - MODERATOR
Moderator
Knifemaker / Craftsman / Service Provider
- Joined
- Aug 20, 2004
- Messages
- 38,410
Sunday afternoon I had a young man (18) over to work on a sword project. He had designed it last year and asked if I would make it for/with him . I told him it would be his graduation present. I had done all the metal work on the blade, and we were working on the habaki, fittings, and tsuka. Up to now, he has just watched the hot work. More on that project at a later time.
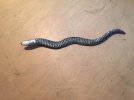
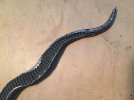
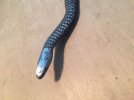
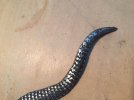
After we were done with the afternoon's work in the forge, I asked him if he wanted to have some fun. He was all, "Oh Yeah!". I rummaged in my "metal for projects" bucket and pulled out a 7-8" tapered half round rasp. I asked if he liked snakes, and he said he loved them....so I taught him to make a foot long snake from a rasp. We kept it simple, but the result was really good. He listens well, and is very smart ( valedictorian of his graduating class this year). He did 80% of the work on this.
The process is really simple. Do all forging between 1600F and 2000F. Don't forge below medium red. Take your time and work slow. Needing more hammer blows is better than one to many. uUe a small 1# machinists hammer. A wooden "schwacker" is good for the final shaping. ( Schwacker is Tai-Goo Yiddish for a wooden mallet made from hard wood like lignum vitae)
Start with the tail. Start drawing the file out from the sides about 1/3 up the rasp from the tail end. Once it is getting drawn out a bit round it as you go when it starts looking tail-like ( A snake belly is flat and the tail is round).
Then switch to the head. Cut off the tang, leaving a 3/8" nose and the shoulders. Fuller in the sides behind the head to start the neck. This should be just a bit into where the rasp teeth start.
Now start on the head shape. Shape the head from the sides, and roll the underside as you narrow the nose/mouth. you want a basic diamond shape to start with. Make a little eye punch from a piece of scrap steel and punch in two diamond shaped eyes. Start drawing and shaping the upper body until it gets a decent snake shape. At this point the back should be rounded with teeth pretty much standing up and the belly flat with teeth in straight rows. Work the bottom edges to roll the sides as needed to make it look like a snake belly. When that is done, start shaping the serpentine look. Start at the head and put a good sideways bend in the body at the neck, using the horn/bick of the anvil. Repeat from the other side a bit father down, repeating until you get to the tail. About two undulations looks good, which is five bends.
Start working the scales now. Do this at low red to dull red....1200-1500F. Flatten the teeth on the back with firm enough blows to collapse the teeth, but not distort the snake body. You will get the feel quickly. this is a lot of gentle tapping. Use a smaller 1/2# hammer if you have one. Even a tack hammer works well. It will leave a diamond shape scale. Work slow and go up and down and side to side. Don't worry about the undulations getting messed up a bit, you will take care of that in the finishing steps. Switch o the wooden hammer to get things tight and not deformed if needed.
When the top is looking good, decide on the bottom. I often leave the bottom as-is with the teeth sticking out because it looks more like a real snake belly with the rows, If you decide to hammer them flat, use a small narrow tinsmith style hammer and work them flat from neck to tail.
When all the scales look good, straighten the curves as needed, and slightly raise the head. Bend the tail down as needed so the snake rests in a natural pose. The wooden hammer is great here.
Take to the grinder, or hand sand, and give the whole body a quick going over with a worn 400 grit slack belt. All you want to do is flatten the scales and shape the head. You will instantly see the scales turn into tight perfect snake scales. The head should be shaped smooth to the neck. Add a mouth with a small three corner file.
Take to the FC tank and etch for a few minutes, rinse and dry (I stick it in the still warm forge for a moment). Hand sand with worn 400 grit lightly, re-etch as needed, and very lightly sand just a few strokes. You want a gray/black look with bright scales. Either quit there, or give it a 15 second final etch, rinse, neutralize, and a rub with coarse cloth ( old blue jeans) to give a nice "sheen" look.
You can give it a blacksmith finish with bee's wax and kerosene if you are familiar with that finish, otherwise it is done.
Attachments
Last edited:
") Make the last one the one for the forge, as you will have it down pat by then.
Make the last one the one for the forge, as you will have it down pat by then.