Fowler 52100 video 'BRASS GUARD' questions

Joined
Aug 26, 2002
Messages
1,333
Hi this is DaQo'tah

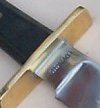
Im now trying to make the brass guard for my 52100 blade, just as Mr. Ed Fowler demonstrates in his Bearing to Blade video.

Well, today is failed miserably in my first attempt at constructing this type of Brass Guard.

In the video Ed Fowler drills the brass out on the drillpress, then uses a file to fit the Tang into place.

I tried,,,but my brass did not fit tight at all,,,I had a gap showing around the guard big enough to slip a fingernail into in places.

The hole for the tang didnt seem to be square to the tang,

In the video Ed bangs the guard into place for a tight fit. I thought i could do that too, but when i would bang on one side, the other end would always pop up.

I never got the brass to slam home against the shoulders of the tang there was always a little gap .

then I tried to solder the brass to the tang...What a disaster!

I think I might have gotten the brass too hot,,,,I used some flux that I had left over from plumbing,,the Radio Shack Silver solder just didnt seem to want to go up as I soldered,,,the solder just puddled on the brass,,,then dripped down onto the vice.

I gave up, and pounded the guard off the tang. On examination, I noticed that solder went up the insides of the guard on only one side of the tang.

QUESTION: - How do I make the hole for the tang in my brass better?

QUESTION; - Lets suppose I mess up my 2nd try at filing the hole in the brass ,and I solder it on anyway, Is there a way to 'Fix' this so that I can end up with a better looking guard?

QUESTION: - Im not sure of the name for the little shoulders that are in front of the guard, but I dont understand how Ed makes his work. Is there a trick Im missing in the video?
 
The key word is patience.Ed is not using any special tricks, he is just filing to "fit".I add my Dremel to the mix after drilling my holes to speed up the process,but just keep filing till it fits ,no more.Sometimes when filing the center of the slot gets a little deeper than the sides and a smack of the hammer on the side of the guard will close it enough to save it.Dave:)
 
I was going to suggest, when the solder puddled something isn't clean enough. Be sure your flux runs throughout the joint, and you might wash everything with dish water before you start.

As to the tang hole, there's nothing to it but extreme patience...cut, test, cut, test, cut... You get the idea. I'm sure after doing enough of these it'll get quicker but so far it can take me several hours to get a guard to fit.

You are working on what I think is the hardest thing in knifemaking to do right, and I've never been happy with my own attempts. Just keep working at it; you're not the first one to scrap a guard. :D

Dave
 
Darn guys, I was hopeing to hear that there was a trick.

like, if you jam some 'X-C900?' into the gap it will buff out, something like that anyway....

I will try again...
(You sure there is no trick?)
 
Suprisingly, silver solder will fill gaps very well, although you will get a broad solder line. Just look at a Randall and you will see alot of solder. I like it personally, but others call it a bad fit/finish. As long as the silver solder joint it smooth and pit free, it should look nice.

First, make sure you have good silver solder. I will only use Eutectic that I get from Kovals. Harris Sta-Brite isnt bad either. The stuff you get in the stores has a tendendy to flow bad.

Assuming that you would use Eutectic, peen the handle side of the guard to the tang with a sharp nail or centerpunch...this will hold it in place and cinch up the fit. Then with the tang in a vise, blade up, start heating the guard from the underside and add a little bead of flux all the way around the joint (i use a needle to apply it)...still applying the heat, keep touching the solder to the joint until it begins to flow freely. If the solder is really flowing nice, back off on the heat because you can overheat it and ruin the solder job. In the case of a bad fit, use alot of solder, really goop ot on until you see all the gaps gone. Remember, stay off the heat if it is flowing.

Let it cool and then grave off the excess solder with a 1/8" or thicker brass rod that has been ground to a 45 deg angle. It'll peel right off. The finish up with sandpaper and your done.

The graver will really make nice straight lines in the joint.

Also, if your gap is so big that you can't peen the guard to the tang, you can support it with an old valve spring wedged between the guard and the vise. Pass the tang thru the spring, butt it against the guard, clamp the tang in the vise. The spring tension will hold the guard in place.

Hope this helps...I've messed up enough in the past that I found I can take a really bad fit and make it look better than a Randall solder joint!

Greg Covington
 
I had lots of trouble with the guard fit until I got a jewelers saw. Now I 'center punch' with a cold chisle (hint from Scott, I think) drill what I can, then use the jewlers saw to clean some of the web. I leave lots to file. Brass files easly. I like to file from the back, or handle side so any time my file isn't exactly square the mistakes will be hidden.
I forgot to say that I mark the front, or blade side, file close then 'press fit'. What I really do is knock the guard on with a hammer and a wooden block cut to fit around the blade.
Helpfully (?), Lynn
 
I use a hardened filing jig for setting the shoulders and filing the guard slot. If you do not have a mill a filing jig is the way to go. It speeds up the process and makes it relatively easy to get a tight fit on guards. I have one of Uncle Al's, which I highly recommend.

www.riversidemachine.net/item15835.ctlg
 
Greg thanks for the excellent soldering tutorial. I've never seen it said so thoroughly in so few words. If you were a technical writer, all those VCRs would be much easier to use! ;)

Lynn, can you expand on the press fit? Terry Primos does this also but I'm not sure how to gauge the correct size hole - and this sounds like a one-shot deal.

How do you measure the blade and mark the guard to know you're going to get a "pressable" fit? If I were doing this I'd make the hole too small somewhere and have a real mess on my hands.

DaQo'tah and I would like to hear some good "tricks"! :D

Thanks all,
Dave
 
Greg (well, actually anyone can answer my question, but hopefully Greg gets this too)

Greg, looking at that knife on your postings, lets say that my blade side of the guard has a small gap in a few spots.
Did I understand correctly that I can plug this little gap with silver solder?

But,,,if this is the correct idea you were teaching, do you mean that I add the solder from only underneath? (handle side?)

My Brass guard is a pierced guard like Mr Fowlers is, the brass surrounds the steel of the tang. is this the same for type of guard you had in mind with your instructions?

Oh by the way,,,KILLER IDEA about useing the old Valve springs to push up on the brass....thats one I will put into use today!


and one more thing,,,this is very important,,,you only added flux to a small place underneath?...but when I solder copper pipes in the bathroom, I had to use flux on the whole joint?....um,,,will the flux work its way up?
 
I always heat from the underside of the guard and feed my solder from the topside (blade side) The solder will flow toward the heat.

By doing this I can gauge how much solder I need to add if there is a gap to fill. I just keep adding until it is one smooth line.

I flux only the seam between the blade and guard and I do it sparingly. I flux only the topside That is why I use a large needle to add it. When it starts to boil is when I start touching the solder to the joint.

My knives use the same guard fitting as Fowler's.

It will fill the gap you are talking about. Feed the solder from the topside.

The real secret I have found to silver soldering is control of the heat. It used to be the bane of my existence! If you keep the heat on the guard the entire time you are soldering, it will go wrong every time. Take the heat off when the solder is flowing good around the entire joint and you will be good.

Here is a pic of Randall style joint that I did once.
 

Attachments

  • 15bb.jpg
    15bb.jpg
    5.2 KB · Views: 222
The next guard you do, polish the front of it on a disc. You want to see your reflection. When you file, have the front of the guard facing you. If you cant the file, even slightly, you will see it instantly in the reflection. Sounds weird, but try it once and you will see.
I put flux on a Q tip, and go all around the tang. the same with the inside of the guard. Assemble them, and solder. I put the solder on from the top. When you are done, boil the blade in a baking soda/water mix, to completely neautralize the flux. That way you won't have any surprises later as old flux/corrosion leaks out of the joint. Usually when it is in a customers hands. :eek: ;)
 
Originally posted by Jack142
Mike,
Did you say boil the blade ?
Thanks
Jack

Yeah Jack. Just put it in a pan of boiling water and baking soda. About 10 minutes should do it. neutralizes any flux remaining in the joint area. It is way better than just scrubbing the area, after soldering. Do both.
 
thanks for the advice everyone,,,I got the guard filed way better this time,,,fits very tight,,,,I have also got some springs set under the brass to push it as I solder it this time,

wish me luck,,,oh, "X-Rayed, you just saved me,,,so much work and pain,,,thanks..

now,,,I will try your ideas out on my blade,,,and if it works I can move on to learning the next step,,but if this dont work this time?,,that strange screaming and cussing you guys hear out of the North, will be me...
 
Lots of good ideas in this post.
One thought, is the flux you are using specifically intended for the solder you are using? If not many times flux and solder don't work together. The secret will be found in the labeling. Allow the flux time to do its work before heating.

It still takes me up to three hours to fit a guard, sometimes longer and sometimes less. I have never figured why some are easy and others are a fight all the way.

Be sure you have the tang tapered to the blade. I flux and solder from the tang side. The guard is fit tight enough that it has to be driven (hammered) on to the tang. As long as the sides are perfectly smooth, you can make it fit. Any gouges in the side will make fit impossible for me. I finish the fact of the guard to an A-30 grit before slodering.

The secret to fitting a guard is liberal amounts of tincture of time.

If you overheat the flux it will turn black (the flux I use) and never work again. I touch the solder to the brass, heat with a neutral flame and when the solder starts to flow, it is hot enough.

When I found a silver solder I liked, I bought 10 pounds of solder and a gallon of flux. I still have about 5 years supply left. The stuff I use flows at 420 f.

Good Luck and Stick With It!
 
I did it!!!!!!!!

All the advice and the helpful hints and that new idea to solder from the top really did the trick!

I had a way better fit to the tang this last time. I took my time, and filed very slowly, and even ground off the sides of one of my new files, just like Mr. Fowler talks about in the video.

I got the brass to fit tight about 1/16 (or less) of an inch above the place where I wanted it to fit, then I banged it home and it fit like a glove.

I even went out in the junkyard behind my shop and found some valve springs to push up on the guard as I clamped it into the vice.
I heated from below as Ed Fowler does, but this time I soldered from the top. I ran a thin line of flux (with the needle as I was told to use) and concentrating very, very hard, started to bring the silver solder down to the metal.

However while I was preparing to do this I started to hear a strange sound at the door. I figured it was just the cats trying to get back in my shop. I had kicked all 3 of my cats out of the shop while I soldered my guard this time due to the way they all wanted to 'help' with my last 2 attempts.
Anyway, I was just about to start my first line of solder, when the noise from the door grew to be too much of a distraction, and I glanced over to see what the heck was going on over there?

The door had been pushed open, and was now wedged 1/2 way open.

Wedged? yes, apparently Pumpkins, (yes,the same cat that took a little ride on my buffer the other night right smack into the wall), was now pinned under the ½ open door.

Im not sure how she did it, but the door was on top of her back, and she was starting to panic big time.

I dropped the torch onto my workbench with the silver solder coil, and ran over to the door to help her.
The door was crushing the poor kitty in half!
I tried to pull her back legs, 'no good'. I went around to the other side and reached to grab her front legs to see if I could pull her free.
She bit me

"Well you little Dickens!" (Ok that's not an exact quote)

I told the cat that she got herself into that predicament, and as far as I'm now concerned she could get herself out. With that I returned to my workbench.

I worked as fast with the solder as I could, knowing that the metal must have cooled. As I worked, the screams of my trapped kitten grew and grew, soon it was almost impossible to think there was such noise, But I finished soldering my guard and ended up with a nice thin line showing with no gaps or flaws at all

(Oh the cat got herself free the moment I finished the guard. "Typical".)
 
Dave,
If you read Ed's post carefully he shows the proper way. If the tang is tapered from the blade to the back the guard will slide on easly until the last 1/2". I use a cheap vernier calaper to check the tang (before heat treating!) and make sure the taper is even from back to blade.
Still trying, Lynn
 
Just so you don't feel too bad fighting a guard, today I started a guard about 1:00pm. I had a few interuptions and dinner to add to the time, but I finished fitting her up at 9:30 pm. Most of the time was devoted to getting it right. Sometimes they make you work for your product. Still it was good times!
 
Back
Top