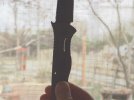
Frame/liner lock contact surface (Question)

Joined
Aug 7, 2007
Messages
2,588
I would like tto hear your opinion regarding lock contact surface for frame/liner locks.

Recently I got my ZT0200 in the mail. I am very pleased with my purchase and I did increase the tension in the lockbar (by bending the lockbar more deeper slightly) since I liked my locks a little strong. I noticed when I saw the contact surface that the ZT0200 has a sort of strider-like approach where only a small surface is contacting between the lockbar and the blade. The small area is in the edge side of the lockbar when opened.

Compared to my ZT0302, the contact is full. My question is as follows.

Based on your experience, is there going to be a significant difference in the lock strength when comparing between a Strider-like contact and a 'full-on' type contact.

Secondly will there be a reduction in longevity of the lock since the area is small and the lockbar will travel more in time due to the small area? Have I just made a grave error in increasing the stiffness of my ZT0200's lock?

Thanks in advance STR. In case you need further explanation due to my questionable rambling english, please do not hesitate to ask.
 
I usually wait until the lock dictates that it needs adjustment before changing it or adjusting it. My dad's words here come to mind, 'if it ain't broke don't fix it.' Otherwise you may end up with a very sticky lock and actually increase the frequency of adjustments due to wear by forcing it along unecessarily. So, yeah, I'd say if the lock was new that it wasn't really needing anything done to it at this time. Unless I didn't get all the information and you did notice it needed attention I mean.

On your question about lock contact: The lock on a liner or frame lock should contact at two points as far from the midline of the pivot as the design will allow based on most interpretations of the correct lock make up. Those two points are the stop pin and the lock contact to form a 'tripod' for the blade to stabalize itself on, and of course that tripod is made up of the pivot in the center, the stop, at the top of the folder and lock contact at the bottom.

Now keeping in mind that there is a margin of tolerance or room for error as some would call it that is built into the design there are really no locks of this type being made that I've seen that contact 'fully'. Don't get me wrong they keep the blade from closing in most cases when you see one wearing in more spots along the lock than just the bottom third and they wear ok but lock contacts of the type that contact at some point on the bottom, middle and top in frame and liner locks allow what we call blade roll in most all cases. This is when you can put spine pressure on the blade and feel the blade move vertically or 'rock forward and back' but the lock doesn't defeat or give you problems otherwise. Rolling is movement of the blade and it comes from too much contact of the lock on the top portion of the lock or the middle which can both act to take away contact from the bottom third where it should be connecting and all it usually takes to remove the roll in the blade is to remove some lock contact from the top or middle so its no longer connecting to the blade and next thing you know its solid as it should be. Sometimes and old cutler trick called peening the lock contact by using a 3/32 flat end punch and a ball peen hammer can squish out just the right amount of contact at the bottom part of the lock so you can insure that the bottom is what is connecting more than the middle or top of the lock face and in these cases you can end up with what looks to be to the naked eye a 'full contact' but it usually is connecting more on the bottom as it should and wearing more there even if other spots do connect too so you still get a rock solid lock so long as the bottom third of the lock is what is contacting the blade providing its contacting far enough away from the midline of the pivot to keep the blade from still exhibiting that rolling movement. Peening is tricky and can lead to sticky locks too if you are not careful but again the lock is a critical part of the make up of the system anyway you cut it so messing with it unknowing can be disastrous if you are not careful. Truthfully its bad enough messing with them when you do know just enough to get you in trouble sometimes. :D

With that said, you have a margin of safe contact on the bottom third of the lock on the folder of this type and so long as the lock is contacting somewhere in that 'third' area its fine and will work great and lock up solid. Some come out of the factory or out of the mill by the maker whichever the case may be, with more contact distribution than others, or what I call a bigger contact foot print than others, even of the same model. For example, I've had models here for work made in the same year and in different years by the same company and the same knife all with various foot prints of lock contact but all had correctly done locks because they all locked up solid and were within tolerance. Personally it seems to me that Chris Reeves is the most consistent in this area and I mean consistent! He is as anal retentive about this as any I've seen and I say that as a positive because it is evidenced by the exemplary lock on his Sebenza folders.

On thinner liner locks I have to say that on examples where the locks contact is mostly at the very bottom of the possible area it can contact the blade and doesn't spread out a little more over that bottom third that it makes sense that they would indent easier than one that had a bigger foot print of contact due to the fact that the lock is thin and the contact is small but I think that this would be very hard to prove out since in many senses the thin liner locks begin self destruction from the moment they are used the first time and progress to self correct from that point on. Its the nature of the lock type.

There are several ways to adjust the locks from peening to pivot size increase to bumping up the stop pin to the next bigger diameter. Each method comes with consequences that must be dealt with based on what that will do to the system as a whole to change things and you have to be able to get those things you don't want changed back to where they were in the system while changing the lock when you do it by this method. Bumping up the stop pin for example, can refresh the lock on a folder that previously had a lock traveling all the way across the contact from wear but doing so can make the actual foot print of the lock contact smaller by increasing the gap between the blade and the lock at the top of the lock and at the same time mean you have to adjust the rest on the blade so the point of the blade is not sticking up out of the body when closed which it will do now since its no longer coming down as far by sitting on a bigger diameter pin than it did originally and also since the blade sits higher until you adjust it the blade won't be kept shut from gravity until the detent ball works again as it did before you made the change to the stop pin diameter.

Anyway, enough rambling. I'll leave it at that.

STR
 
Last edited:
Wow! Thanks for the details, I will take some time to digest it fully since english is my second language.

Perhaps I made a mistake in my modification, luckily i've only tweaked it a little but thanks to your explanation, I now know what to observe and look for in buying frame/liner lock type blades. Also now I know I won't be able to simply just use a larger stop pin (what i planned for some of my folders) due to the ball detent issue you've mentioned, saved me from another boo boo :)

Thanks again :)
 
Understood. All I'm saying in a nutshell is that there is a minimum distance from the mid-line of the pivot. And so long as your lock is contacting from that minimum footprint to the maximum footprint in the bottom part of the lock, which is the part of the lock where finger grooves would be cut. This is the part of the lock where your thumb touches to push the lock to release to free up the blade. That is the bottom.

If the lock bottom portion right by the thumb grooves was all that contacted only the lock up would be fine and you would have a solid contact and solid lock up. If it contacted from the maximum and middle third as well as the bottom and was still far enough from the midline point of the pivot its still fine. Its when the lock contacts too close to the pivot mid line or past the middle line way into the top that is connecting too much that you can still have a lock connection but blade roll. The lock should not contact at the top part of the lock and no where on the lock should the top contact on the blade at all really if you follow the theory for the design parameters. Some are harder to tell that this is the case because it can look like they are connecting fully for the full width of the lock from looking with the naked eye but they don't in most all cases. I've never seen an example of a frame or liner lock that did connect for the full width of the lock. On most what I've seen is that the ones that did connect too much in the wrong spots didn't allow enough good connection of the parts that make the blade lock up solid.
STR
 
Last edited:
Very fine post on one of the more common locking systems.
Incidentally, right after reading it, I went and checked ALL my linerlocks and framelocks ;).

Thanks a lot Steve!
 
Thanks. Sorry for the late reply. I just noticed that you posted. Most contacts on integral style folders would surprise people I think. For example, if you look at any typical integral lock contact for a frame lock as seen here or if you remove the scale and take apart a liner lock on a production folder to look at it closely in the light as seen here or even if you did that with most customs for that matter you will see a lock connecting to a blade in most cases just like this here where you can see the bottom of the lock connecting physically to the blade and light passing through from the middle on up to the top or almost from the very bottom to the top. Why I say most would be surprised is because I believe most think that the full width of their lock is coming into contact with the blade. Its not! And as I said in some detail above technically speaking, its not supposed to. Its a weird look you get when you show someone for the first time just how little of a lock is actually connecting to the blade.

You can see from the wear pattern on any lock thats been used a while how and where the lock connects over time to the blade and if you have a lock that had a bead blasted surface or anodized if its titanium it stands out more because you see one spot that is not that blasted surface or color or look anymore and its usually on that inside corner at the bottom of the lock or close to the bottom depending on how much the blade covers the lock and the type of contact that is ground into the blade. The lock may look massive and impressive at .125 or more in thickness but no where near that is actually connecting to the blade in most of these locks. Most don't believe it at first and a lot don't want to. You can hear them exclaim things like, 'what! and no way!' or other stuff like this as they check it out with a squint in disbeief as they grasp with the fact that its not what they expected or thought they would see for lock contact. Some would say this is trick photography but its easily repeatable if you care to do it. Still others that notice this on their own wonder and sometimes ask if its supposed to be that way or if they should return it. We've had threads like that started here in fact.

Contrary to popular belief and in summary once again for those that missed it above in other posts you can maximize the contact of this style of lock and increase the life of the folder, well, at least the lock and by making it wear more evenly with a bigger foot print of spread out contact surface area to connect to the blade that encompasses all of the bottom third or as much as you can muster and still not have blade roll by being far enough away from the mid line of the pivot, and you can reduce sticking tremedously by spreading out that contact over the bottom third as much as possible vs just at the very bottom inside corner only like shown here in the pictures. One of the reasons I'm not a big fan of most concave looking contacts is just for how they cause the inside corner to stick terribly to where they can be painful to release. Some of these will wear a thumb out fast but eventually they do break in. However in my experience they wear faster in some repects but prevent over travel of the lock better in others but its just my own opinion there. The other thing that bothers me of course is the way once the lock wears and moves in to self correct as it should it hits that curve in the lock contact and with spine pressure you can notice that the lock moves back to that flatter contact sweet spot on the blade.

Some would say they do their locks just like Chris does his. They don't usually do them quite the same though when you compare them side by side. Technically both may be made using the same theory or same by the technique but Reeve knows what I've learned regarding the margin for error and maximizing the wear foot print as much as possible. I've learned by examining his example called the Sebenza. Don't believe me? Hold your Sebbie up and examine it in the light like you see these here in the pics and compare that Sebenza contact and the amount of light allowed through in the other areas to these popular frame lock models and others. All are correctly done...technically speaking. All work fine too and make a lot of people happy. Some just wear better and stick less than others going further between adjustments or problems and there is a reason for this. I'll leave you to figure out which is which on your own. ;)

Some have asked me a time or two why I do things the way I do focused more on function than looks. Thats why. Looks be damned. I'm more concerned with reliability and function long term and while I don't always hit each one perfect I spend a bit more time trying to at least. Even wear and less sticking are primary concerns and I don't want a lock coming back to see me in record time because it wears so fast the owner thinks something is wrong with it when he notices at 6 days old that its already nearly traveled clear across the contact to the non locking side liner. Like all makers I do on occasion have one that comes back but generally speaking my frame locks give me very little trouble. I quit making liner locks for that reason but I'm hoping with my latest venture back into that with the BUSSTR folder that my concern for maximizing the foot print of contact and even wear will come together to make for a long lived long loved folder. We'll see.

STR
 

Attachments

  • DSCF0001.jpg
    DSCF0001.jpg
    98.4 KB · Views: 62
  • Contact pic.JPG
    Contact pic.JPG
    71.9 KB · Views: 64
Last edited:
And the above post/posts are reasons why I am getting a BUSSTR (by the way is it intentional that it sounds like Buster?) and I'm waiting patiently for the long haul :)

I'm actually unaware concave locking points cause sticking. I've actually experienced more sticking in my flat contact points. I'm assuming you are referring to the cutout on the blade portion and not on the lockbar portion right?

I am of the opinion that the 'not-flat' surface will result in longer lifespan of the lock since the lock bar will have to wear more for the same amount of travel compared to a flat type. What do you think or have I failed to see/analyze someother aspects?

Keep up the good work.
 
I agree somewhat but both ways can be done well and work well. The lock reliability seems more related to the angle of the pitch for the contact than it does whether its flat or concave. It seems sometime back in the late 90s most companies went to the concave type contacts you see today. There are equal numbers of both types out in public hands though from what I see but I believe most newer folders, even some that may look flat are actually probably concave its just harder to tell. On most its very subtle concavity while on others it stands out really well. For example, I have a Junk Yard Dog model 1720 that I've had new in the box since it came out. You can't tell looking at it at if its concave or flat really. It appears flat for the contact but if you study it's big brother the JunkYardDog II SG2 frame lock that was made in a limited run you can see from the bigger model that the contact on it is indeed concave and it appears to me to be done exactly like Gene Baskett's knives at a 7` angle with a 10" wheel. They look just like my contacts only I do a lot of them flat anymore because quite frankly I see less problems with that. Comparing this to a Spyderco Military or Emerson you can see that the Kershaw knives appear flatter in the contacts made on their blades on many models also.

Those with sharper concave form to me like my CQC12 for example just tend to stick bad when new sometimes and this can depend on just how concave it is as well as how much spring tension there is in the lock. I personally prefer a 7 degree angle on a 10" wheel if I do them on the wheel and with my table set so its height is in the middle of the wheel. Otherwise I use the flat platten and a 7 degree angle and feel this works best of anyway you can do it. As I said this is how Gene Baskett does his contacts (Gene is the VP of the knife makers Guild by the way) and I've tested and used his lock extensively finding it to be among the best I've owned in liner locks. These knives in the pictures are not 7 degrees. I'm not sure going from memory what these in the pictures were set at but neither look the same as a 7 degree with a 10" wheel so I've got to assume they are not done the same way. It may be their tables are set at 7 degrees but that they position their table higher on the wheel or lower by a certain margin than Kershaw uses, or that this can change some so that at times the table is positioned more to the mid-line of the wheel for one run of knives vs another. Changing the height of the table used to make your lock contact by even a small amount can change the way the lock contact appears and how sharply angled it ends up being and I would have to say it can also change the way the lock behaves once the folder is all together.

If the makers/manufacturers set their tables at 9 degrees or 10 it may be just as varied looking if the table is not set in the exact same height everytime. In the end all that really matters from the stand point of the product is does it work or not? Some concavities are so curved that they actually aid the lock in moving toward release much more than a flat contact would so for me personally I prefer the flatter contact shapes. Locks like that which I see quite often for problems that hit a blade contact that is sharper angled are still sometimes hard to defeat but it is not very reassuring for me personally when the locks of the sharper angled contacts are seen to move from further in the middle of the blade toward release closer to the edge or toward a better flat spot; as this seems to be what is happening when the lock moves to a more stable spot in the contact to stay put better. This is ususally there close to the edge of the contact. In some cases the lock slides right off the blade allowing the blade to close. I've seen this happen at times and with very little spine pressure. It does make one wonder what they would behave like under sudden impact or shock whenever you see one move toward release from simple spine pressure.

STR
 
Last edited:
Back
Top