- Joined
- Apr 8, 2020
- Messages
- 2,099
First of all, I'm no professional.
I did however teach high school photo for 3 years.
For that three years I pretty much immersed myself in photography both digital and film.
I prefer film if that matters.
I do hold a degree in art, BFA Sculpture, but ceramics is my main thing.
Ok.
1. Size your pics to fit the screen. If your pics are too big to see on my screen then it pretty much destroys your whole composition as we cannot see the whole knife without scrolling. I have a 27 iMac so if it don't fit on my screen imagine what it looks like on a laptop.
2.Focus, focus, focus. If your picture is too big for my screen and it's out of focus, it really is painful to my eyeballs to look at. Pass!
3. Exposure, exposure, exposure. Make the exposure is correct. Overblown highlights are a killer. Personally I take my images a couple of stops darker. Not too dark.
4. Pet peeve. Make sure your horizon is straight. I don't walk around with my head tilted to one side and I don't like looking at pictures that are crooked. There is a thing called Dutch Corners where you intentionally tilt the camera but I don't use it. Crooked horizon-Pass!
5. It's all about the light baby!(look for my group on Flickr) Seriously, if you want to take nice pics, check your lighting. I never use flash unless I'm in total darkness and I NEED the pic. I often use a USPS Priority Mail box (flattened) to reflect light on the subject to even out or to add more light. Lighting adds drama and interest.
6. Check your background! a lot of you photobomb yourselves with distractions in the background.
7. Fill that frame. Not my computer screen, but your photo frame should be all about your subject. Unless you are using Rule of Thirds, get the whole thing. Everything else is just wasted space.
8. Rule of thirds. Stop centering your subject. Rule of thirds involves using the left and right third of the frame for your subject, the rest being negative (nothing there) space. It helps emphasize your subject. Here it's okay to have benign stuff in the background.
9. Depth of field. Most overused/abused trick in the book. There is a time and place to use it. Depth of field, also called bokeh (or some derivative of that) is when the subject is in focus and the background is blurred.
Be aware that not all lenses are good at bokeh, some are smooth and creamy, some hurt my eyes. If the WHOLE subject is not in focus, you are doing it wrong! Why oh why would you want your subject blurred?
Those of you who know what I'm talking about, I shoot most of my knife stuff now at f11, f1.4 IF I want to kill the background/foreground and then only if I got enough room to control it (DOF). Subject out of focus-Pass!
10. See all of the above.
Bonus: use a tripod if you can. It really does help.
Ok, it takes a while to get all this down.
Andre Cartier-Bresson (famous guy) said that your first 10,000 are your worst and yes it took me about a year of popping off images for me to understand what I was really doing. Took me that long to understand the exposure triangle: Shutter, Aperture, and ISO
Once you get that stuff down, the other stuff kinda falls into place.
If you want nice images, you gotta practice and be conscious of what you are doing and not just pop them off like there's no tomorrow (pray and spray). Actually you can just pop them off like there's no tomorrow as long as while you are popping them off you are leaning something!
Yes, it's a bit more complicated than just ten things, but I think if you at least think about some of those things your pics will improve.
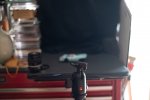
I have a small knife 'studio' set up where I do the majority of my knife pics:

Just a small area and a black t-shirt for my background.
That other lens there is a 50mm macro.
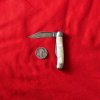
I use that set up to take these:


On the floor for the overhead:

Notice though my source of natural light.

Once you learn to control the light, what you can do with the camera becomes infinite! It really does allow you to become a lot more creative with your images.
Oh and stop taking pics from on top of your plastic laundry basket. Change up the background every once and while. You know who you are.
I hope all this helps!
You can take nice pics if you care to work on it and do some simple adjustments.
If are interested you can search Flickr for my stuff (theflattire).
Feel free to ask questions or offer criticisms.
I did however teach high school photo for 3 years.
For that three years I pretty much immersed myself in photography both digital and film.
I prefer film if that matters.
I do hold a degree in art, BFA Sculpture, but ceramics is my main thing.
Ok.
1. Size your pics to fit the screen. If your pics are too big to see on my screen then it pretty much destroys your whole composition as we cannot see the whole knife without scrolling. I have a 27 iMac so if it don't fit on my screen imagine what it looks like on a laptop.
2.Focus, focus, focus. If your picture is too big for my screen and it's out of focus, it really is painful to my eyeballs to look at. Pass!
3. Exposure, exposure, exposure. Make the exposure is correct. Overblown highlights are a killer. Personally I take my images a couple of stops darker. Not too dark.
4. Pet peeve. Make sure your horizon is straight. I don't walk around with my head tilted to one side and I don't like looking at pictures that are crooked. There is a thing called Dutch Corners where you intentionally tilt the camera but I don't use it. Crooked horizon-Pass!
5. It's all about the light baby!(look for my group on Flickr) Seriously, if you want to take nice pics, check your lighting. I never use flash unless I'm in total darkness and I NEED the pic. I often use a USPS Priority Mail box (flattened) to reflect light on the subject to even out or to add more light. Lighting adds drama and interest.
6. Check your background! a lot of you photobomb yourselves with distractions in the background.
7. Fill that frame. Not my computer screen, but your photo frame should be all about your subject. Unless you are using Rule of Thirds, get the whole thing. Everything else is just wasted space.
8. Rule of thirds. Stop centering your subject. Rule of thirds involves using the left and right third of the frame for your subject, the rest being negative (nothing there) space. It helps emphasize your subject. Here it's okay to have benign stuff in the background.
9. Depth of field. Most overused/abused trick in the book. There is a time and place to use it. Depth of field, also called bokeh (or some derivative of that) is when the subject is in focus and the background is blurred.
Be aware that not all lenses are good at bokeh, some are smooth and creamy, some hurt my eyes. If the WHOLE subject is not in focus, you are doing it wrong! Why oh why would you want your subject blurred?
Those of you who know what I'm talking about, I shoot most of my knife stuff now at f11, f1.4 IF I want to kill the background/foreground and then only if I got enough room to control it (DOF). Subject out of focus-Pass!
10. See all of the above.
Bonus: use a tripod if you can. It really does help.
Ok, it takes a while to get all this down.
Andre Cartier-Bresson (famous guy) said that your first 10,000 are your worst and yes it took me about a year of popping off images for me to understand what I was really doing. Took me that long to understand the exposure triangle: Shutter, Aperture, and ISO
Once you get that stuff down, the other stuff kinda falls into place.
If you want nice images, you gotta practice and be conscious of what you are doing and not just pop them off like there's no tomorrow (pray and spray). Actually you can just pop them off like there's no tomorrow as long as while you are popping them off you are leaning something!
Yes, it's a bit more complicated than just ten things, but I think if you at least think about some of those things your pics will improve.
I have a small knife 'studio' set up where I do the majority of my knife pics:

Just a small area and a black t-shirt for my background.
That other lens there is a 50mm macro.
I use that set up to take these:


On the floor for the overhead:

Notice though my source of natural light.

Once you learn to control the light, what you can do with the camera becomes infinite! It really does allow you to become a lot more creative with your images.
Oh and stop taking pics from on top of your plastic laundry basket. Change up the background every once and while. You know who you are.
I hope all this helps!
You can take nice pics if you care to work on it and do some simple adjustments.
If are interested you can search Flickr for my stuff (theflattire).
Feel free to ask questions or offer criticisms.
