Grinding Block for Bevels

Joined
Mar 6, 2022
Messages
317
I can't stop watching Mike Snody video on how to make a knife. Something stuck in my head though, he shows these welded together steel blocks that he uses for doing the bevel grinding. Goes on to explain that it works also as a heat sink. But he does so, so quickly that I can't actually see what it is. Seems there is a flat piece of steel with another piece welded at some angle and perhaps a screw somewhere. I can't quite tell if he has one for each knife, or type of knife, or size of knife... or day of the week :) because he shows "Here's how to do a big knife on a little block..." :D :D :D

Others have grinding jigs that seem like they have lots of moving parts, or the front surface looks like a bad day at the Swiss cheese factory for all the holes.

I am of the opinion that simpler is always better. Especially when it comes to jigs. Can someone tell me the two important points of his grinding blocks.
1. The angle
2. Where to place the screw

And 2 are any of these other crazy looking things with either all sorts of angles and moving parts, or the million holes all over them any better?

And, before anyone suggests it, yes, I will try freehand.
 
What a character that guy, never heard of him. Looks just like a two pieces of flat stock welded together at different angles. He actually shows them quite good in the first hit on YT.

Exact angles won't help you much as he is grinding at an angled table on a wheel. Wheel size, table position relative to the wheel, table angle, stock thickness and jig angle will all dictate how the grind comes out.

Simplest and one of the most effective jigs is a piece of angle iron with a screw on the back to set the angle. You can clamp the knife on the angle iron, and keep setting the angle lower as you progress with the grind.

Alternatively you could set the angle on your platen or table if you calculate the angle with grind height and stock thickness. There is calculators online for doing this.

Finally, jig grinding might help you in the start, you can progress to push stick method and complete free hand grinding. A lot of people also advocate the bubble jig made by a forum member to help you figure out the angle.

To me the push stick method works good, and my friends that were in the shop for the first time got the hang of it quite quick.
He is quite entertaining to watch. I get what the block is, conceptually. My table will change angles and all that. So I guess the angle doesn't matter. But, in the video, they all looked similar. So I assumed there was a starting angle to make them with. But, I was not able to determine what it might be. It also seemed that there was a screw that one end sits on, and then the back was clamped in place. Certainly that screw position will determine something about how it all sits. Somehow, there has to be a way that when the knife is on the block either left or right, it is presented consistently to the belt. I assume that is what the screw and angle are all about, but I am not quite figuring out what it should be.

I assume simplest is just a chunk of angle iron, period. As long as my table tilts, I can achieve whatever angle I want. In the ones I see people making, there is a lot of effort going into making the angle adjustable. As well, plenty of resources go into setting up lots of screw points. But, his, seems to be the absolute simplest design, so I ask. Who knows, maybe he is on this forum somewhere..
 
Welders magnets
welder's magnets are all 90° as far as I know. So, what does your response mean? Are you suggesting that you use a welder's magnet to set the angle and consistent flow of your bevel? Sometimes just a two word answer is not sufficient for the reader to understand what you are meaning. At least in this case, I have no idea what you are suggesting. :(
 
Welders magnets are by far, the best and easiest knife grinding jigs I have found, or used, and there are no moving parts.
I’ve made a dozen different types found on the ‘tube and they all seem to come up lacking.
Slap a blank in/on a welders magnet with no fuss or muss.
Natlek was right, simpler is better (he just used a piece of angle iron I believe), which started me thinking.
Pic coming
 
4454380B-323A-4C97-9593-7FFEA2663B90.jpeg
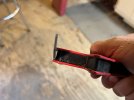
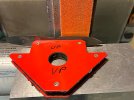
Welders magnets have a “lip” all the way around, basically the top and bottom covers for the magnet.
68EFC79F-E03C-4F23-A052-FF3EE1626629.jpeg
I use three magnets to grind nine different length and styles of knives, from very small slipjoint blades up to a 9” knife.
I use three different magnets because I have ground the top plat to the point that it gives me the angle I need for a given knife. The bottom lip is left as it is as a permanent catch or stop for the blade to rest on. You just make sure the spine in IN that lip/groove against the magnet.
I haven’t had one move yet once I place it, and I have done dozens with it.
 
View attachment 1956321
Welders magnets have a “lip” all the way around, basically the top and bottom covers for the magnet.
View attachment 1956323
I use three magnets to grind nine different length and styles of knives, from very small slipjoint blades up to a 9” knife.
I use three different magnets because I have ground the top plat to the point that it gives me the angle I need for a given knife. The bottom lip is left as it is as a permanent catch or stop for the blade to rest on. You just make sure the spine in IN that lip/groove against the magnet.
I haven’t had one move yet once I place it, and I have done dozens with it.
Wow, picture is worth many thousand words. I certainly had a much different orientation in mind when thinking of a welding magnet.
So, as I understand what I am looking at, the flat of the spine rests on the bottom lip of the magnet. The top will then rest against the outside of the top lip. That seems like a reasonable angle 8-10° perhaps?

So when doing slipjoints, and the blade is too short to reach the top lip, are there narrower welding mags or do you shim up the bottom?
Secondly, it appears you are using no additional clamping. So do you mean to say that the magnet itself is strong enough to be able to press it into the belt and not slide off the magnet at all? I would not have guessed that. Do you use a particular brand or style of these magnets that are particularly strong for this, or simply the pack of 4 or whatever you find at HF? It also appears that you are using the rounded ends of the rivets down, not sure all of them are designed that way, but it is a good thing to know. The top like doesn't look to be modified at all or is it just slight to match the angle?
 
This is (I guess) a medium sized magnet, and I have not made a slippie that did not reach the top lip but there are smaller (and narrower) magnets available, BUT, I like the medium because the holding power is stronger. It would take a tiny blade to not reach the top lip as this magnet is approx. 3/8” top to bottom (just an estimate).
These guys are strong, but I have seen a difference from magnet to magnet in holding power so I pick the stronger ones for my use. I have used HF and others by being selective according to the strength and the quality control on a given magnet (sometimes the magnet has a wonky edge or the lip is not perfectly parallel with the magnet. THAT can be corrected, but I avoid the malshaped magnets.
Nothing needed to hold it in place, sometimes it is difficult to remove the smaller blades due to the holding power.
Make sure your table/rest has a non-magnetic cover (I use an aluminum plate on mine now. I Had used wood early on but the magnet was hard to slide across it smoothly). The rivets are not a problem as long as your table/rest is large enough to accommodate the side to side movement.
I have some, like one big one and 2 or 4 little ones I can't remember. I am sure I bought them as a set. I will try one tonight since I plan on doing some other grinding. I will put something on it and see if I don't send it across the room. :)

They rate these in lbs. So I looked on amazon, and I can get them in 25, 28, 50, and 75 lbs. If the one I have doesn't do the trick.
 
What an interesting fellow! Gold teeth in your mouth, carbide teeth on the saw. I prefer Versace glasses, they not only block out the UV rays, they block out the haterrays. Great video.
 
Google Bubble Jig or we have 10 videos on YouTube, if you want to see this tool in action, search YouTube - bubble jig.
My son Kevin and I manufacture this tool in our shop in S/E Ohio. We've been supplying knife makers for over 12 years.
Regards, Fred
Looks pretty good.
 
Back
Top