Hamon colors

Joined
Apr 4, 2025
Messages
2
IMG-9475.jpg
IMG-9490.jpg
Heyy!
First of all im really new on this forum and also to knife making so sorry if thats not the right place to post and same if i say something thats not true
So i tried to make a hamon on a piece of C130 today, i used refractory ciment for the clay, then quenched in water
The blade wass too hot so it broke. But i etched it anyway to see what it look like. But on the blade the upper part is white and the lower part is normal steel. On pictures i have seen the upper part is darker. Why? Is that because of the quench too hot?
 
You should ask a moderator to move this to the knife makers section here on BF. Lots of guys there to help.
 
That's just a function of the polishing and etching process. Often the harder edge polishes out bright, while the part above the line has a bit more texture, so we leave a bit more oxide up there.
 
Welcome yokachi. Fill out your profile so we know where you live and a bit about you. (interesting name - details?)

OK, here is what I see as issues you will need to eal with:
1) C130 will take a hamon, but the .2% Cr may make it harder to get a good activity.
2) The clay is way too think. 1/16" to 1/8Max is all you need.
3) Water is not the quenchant for a hamon in C130. 8-10% brine is better than plain water.
4) Avoiding overheating s very critical. Heat to the lower end of the hardening range. For your steel I would suggest 1435°F/780°C.

Once quenched be very cautious with the blade. Temper immediately, at round 400°F/205°C.
After tempering, clean the blade and grind the bevels to 220 grit. At this point you can check the hamon to see how it looks. Etch in 1:5 FC (1 part stock solution FC to 5 parts water). If all is good, finish the blade and re-etch when at 400 grit. There are all sorts of polishing tricks for getting the most contrast on a hamon. Use the Custom Search engine in the stickys to find them.
Hey! First thanks for moving my post.
For the quenching what is brine? Salted water? Why that? It cool faster ?
Then for the etch I did in 1:4ferric but my question is what make it either black or withe (upper part) u can find knives with totally different Hamon color, Is that due to the etching solution?
And I will fill up my profil 👍
 
HSC blades (Habeer) is in France. He would be a good person to get with and learn a lot.


1:4 ferric/water is too strong for working on a hamon. I use 1:15. Other acids are lemon juice, vinegar, or 1:100 HCl.

Brine is water and salt. To make an 8% solution, dissolve 350 grams salt per 5 liters water. Warm the brine to 40-50°C.

yaki-ire is what a hamon quench is called in Japanese. It is a very fast and violent quench, and you will crack and break blades a lot while learning it. Most folks learn to do a regular quench for a long time before attempting a hamon quench, so with only a month of experience, you can expect a lot of failures in yaki-ire. We often call the sound of a failed quench, "The dreaded PING'". It makes a sound you can hear and feel in the tongs - a sharp PING or TINK.

Heat control in a quench is hard to teach over the internet. If you have an experiences maker to teach you it will help a lot. A forge will overheat a blade really fast. Using a magnet to test when the blade is ready to quench is a good way to know an approximate temperature. When the blade stops sticking to the magnet, stick back in the forge for a few seconds and then quench. Obviously, a HT oven is far better, but most new smiths don't have one yet.

There are lots of reasons the metal will not etch dark. Decarb is the most common. Basically, the higher the carbon, the darker the etch. Structure also affects the degree of darkening. Martensite etches darker than pearlite. In a hamon blade, the edge is martensite, and the upper part is pearlite. The place where they meet and mix is the hamon. The frosty look and little islands of bright spots of the hamon and area around it are from fine and coarse martensite crystals of nioi and nie.

What Hoss was saying about kurouchi blades is the colors are from forge scale which is a form of iron oxide. Kurouchi is entirely different from yaki-ire.
Etching the blade with FC and then carefully polishing the blade with various oxide powders is how those fantastic hamon blades are finished. What most folks do is called a hybrid polish.

Here are some info I have posted about yaki-ire and polishing
Post 10 & 11:

I posted this on finishing and polishing a hamon a while back:
A polish techniques that can develop a hamon:

Sand by hand evenly and slowly. Using water stones is a great system, but requires a lot of skill. Good quality sandpaper, a bowl of clean water with a few drops of dish soap and a 1/2 Tsp of washing soda ( to retard rusting), a clean and comfortable place to sit, backing sticks/blocks to hold the sandpaper on, and lots of elbow grease are the main ingredients.

Sand evenly and in the direction of the hamon (lengthwise, not crosswise) and go up the grits to 600-800. Give the blade a quick etch in 10:1 FC or full strength white vinegar. This will help you see where the features are. You should see the main line, and hopefully any secondary lines and some wisps ( if they are there).

Continue sanding the blade at 1000 grit, rubbing a bit harder above and below the hamon line than directly on it. At 1000grit ,the features should start to show. Rub the hamon line with a weak etchant. Use a bit of thumb pressure and go in tiny circles. Look for lines and wisps that are showing now that you did not see before.
Continue polishing to 2000 grit. Depending on the surface desired you can quit here or go up finer. Etch the line to see what has shown up at the end of each grit . You may think you are removing the hamon as you polish, because the surface just gets shinier, and thus the hamon disappears. The etch will show what is there, and the details will be enhanced in the next step.

Now that the blade surface is prepared, it is time to "develop" the hamon. All the features that are present are locked in the steel, and are waiting to be made more visible. This will be done by oxidizing, and changing the surface of the steel in different ways. A word about the work area...CLEAN. Let me give you that woird again - CLEAN.
Any grit sitting around from previous sanding will come out and haunt you. Clean everything up well, wash all tools and blocks, wipe off the table and chair arms. and make sure the blade is C_L_E_A_N.

On a very simple hamon ,with little or no detail beyond the line, you might just carefully work the surface between the edge and the hamon to make it frostier than the shiny bevel above. This is not the same thing as the fake hamon on many cheap blades that is sand blasted on.

You will carefully work an abrasive compound (the paste from a tiny flat stone in shiagi togi), to dull the shine on the surface. On a hybrid polish,use a fingertip to rub a fine grit abrasive that will leave the surface less reflective. This can be anything from finely ground scale collected of the anvil in forging, Nagura stone "mud" paste, fine valve grinding compound, or 4-6 micron diamond paste. The fine grit in the compound will leave a smooth but slightly frost surface. Carefully follow the hamon and do not go above it. This looks good and sometimes is all you can do with a very simple hamon.Some folks quite here.
If you don't like the completely "white" surface to the edge, use some Flitz or rouge and careful polish below the hamon. Wash everything and give the blade another etch. Now use just a tad of Flitz, and re-polish the blade, staying off the hamon as much as possible.

For a hamon with lots of activity, the process goes the same up to when you switched to the abrasive compound. Instead of making a frosted surface, you will try and coax the hamon out by polishing the three surfaces with different materials. The surfaces are:
The area above the hamon
The hamon
The surface from the edge to the hamon

Each surface should be polished in a way to enhance the hamon. The way to decide is far beyond this (already long) post. Try several polishes and etchants, and observe what the steel looks like after the polish. red oxide leaves a darker look, green brighter,acid etchants white, FC dark. At each step, you often have to re-etch and then rub off the oxides with a fine compound, like Flitz. One standard (well, there are no standards) look is a shiny edge, a white hamon, and a darker bevel.....or the reverse of that.

You may need to employ strategies to keep from polishing areas that you don't want to change. Applying white nail polish over the hamon area after you get it just the perfect frosty look, can allow you to polish and etch above and below without worry of ruining the last 4 hours of work. Remove the nail polish with acetone when you are done. The same method can be used to protect the shiny and darkened bevel from damage while re-working the hamon and lower surface.

A piece of cardboard or plastic held by your right hand at the boundary of the hamon will keep the compound you are using with your left hand (to make the hamon white ) from dulling the brightly polished bevel. After the hamon is worked, the same procedure (new piece of cardboard/plastic) can protect the hamon while you polish the edge.
 
Last edited:
More info from past posts:

Here is some info I wrote in the past on yaki-ire and attaining a hamon:

Forge
- holding the steel in a small forge at an exact temperature for 10 minutes without heating beyond 1425F ,eg., is difficult. Use a full size forge and soak it well for at least 15 minutes. Adding a PID controller to the forge and using a muffle could help.

Quenchant - the quench speed is everything in attaining a hamon. Using any oil will decrease the activity. Using vegetable oil in lieu of a fast commercial quenchant (like Parks #50) will further decrease the results (or virtually eliminate them).
Try to learn the quench using brine. Once you have it just about mastered....you will probably go back to fast oil.

Steel - the steel needs to be as shallow hardening as possible. Little or no alloy content. .70-1.00% carbon, and .30 or less Manganese is the perfect steel, but such a mix is hard to find. The usual suspects are 1070-1095, W-1, and W-2, 26C3.
Alloy steels like 5160,52100, (and, obviously, stainless steels) will not work.

Clay - coat the entire blade with a thin wash coat and let it dry. Recoat the shielded areas with a second coat of clay between 1/16" and 1/8" coat. Too much clay is bad. Too little is rarely a problem.
What the clay is isn't nearly as important as how it is applied.
I like satanite, but APG#36 or Rutlands are also good. Satanite is best, IMHO, because you mix it fresh every time and to the exact consistence you want. Properly applied, it stays on the blade well in HT. Commercial products like Nu-clayer are great but expensive.
Start with a thin wash coat over the whole baled. Mix the satanite to a consistency of cream (very thin). Let that dry (a hair dryer helps). Once dry, add a little more satanite powder to the satanite pot and make it like thin pancake batter or thin sour cream. Apply in a fairly thin layer to make the hamon pattern. 1/16" to 1/8" is all you need. Dry well and HT.

BTW, this procedure is called yaki ire.

Condition of the steel - any blade being quenched needs to be ready for the stress it will be under, but shallow hardening steels need it the most. Properly normalize/stress relieve the blade before the clay coating. Sand the surface smooth and remove every grind mark. Eliminate any possible stress risers, such as sharp corners or edges. Leave plenty of edge meat, about .040", and round the edge. Round off all edges a tad (many folks mistakenly grind the edge and spine to a prefect flat surface, which creates a sharp 90-degree angle with the flat sides). Sharp corners are where cracks will start and snap the blade in half with the dreaded "PING". For the same reason don't put in notches, chouls, or jimping until after hardening.

The quench - Plunge the blade straight in the tank (vertical or horizontal), hold the blade still for about 2 or 3 seconds, to allow the edge to cool below the pearlite nose, and then pull it out for 2-3 seconds. Put it back and let it cool to below the martensite. Don't remove it from the warm oil for at least two or three minutes. Gently clean off any clay still stuck on, and snap temper at 300°F immediately for 30 minutes Do the full tempers for the desired hardness as soon as is practical. Any straightening should be done at the tempering temperature on the second cycle.
Resist the temptation to pull it from the oil/brine and give it a quick grind and dip in the FC to see the results. Cracks will likely form while you do that if the steel isn't snap tempered quickly after quench.

For brine and fast oil I use, IN-1-2-3-OUT-1-2-3-Back in. The immediate post quench temper still applies.


Rest of info:
MORE INFO:
A hamon forms in shallow hardening steels. Any alloy ingredient will make the steel deeper hardening, and thus wash out or block the formation of the hamon. 5160, 52100, O-1, D-2, and other higher allow steels are not suitable for hamon development.

A short course in hamon formation may be in order:
A simple steel has carbon and iron. Anything else is an alloy ingredient. W2 has about 1% carbon and 98.25% iron. There is also a .25% amount of manganese, silicon, and vanadium (typical assay). These alloy amounts are small enough to have little effect on the hardenability. Be aware that all W2 and other steels don't always have the perfect alloy specs. Get a cert with any steel you buy.

When the steel is heated to about 1450F, the carbon goes into solution, and forms a structure called austenite. Upon cooling the steel can do one of several things. If cooled slower than one second to get below 900F, it will form pearlite, a soft structure of steel. If cooled fast enough to miss this "pearlite Nose", the steel will remain as supercooled austenite until it reaches about 400F, where it will start converting into martensite. Martensite is the hard steel we want for cutting tools. Besides the hardness, martensite and pearlite have different crystaline and visual properties. They also react differently to etching.

Now, when the clay coated blade is heated to the austenitization point, and then quenched in water/brine/fast oil, the edge immediately cools to below the pearlite nose, and at 400F converts into martensite. The clay insulated spine retains its heat, and cools slower, thus converting into pearlite. The junction of the two structures is the hamon. This area is a mixture of fine pearlite, coarse pearlite, and martensite crystals. In my early days studying metallurgy this structure was called Troosite, but now we just call it a mixed structure.
Highlighting the effects of this transition area by proper polishing and etching to bring out the optical characteristics of these structures is the skill required in shiage-togi.
The final hamon you get is somewhat of a mystery, but the methods are not.

I have posted several hamon tutorials in the past, but here is a simple guide for a suguha hamon:

Start with a blade that has been through foundation shaping (shitaji togi to form the basic sugata), and is ready for yaki-ire. Normalize the blade before HT. The condition of the steel before HT will greatly affect the final results. Coarse pearlite with fine grain is the desired structure to start with.

Note - While not everyone agrees, it seems that machine work (grinders and milling machines) can create stresses that show up in the final hamon results. Many smiths make the blade by whatever method they wish (forging is the usual way), and then anneal or normalize the blade. After that they do all the shaping work with stones and files. If you are having issues with blades cracking, try shaping by hand with files and stones.

Applying the clay:
Make a simple stand/clamp that will hold the blade by the tang and allow you to work with both hands. The ability to rotate the blade and work both sides is important. A trip to Harbor Freight will yield some inexpensive clamps that rotate. Mount the clamp firmly so you can sit or stand by the blade and do the clay work.
If you are married, or have a good partner, Don't do clay coating in the kitchen.

I recommend that you use satanite for the clay. You will read about AP-green, Atlas/Rutland furnace cement, etc., but satanite is cheap, reliable, and works perfect.

Make a thin mix, about like heavy cream, and apply a wash to the whole blade. Dry with a hair dryer or heat gun.

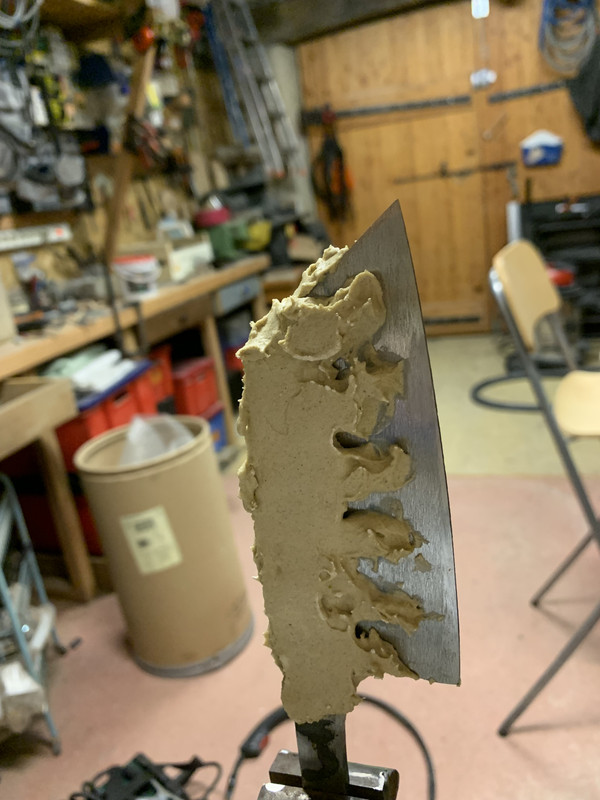
Thicken the mix with more satanite until it is about like sour cream. Apply this to the spine area, bringing it down toward the edge. Stop about 1/4" before the edge. Do the same to the other side, trying to make both match. Use a popsicle stick to smooth the layers to about 1/16" to 1/8" thick. Take your fingers and wipe the edge in a straight line, removing the excess along the edge. This will leave the ha exposed for about 1/4". The pattern you leave in the exposed steel will shape the hamon. Dry the blade with the hair dryer.
Note: If you as doing a blade that you wish to control sori somewhat, you can wipe the satanite off the mune (spine).

Do yaki-ire as desired, keeping the austenitizing temperature on the lower side. For example, 1070 says "1450°-1525°F" Try 1450°F.
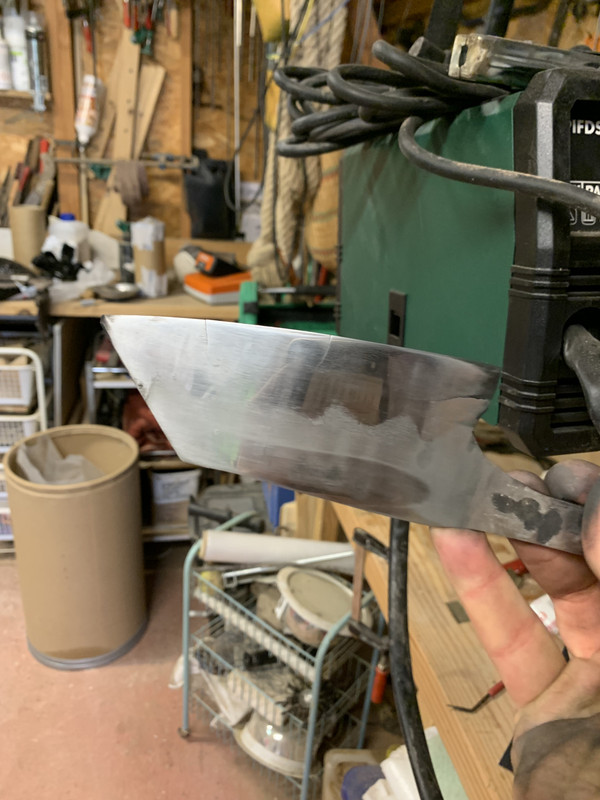
After quench, clean the blade and examine the edges for ha-giri - tiny cracks running from the edge inward. If there, discard the blade and start again.

After a snap temper, a light sanding, followed by a quick dip in FC may show the potential hamon line. This is not the final result, just a confirmation of different structures in the blade.

If inspection goes well, do the final shitaji-togi (foundation polishing) - the hamon may not be visible at all at this point. Get all the shaping right at this stage. Removal of excess metal will not be possible in the next stage.

Please Note:
The blade will be getting sharp as you do togi. Use caution as you go, and extreme caution in the final stages of shiage-togi. Misuse of things like hazuya stones and nugui can lead to having no fingerprints ... or fingertips if not done right. Doing a hybrid polish instead of traditional togi on your first several blades is a good idea.

Continue onto shiage-togi (finish polishing), where the hamon will start to re-appear.

Use of a variety of methods and etchants can bring the subtleties of the hamon out in the final steps. Ther are many articles and threads on doing this

General notes:
The hamon will not be exactly where the clay stops. Experience, and your own equipment will teach you how to place the hamon.

If the hamon does not appear to have developed, re-do the clay work and HT.

Note that fast oil is safer, but any hamon will be faint or may not exist at all. Brine will develop the best activity (hataraki). Brine will crack some blades until you get it mastered ... somewhat. Water is wonderful for a hamon, but will break a lot of blades.

More complex hamon, greater hataraki, ashi, and other features can be developed by changing the shape of the edge of the thicker clay line. Make the line wavy and you can get notare; poke it with a stick into small ridges and get Choji or many other patterns; make small lines to the edge with a slightly thinned slurry and create ashi.
Another thing that affects the hamon is the niku (meat) of the blade toward the edge. The amount of thickness and grind shape toward the edge affects the quench and how fast the steel cools. I like a slight apple-seed grind.

Info for polishing the hamon:
I have several articles on hybrid polishing but a short list of the agents that will help develop a hamon are:
Diluted HCl ( 100:1), FC, lemon juice
chromium oxide
red iron oxide
black iron oxide (magnetite)
tin oxide, FC
fine SC grit
3M polishing papers ( 400-8000)
Choji or other pure oil
Flitz polish
1.25" round gun cleaning patches.....lots of them!

Other supplies:
White enamel paint (Testors) and finer sable brushes
popsicle sticks
Tough painters tape to mask areas off (Frog tape)


There are several good books on the subject, and some good DVD's.
A few are:
Walter Sorrells - Hamon (and his entire set on Japanese blades)
Setsuo Takaiwa - The Art of Japanese Sword Polishing (I highly recommend this book)
Clive Sinclaire - Samurai Swords
 
Last edited:
Back
Top