Bailey Knives
Knifemaker / Craftsman / Service Provider
- Joined
- Oct 18, 2004
- Messages
- 3,802
OK, I was asked to do a tutorial on how to do hamons. I find this odd for a couple reasons, first, while I do love to do hamons, there are others who are much better than I am at it. Second, I am still learning this whole thing, each knife is another test.
So, this is how I do it. I am not saying this is the right way, or even the best way, just the way that works for me.
I had in mind to add a bunch of pictures, but whenever I got into different steps, I forgot to snap pics.
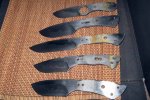
It is important to use the correct steel when trying to create hamons. Simple steels work well, 1095, W1, W2 (of course, see Don Hansons stuff!) 1084, and other 10xx steels. I have found that even within a certain steel, the hamons can be quite different. Later there will be pics of a bunch of 1095 knives, some were hot rolled, some were cold rolled annealed, and some were forged from different thickness 1095. All the hamons appear differently.
I take my knives up to 60 grit. I know some people talk about going up to 220 or 400, but 60 grit helps the clay stick, and I have never had a problem. I also spray them with carb cleaner and immediately wipe them off then refrain from touching the blade. It helps the clay stick also. I do sometimes have to tap them on the anvil after quenching to pop the clay off. I used the word "whack" in a previous post, and it came across as if I beat the untempered knife against the anvil. A light tap on the spine makes the clay pop off, and I have never had a knife shatter like glass. If it does, I imagine you might have done something wrong in the heat treat.
Blah, blah, blah. start showing some pics.
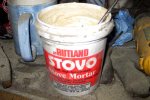
This is the stuff I use.

I know, I know...satanite. I have trouble with the stuff falling off in the forge, and this stuff I can get at Home Depot and it sticks like glue.
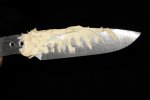
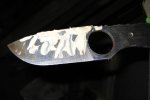
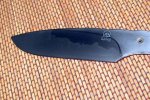
This is how it looks when I apply it.


Here is what I do. I use little metal spatulas that I got from usaknifemaker.com (love that site) and an old bamboo chopstick. I put the cement on the spatula and try to apply as random a pattern as possible. This is where I am always experimenting. The thickness of the clay makes a difference. I have also noticed that different steels react differently. This is what I mean. The 1084 that I have used tends to have the hamon creep inward from the edge of the clay. I apply the clay closer to the edge when using 1084. The 1095 that I use tends to plop the hamon very close to the edge of the clay. I am always trying for that cloudiness, and I think that is created by using thin clay and keeping heat at the low end of critical.
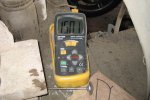
I am careful about forge temps. I keep it hovering around 1500. Under is best, dont let it get over 1550 or you will start developing grain growth.
I use a Harbor freight pyrometer with a better thermocouple that I got online.

Hold it as long as possible.
Please...use decent quench oils when using 1095, or any steel for that matter. I use Parks #50. I have not cracked a blade since I have started using it. It is so much better than the olive oil I used to use. Take the money from your next knife sale and buy a gallon or two.
So, this is how I do it. I am not saying this is the right way, or even the best way, just the way that works for me.
I had in mind to add a bunch of pictures, but whenever I got into different steps, I forgot to snap pics.
It is important to use the correct steel when trying to create hamons. Simple steels work well, 1095, W1, W2 (of course, see Don Hansons stuff!) 1084, and other 10xx steels. I have found that even within a certain steel, the hamons can be quite different. Later there will be pics of a bunch of 1095 knives, some were hot rolled, some were cold rolled annealed, and some were forged from different thickness 1095. All the hamons appear differently.
I take my knives up to 60 grit. I know some people talk about going up to 220 or 400, but 60 grit helps the clay stick, and I have never had a problem. I also spray them with carb cleaner and immediately wipe them off then refrain from touching the blade. It helps the clay stick also. I do sometimes have to tap them on the anvil after quenching to pop the clay off. I used the word "whack" in a previous post, and it came across as if I beat the untempered knife against the anvil. A light tap on the spine makes the clay pop off, and I have never had a knife shatter like glass. If it does, I imagine you might have done something wrong in the heat treat.
Blah, blah, blah. start showing some pics.
This is the stuff I use.
I know, I know...satanite. I have trouble with the stuff falling off in the forge, and this stuff I can get at Home Depot and it sticks like glue.
This is how it looks when I apply it.
Here is what I do. I use little metal spatulas that I got from usaknifemaker.com (love that site) and an old bamboo chopstick. I put the cement on the spatula and try to apply as random a pattern as possible. This is where I am always experimenting. The thickness of the clay makes a difference. I have also noticed that different steels react differently. This is what I mean. The 1084 that I have used tends to have the hamon creep inward from the edge of the clay. I apply the clay closer to the edge when using 1084. The 1095 that I use tends to plop the hamon very close to the edge of the clay. I am always trying for that cloudiness, and I think that is created by using thin clay and keeping heat at the low end of critical.
I am careful about forge temps. I keep it hovering around 1500. Under is best, dont let it get over 1550 or you will start developing grain growth.
I use a Harbor freight pyrometer with a better thermocouple that I got online.
Hold it as long as possible.
Please...use decent quench oils when using 1095, or any steel for that matter. I use Parks #50. I have not cracked a blade since I have started using it. It is so much better than the olive oil I used to use. Take the money from your next knife sale and buy a gallon or two.